You may be asking yourself…What’s the deal with SSR (Server-Side Rendering) and RSC (React Server Components), and are they the same thing? And why do they sound like the same thing but can be used together, separately, or not at all?!?” – This situation would even make the great comedian Jerry Seinfeld pull his hair out.
In this article, we will define the two concepts and look at some examples of ways to use them with WPGraphQL and headless WordPress.
Table of Contents
Let’s Define SSR
Let’s first focus on SSR. Server-side rendering (SSR) is an application architecture in which the server’s job is to render a single-page application. Server-side rendering is easier on the client’s device because you only send a rendered HTML file to them.
In SSR, when a user requests a web page, the server dynamically processes the request and generates the corresponding HTML content. This process can involve fetching data, rendering the page’s layout with this data, and then sending the complete HTML to the client’s browser. In the context of using SSR with Next.js, the server processes the React components, and then the HTML is rehydrated into a fully interactive React app in the browser.
SSR method’s benefits are as follows:
- Reduces initial load time by sending a fully rendered page to the client.
- Improves SEO as search engines can crawl the server-rendered content.
- Requires a Node.js server to render the React components.
- Shares a common codebase for both server and client rendering.
React Server Components
Let’s shift the focus to RSC. React Server Components are components that allow you to write UI that can be rendered and optionally cached on the server side. In Next.js 14 and its new App Router, the rendering work is further divided by route segments to enable streaming and partial rendering.
The focus that helped me understand the two concepts is not the similarity they share with the word “server”. Instead, it is the difference in the word component. At a high level, a server component is a small part of the UI that you have granular control of.
To break this down even further, by default, React Server Components are rendered on the server. However, unlike traditional server-side rendering that outputs a complete HTML document, React Server Components render to a unique format that describes the component tree.
This format is then sent to the client over a streaming protocol. During this process, the server sends over a representation of the component tree rather than a fully rendered HTML document.
On the client-side, this stream is received and used to “hydrate” the React application. This process involves React understanding the structure of the component tree from the stream and then creating the corresponding DOM elements.
A few of the significant benefits of React Server Components are as follows:
- They allow for rendering only specific parts of the UI and only updating those specific parts
- They provide more fine-grain control to developers on what pieces of their application should be updated (allowing for less resource usage)
- Less client-side code
- Simpler data fetching with more rationale as each component is in charge of fetching its own data

WPGraphQL Queries within Next.js 14
Now that we have defined RSC’s, let’s take a look at some code examples in Next.js 14 using one of my favorite plugins to make WordPress headless: WPGraphQL.
WPGraphQL
An extendable GraphQL
schema & API for WordPress.
Default Data Fetching Behavior
The default data fetching behavior in Next.js 14 is SSR.
For example:
import Link from "next/link";
import { Suspense } from "react";
import Loading from "./loading";

async function getPosts() {
  const query = `
  {
    posts(first: 5) {
      nodes {
        title
        content
        uri
      }
    }
  }
    `;

  const res = await fetch(
    `${process.env.NEXT_PUBLIC_GRAPHQL_ENDPOINT}?query=${encodeURIComponent(
      query
    )}`,
    {
      method: "GET",
      headers: {
        "Content-Type": "application/json",
      },
      next: {
        revalidate: 0,
      },
    }
  );

  const { data } = await res.json();

  return data.posts.nodes;
}

export default async function PostList() {
  const posts = await getPosts();

  return (
    <>
      {posts.map((post) => (
        <div key={post.uri} className="card">
          <Suspense fallback={<Loading />}>
            <Link href={`/post/${post.uri}`}>
              <h3>{post.title}</h3>
              <p
                dangerouslySetInnerHTML={{
                  __html: post.content.slice(0, 200) + "...",
                }}
              />
            </Link>
          </Suspense>
        </div>
      ))}
    </>
  );
}


Code language: JavaScript (javascript)
This is a page.jsx file from my headless WordPress example using Next.js 14. I am not going to go over the entire code block. If you want an in-depth explanation of the code, as well as follow along with this code example please refer to my article on the topic.
Instead, let’s focus on the way this file is fetching data. To fetch our data, this component by default is a React Server Component, and we define an async function named getPosts. This query fetches the first five posts with the fields we declare.
Then, we await a GET request using fetch to grab data from the WPGraphQL endpoint.
This request will be cached on the network and not the Next.js server. In the object, we have the content type header of the request and the cache option of fetch with the value set to "no-store". This tells Next.js to bypass the cache and have everything fetched anew upon every request.
async function getPosts() {
  const query = `
  {
    posts(first: 5) {
      nodes {
        title
        content
        uri
      }
    }
  }
    `;
const res = await fetch(
   `${process.env.NEXT_PUBLIC_GRAPHQL_ENDPOINT}?query=${encodeURIComponent(
     query
   )}`,
   {
     method: "GET",
     headers: {
       "Content-Type": "application/json",
       // ... any other headers you need to include (like authentication tokens)
     },
     cache: "no-store",
   }
 );


 const { data } = await res.json();

Code language: JavaScript (javascript)
The main thing to notice here is that we did not need an actual function to use SSR. Rather, this is code that runs on the server.
Dynamic Requests SSR
Now, the other thing to notice is the cache: “no-store” key and value. By default, Next.js will cache data. However, since we made the value “no store”, it tells Next.js not to cache this and run it every time on the server. If you just set no key or value, Next.js will statically build this page at runtime and then cache it.
Therefore, every time the data is fetched, it is dynamically rendered. To highlight what is being executed, the whole page is not rendered; rather the component is.
To ensure that SSR is working, first run in the terminal npm run build to run a production build of your Next.js app. When you run that command in your terminal, you should see this output:
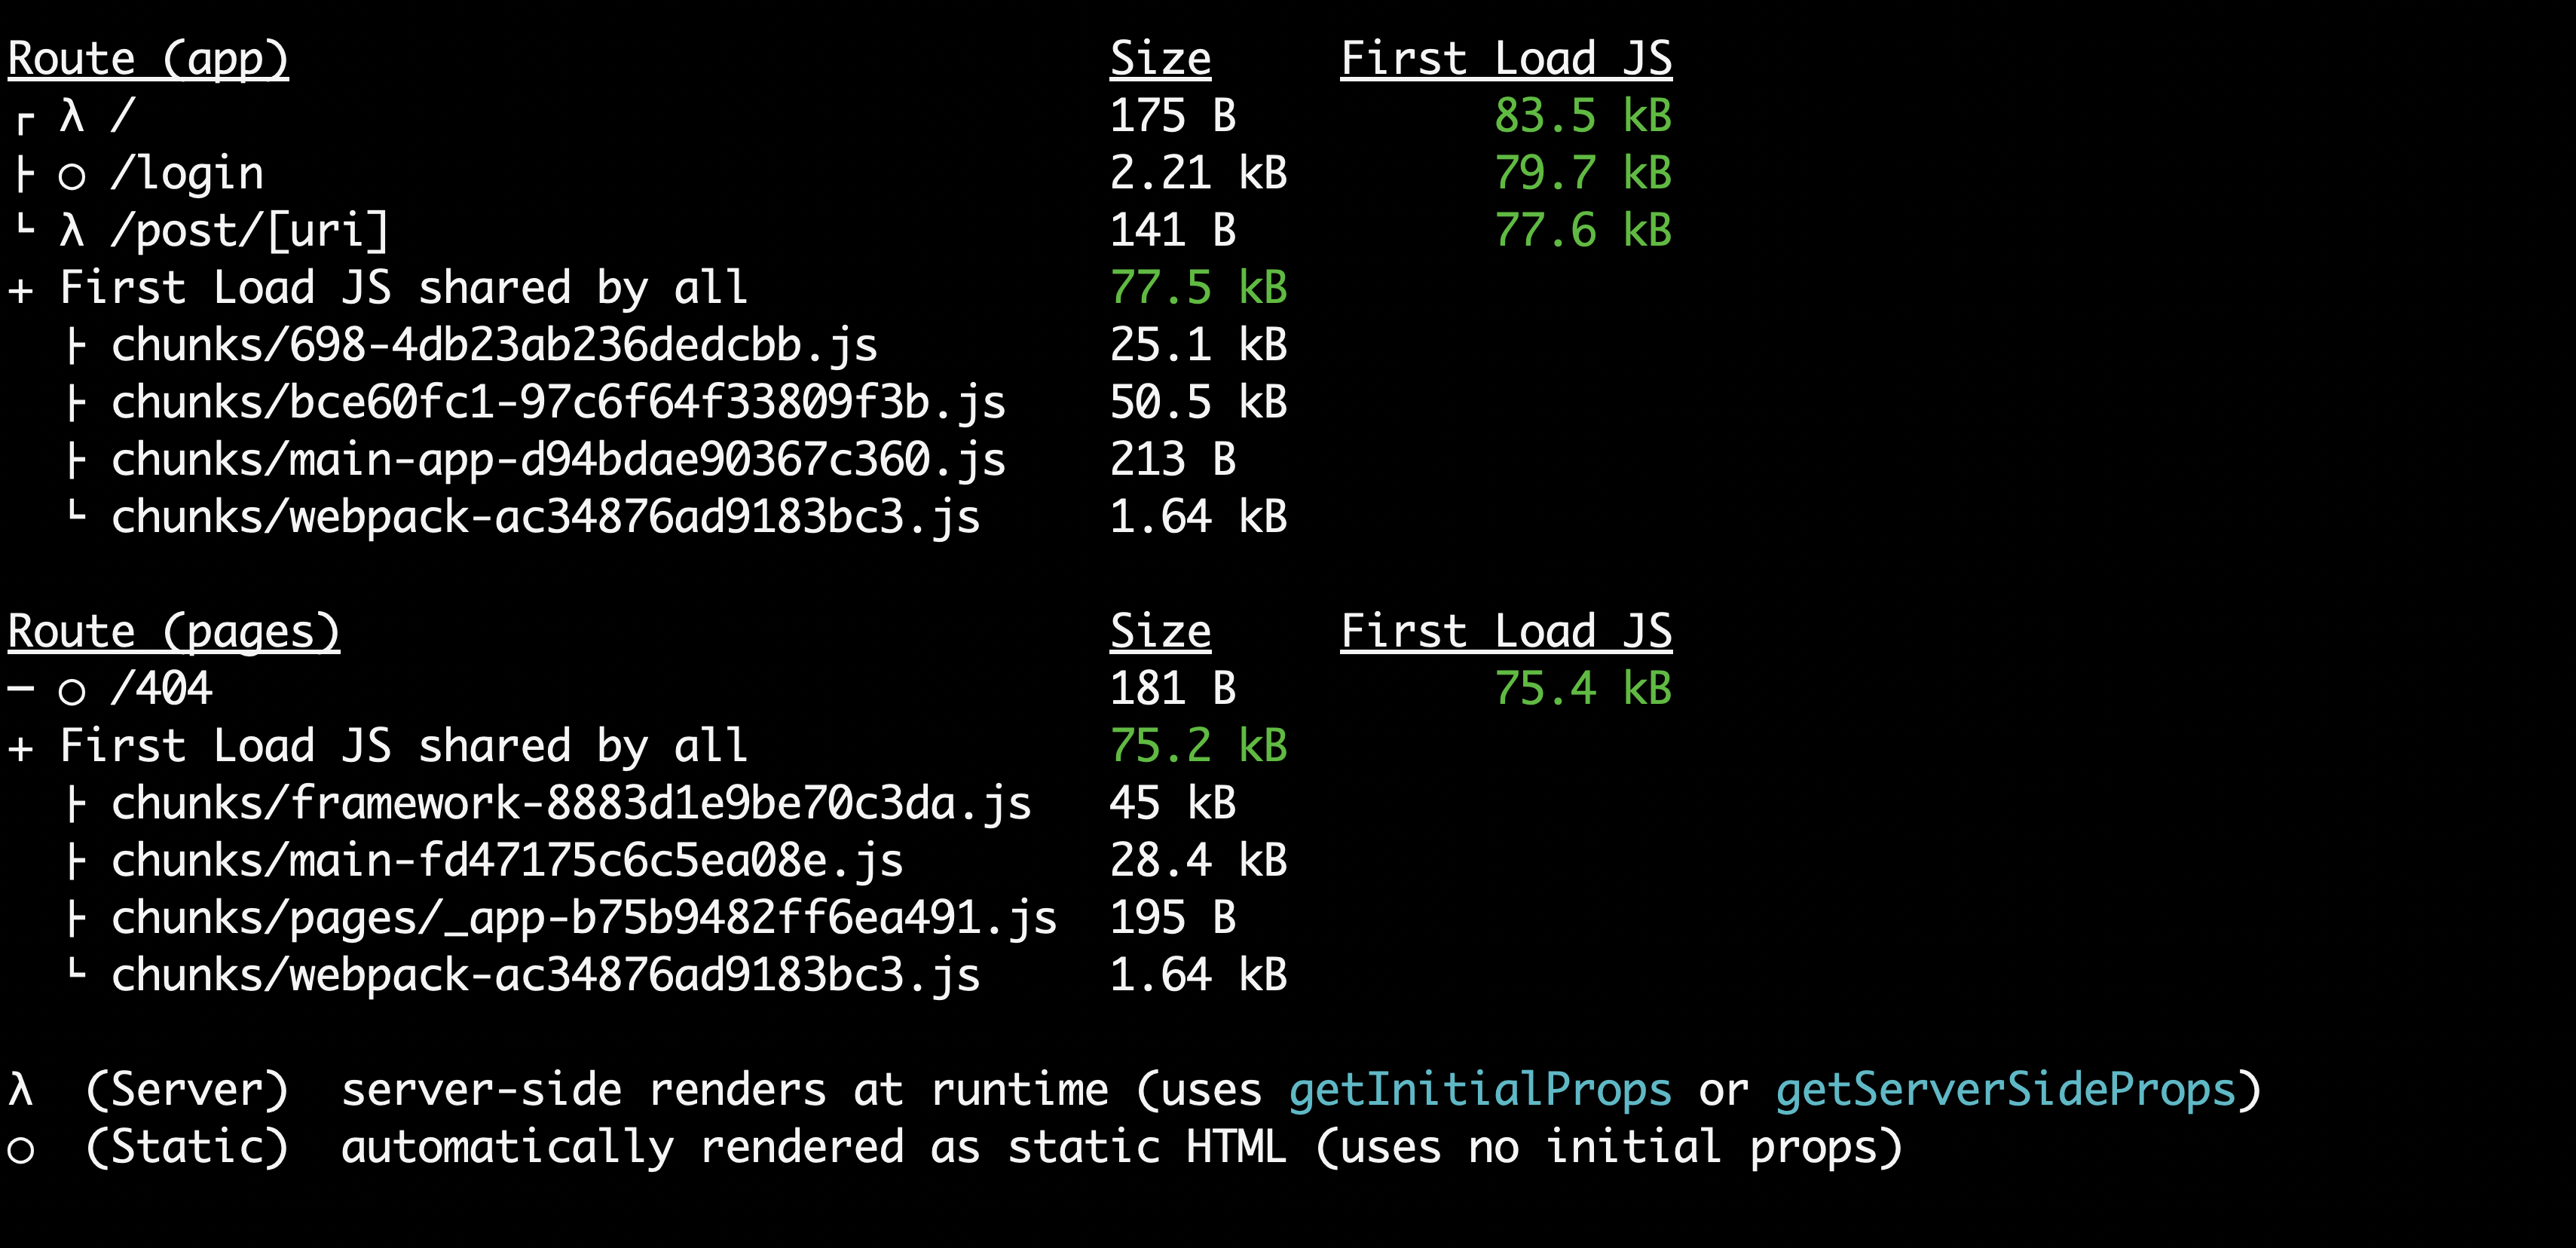
Focusing on the / at the very top of this image, which is the home page of our application, there is a Lamba symbol next to it. This indicates that we are applying SSR correctly to that page.
After this output, you can go ahead and type npm run start in the terminal to start up the app. Once that starts up, visit localhost:3000. You can do several checks to make sure SSR is working. I simply will check by right-clicking on my mouse to inspect the page source. This is what I get:
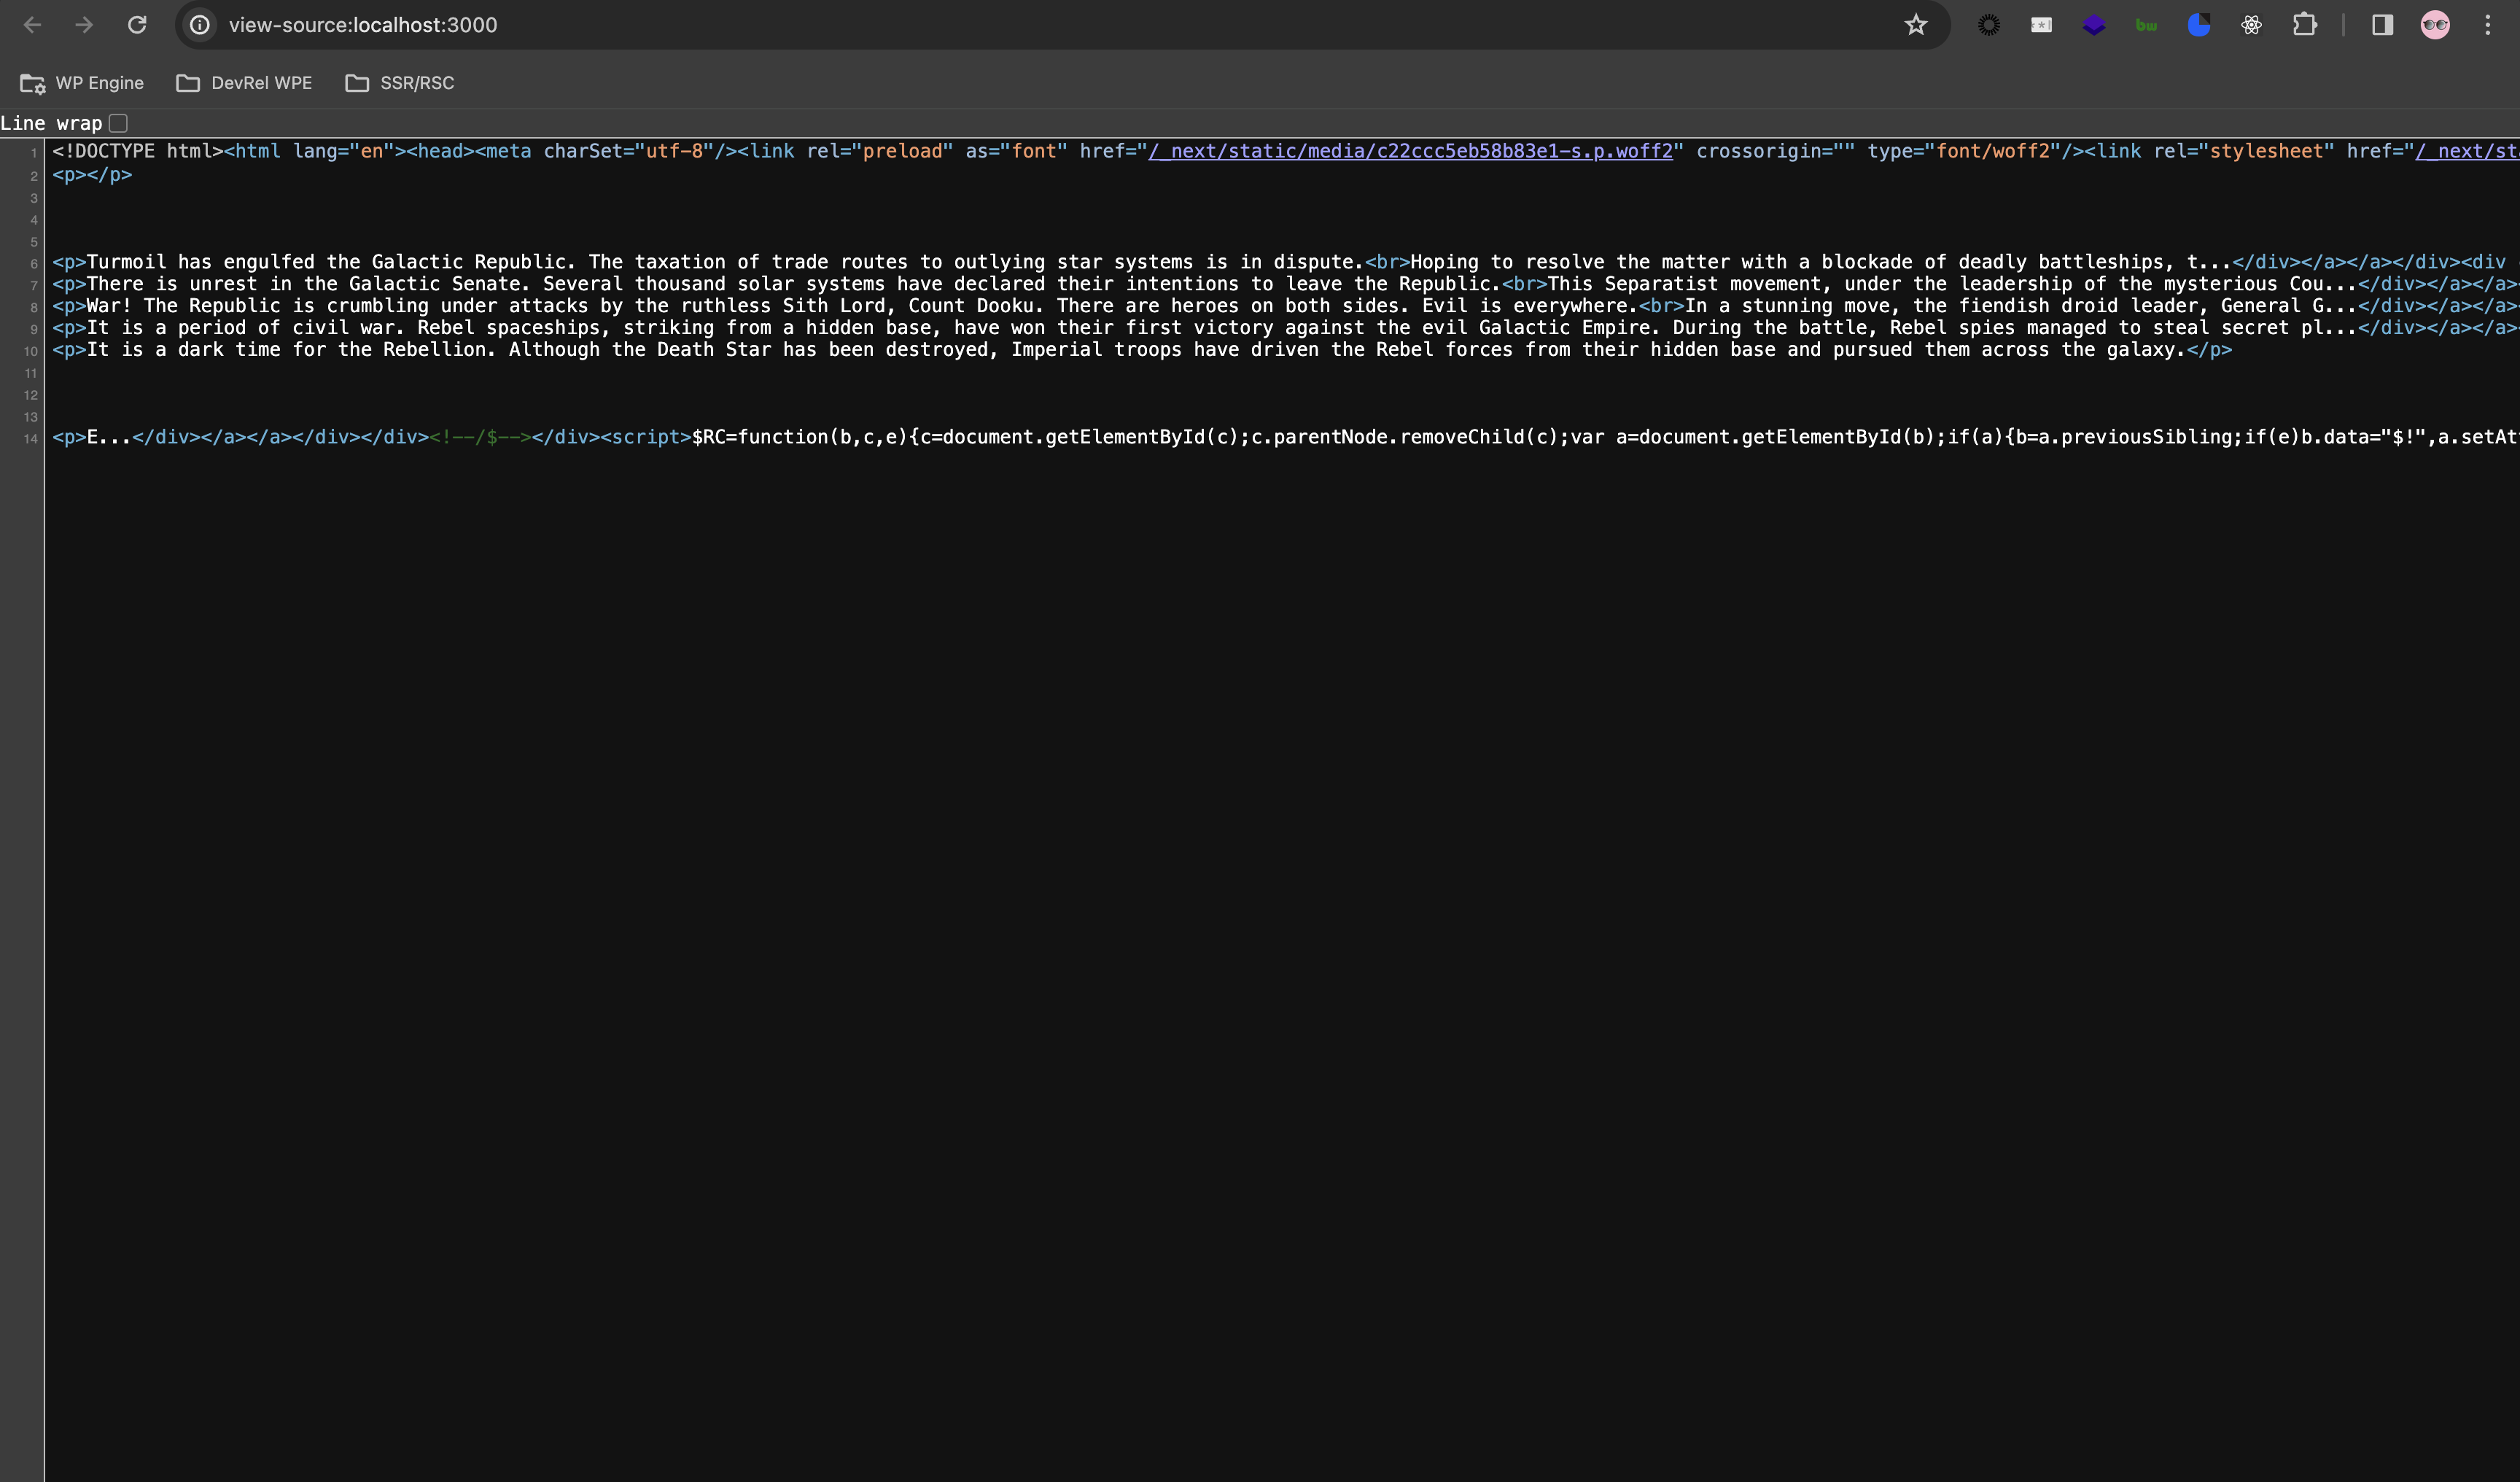
I see the actual fully rendered content of my post data I am grabbing from WordPress in this initial HTML response. Stoked!!! SSR is working.
Hybrid Rendering/ISR
Let’s now talk about hybrid rendering. Incremental Static Regeneration, or ISR, is a rendering method where we want to create the page and then check every so often if there is a data update.
This is the same home page from the previous section. Let’s focus on the data fetching syntax for the example:
const res = await fetch(
    `${process.env.NEXT_PUBLIC_GRAPHQL_ENDPOINT}?query=${encodeURIComponent(
      query
    )}`,
    {
      method: "GET",
      headers: {
        "Content-Type": "application/json",
      },
      next: {
        revalidate: 60,
      },
    }
  );

  const { data } = await res.json();

  return data.posts.nodes;
}

Code language: JavaScript (javascript)
The difference in this code snippet from the previous section is the {next: revalidate: 60} syntax which is called the next.revalidate option. The value of “60” means that every 60 seconds, Next.js will check to see if data is updated on the page.
In this case, we are using this and pairing this with SSR. This is saying to show data for 60 seconds before you revalidate to check and see if there is new data. We render it at the time of request, but if it changes before the 60 seconds is up, you will still see the old data. Once the 60 seconds is up and you navigate back to the page, you will see the accurate updated data quickly.
You can set this revalidation at different levels, as stated in the docs. You can set it at the component level, the page level, and the layout level.
WPGraphQL Queries within the legacy Next.js 12 Pages Directory
Now, let’s return to the legacy Next.js version 12. In this version, it was based on the Pages Router. What this method does is it has a file-system-based router built on concepts of pages. When a file is added to the pages directory, it’s automatically available as a route
getServerSideProps
To SSR a page in Next.js 12, you would use a function called getServerSideProps. This function runs on the server for each request and enables developers to fetch data that is required for rendering a page. When using getServerSideProps, the data returned from the function is passed to the page component as props.
Now the major difference in using this method versus RSC’s is that the entry point was the page component. The whole component tree is rendered to HTML before being sent to the client. This is great for initial page load. But this does not give you the fine-grain control that RSC’s do. If you would like a deeper understanding and dive into the differences and benefits of RSC’s vs. the legacy Next.js, please check this article out here by Vercel.
Let’s take a look at an example using getServerSideProps:
import Head from 'next/head';
import Footer from '../components/Footer';
import PostCard from '../components/PostCard';

export default function HomePage({ posts }) {
  return (
    <div className="container">
      <Head>
        <title>Headless WP Next Starter</title>
        <link rel="icon" href="/favicon.ico" />
      </Head>

      <main>
        <h1 className="title">
          Headless WordPress Next.js Starter
        </h1>

        <p className="description">
          Get started by editing <code>pages/index.js</code>
        </p>

        <div className="grid">
          {posts.map((post) => (
            <PostCard key={post.uri} post={post} />
          ))}
        </div>
      </main>

      <Footer />
    </div>
  );
}

export async function getServerSideProps() {
  // Define the GraphQL query
  const query = `
    query AllPostsQuery {
      posts {
        nodes {
          title
          content
          date
          uri
        }
      }
    }
  `;

  // Fetch data from the WPGraphQL endpoint using the fetch API
  const res = await fetch('https://yoursite.wpengine.com/graphql', {
    method: 'POST',
    headers: {
      'Content-Type': 'application/json',
    },
    body: JSON.stringify({ query }),
  });

  // Parse the JSON response
  const json = await res.json();

  // Extract the posts data
  const posts = json.data.posts.nodes;

  // Return the posts as props
  return {
    props: {
      posts,
    },
  };
}


Code language: JavaScript (javascript)
This is the index.js file from the headless WordPress crash course using Next.js 12. (Just a note, I stripped out the Apollo Client for this example and refactored the code to use the fetch API) Let’s focus on the way this file fetches data via SSR. To do so, we use the getServerSideProps function, which allows us to fetch data on each request dynamically. The function returns an object with props, which has the posts array and is passed to the page component as props.
export async function getServerSideProps() {
  // Define the GraphQL query
  const query = `
    query AllPostsQuery {
      posts {
        nodes {
          title
          content
          date
          uri
        }
      }
    }
  `;

  // Fetch data from the WPGraphQL endpoint using the fetch API
  const res = await fetch('https://yoursite.wpengine.com/graphql', {
    method: 'POST',
    headers: {
      'Content-Type': 'application/json',
    },
    body: JSON.stringify({ query }),
  });

  // Parse the JSON response
  const json = await res.json();

  // Extract the posts data
  const posts = json.data.posts.nodes;

  // Return the posts as props
  return {
    props: {
      posts,
    },
  };
}


Code language: JavaScript (javascript)
If you want to check and make sure SSR is working on this page, you can do the same check we did in the Next.js 14 section.
The hybrid rendering technique ISR does not apply to this part because in the legacy Pages Router, static site generation is required to implement ISR, and for this article, we are only discussing full rendering on the server.
Conclusion
Server Side Rendering and React Server Components are two powerful methods in Next.js. Understanding their functionality and features and pairing them with WPGraphQL make for accurate, updated data for users. I hope you have a better understanding of how this works!
As always, stoked to hear your feedback and any questions you might have on headless WordPress! Hit us up in our Discord!