Get Started


Key Takeaways
Gutenberg revolutionizes WordPress editing. The block editor replaces the classic editor, offering a more interactive and customizable experience with drag-and-drop functionality.
WordPress adapts to user preferences. The introduction of Gutenberg meets the demand for drag-and-drop editing directly within the platform, eliminating the need for external plugins.
Enhanced content creation with Gutenberg. Features like drag-and-drop image handling, live HTML blocks, and document outlining streamline the editing process and improve user experience.
Future-proof your WordPress site with Gutenberg. Embracing the block editor ensures alignment with WordPress’s evolving features and sets the stage for upcoming enhancements.
The WordPress classic editor was a staple for millions of content creators who relied on WordPress to keep their websites and blogs running. However, the editor wasn’t always easy for users to navigate, especially for beginners or those looking for more custom features.
With that in mind, WordPress rolled out a more intuitive and functional editor. With the introduction of WordPress 5.0, the block editor (né Gutenberg) became the default editor. It offered many appealing features for beginners and advanced users alike.
In this article, we’ll introduce you to the block editor, examining its main features, pros and cons, and what its use may mean for the future of WordPress. Let’s get started!
What is the Gutenberg editor?
Gutenberg was the development name for the block editor, which is now part of WordPress core. It replaced the long-standing visual or ‘classic’ editor, a feature that saw minimal change over the years.
Gutenberg is now known as the block editor because it provides a library of individual content blocks. These blocks cover use cases such as text formatting, media insertion, and section arrangement. They can then be customized in a similar way to many third-party page builder plugins.
The block editor offers a more interactive, drag-and-drop experience for users. It also allows them to add placeholder blocks to their content for later editing, move content around the page, or post more easily.
Gutenberg, now solely a WordPress plugin, has evolved from its initial iteration of the block editor into an experimental tool that shapes the development of future WordPress versions. It serves as a platform for testing and refining new features, guiding the capabilities of upcoming releases.
Why Gutenberg?
At this point, you may ask yourself the following question: If WordPress already had a functional editor, why was Gutenberg created, and why does the block editor now exist? There are a few reasons, but they mainly come down to changing trends.
Of course, there was nothing inherently wrong with the classic WordPress editor. However, some people found that it lacked the options they needed and often turned to alternative solutions. Plenty of page-building tools, such as Elementor and Divi, offer different editing experiences.
What became clear is that many WordPress users prefer to create content through these drag-and-drop editors. After all, they can be more intuitive and flexible to use. With the addition of Gutenberg and now the block editor, the goal was that users would no longer need to seek out a plugin to add this functionality to their sites. Instead, drag-and-drop editing is now built into the platform, making site editing a breeze.
How to install the Gutenberg plugin
To learn more about Gutenberg, we recommend first test driving the new editor. This will give you a chance to play around with it in a safe environment, and decide if you like the way it works.
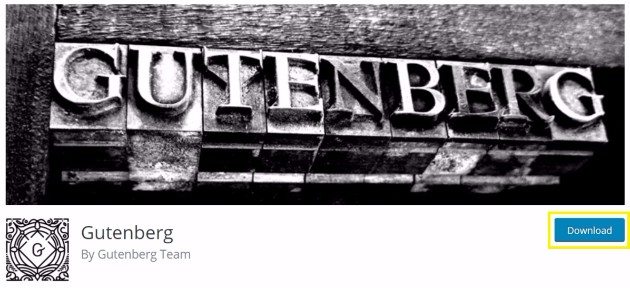
The plugin’s .zip file will automatically begin the download process. Once that’s complete, go to Plugins > Add New in your WordPress dashboard, and click on Upload Plugin in the top-left corner of the page:
Select Choose file, or drag and drop the Gutenberg .zip file into the plugin uploader. Then click on Upload Now. Select the blue Activate Plugin button, and the new editor will be ready to go!
Gutenberg features
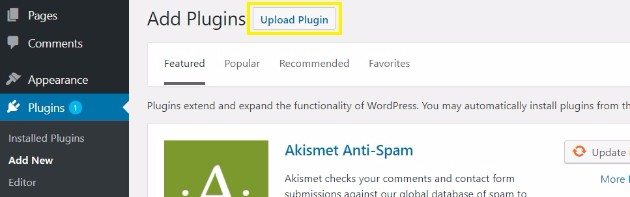
To access the Gutenberg editor, navigate to either your Posts or Pages screen. Mouse over the post or page you’d like to edit, and you’ll see a small menu appear. Select Edit to use the Gutenberg editor:
Later, we’ll discuss how to use plugins to re-enable the classic editor and give your content creators the choice of either option.
WordPress blocks
At first glance, the WordPress block editor can be overwhelming. Here’s a breakdown of its main features.
You’ll see your main content area at the editor’s center. As you mouse over each section, you’ll notice a faint outline—indicating that the section is a block and, once clicked on, can be edited.
Here, you can choose the block’s format (Paragraph, Heading, Image, Quote, List, Group, Preformatted, or Verse), add links and other HTML elements, and perform basic editing tasks. To add another WordPress block, click the Plus icon and select from one of the many options.
Rearranging content blocks is a breeze! Simply select the block you want to move and use the Up and Down arrows to the left of the content.
If you use the same content snippets in your posts, the synced patterns feature in the block editor lets you save any content block and reuse it in other articles and pages on your WordPress site.
In addition to written content, you can also upload images and videos. Just like with the WordPress classic editor, you have the option to Upload, Insert from the Media Library, or drag and drop media in. Regarding basic features, the block editor has it all figured out. Now, let’s take a look at a few more advanced options.
Drag and drop images
The block editor simplifies the process of handling images. You can easily add an image block to your content and start editing by simply dragging a photo from your computer. It’s that straightforward.
There are several image blocks to choose from. You can use the Cover block and quickly add text to your image, add multiple images with the Gallery block, or insert single images with the Image block. Either way, you can customize your image placement and configuration to your heart’s content.
Live HTML blocks
If switching to Text View in the classic editor was something you did often, you’ll be happy to know that you can still view your content in HTML. Additionally, you can add your own custom HTML code with the appropriate block.
Once you place the Custom HTML block in your content, you can add HTML to enhance or change your styles (among other things). Let’s take a quick look at the HTML block settings by using it to add some bold formatting.
Verifying that your HTML is working is a breeze. Simply click on Preview and view your HTML as it will appear on the front-end display of your website. This feature is designed to give you peace of mind, ensuring that your changes look exactly as you intended.
You can, of course, use text formatting tools to achieve what our example demonstrates. However, this is just an example of how the HTML block operates—the sky’s the limit.
Document outlining
Document outlining is another useful tool that the block editor adds to WordPress. This particular feature will only display information if you have used the Heading block.
To access the document outline information, you can click on the ‘i’ icon in the upper-left portion of your edit screen.
As you can see in the above example, the document outline is useful for reviewing your page’s structure. When you employ proper header hierarchy, you’re accomplishing two important tasks.
First, you’re making your content a lot more accessible to those using screen readers.
Second, you’re giving Google some helpful information about your content, which can in turn improve your search rankings. Plus, this tool also gives you a word count for your document, along with paragraph counts and a tally of how many WordPress blocks you’ve used.
Cover text options
As we mentioned earlier when discussing the drag-and-drop image options, the Cover block allows you to add text to your image quickly.
Once you add the Cover block, you’ll see some text formatting options within the block’s settings. You’ll also have additional formatting options to the right of the block in the page sidebar. Importantly, you’ll be able to see your changes live as you make them, giving you full control over the design process.
Embedding content
The block editor makes embedding content into your website’s posts and pages easy. An entire category of blocks comes standard with the editor, which is dedicated solely to embedding content.
In this category, you’ll find blocks designed for embedding specific kinds of content from third-party applications. For example, you can use the YouTube block to embed a video into your page quickly. The block gives you a field to fill in with the specific YouTube embed code and will format the video to display nicely on the page.
Buttons
In the classic editor, creating buttons on your page or post could be a hassle, but it was easier to do with the help of a plugin. Now, you can easily add buttons to your content with the block editor.
The Button block in the block editor offers many options for customizing your buttons’ style, color, and even the URL they connect to. It also includes blocks specifically designed for payment-related buttons.
Pros and cons of the block editor
The main benefit of the WordPress block editor is its intuitive interface. Even those with minimal experience can use it to put together cohesive and beautiful content.
Moreover, the block editor offers a seamless, distraction-free experience. With its block system, users can concentrate on content creation without the need for menu bars, as the entire process—from writing to formatting—can be managed on the clean, white screen.
Early in development, there was concern that the block editor did not work with the custom meta boxes added in many plugins. These are common in tools like Yoast SEO, CoSchedule, and Jetpack. However, there are now ways to circumvent that problem with a little bit of programming knowledge.
What does the block editor mean for the future of WordPress?
Since backward compatibility isn’t available, the block editor can be a slight headache for plugins and their developers. As such, developers must update their plugins and themes to ensure they are fully compatible with the new editor.
On the bright side, developers will have the exciting opportunity to create custom blocks for their themes and plugins. This opens up a world of further customization options and promises improved usability as the block editor evolves.
Do you have to use the block editor?
While the block editor is now native to WordPress, you can still revert to the previous visual editor if you want to. WordPress has provided an official plugin enabling users to revert to the classic editor quickly.
You can continue using the familiar “old-style” meta-boxes. It’s reassuring to know that WordPress has committed to supporting and maintaining the classic editor plugin for the foreseeable future. This provides a strong sense of security as you transition to the block editor, knowing you have a reliable fallback.
Do you need a special theme to use the block editor?
Now that the block editor is a part of WordPress core, you can rest assured that it will work with just about any WordPress theme. However, some themes, such as our own Genesis Framework themes, are optimized for the editor.
These themes have been extensively tested with the block editor and can make the design process smoother and more intuitive.
How to contribute to the WordPress block editor
As a WordPress user, you have a unique opportunity to contribute your thoughts and ideas to improving and continuing the development of the block editor.
Non-technical WordPress users can report glitches or bugs while using the editor, which alerts developers to the issue and can even give them insight into typical usage patterns.
You can check out the Gutenberg contribution guide for those interested in more technical contributions. You’ll learn how to test the plugin, collaborate with developers, and contribute to the documentation there.
Speed up content creation with the block editor and WP Engine
We understand that sometimes change isn’t easy, but we encourage you to get to know the block editor at WP Engine. It’s designed to help you quickly build engaging content and amazing digital experiences. You can also leverage helpful developer resources to maximize the new editor’s capabilities.
Here at WP Engine, we offer several pricing plans for our fully-managed platform for WordPress. When you pair our platform with the block editor, you’ll be set to take your WordPress website to the next level!