User Portal Domain Management
Adding a domain in the User Portal should be done when you are ready to go live with your WordPress® website and should be done before modifying DNS records.1 This process is necessary to ensure that after DNS is pointed, your traffic can be routed to the correct environment.
Learn how to add a domain in this guide, as well was what pre-verification means, and see related terminology.
Add Domain in User Portal
A new domain must be added to the WP Engine User Portal in order to properly route the domain to the intended WordPress website. A custom domain can be added to any Production environment. Additionally, Premium plans may add a custom domain to Staging and Development environments.
Prefer to watch a video?
Was this video helpful?
- From the Sites page, select the environment name
- Choose Domains from the secondary left-hand menu (You may have to expand the Manage dropdown section)
- Click Add Domain on the right
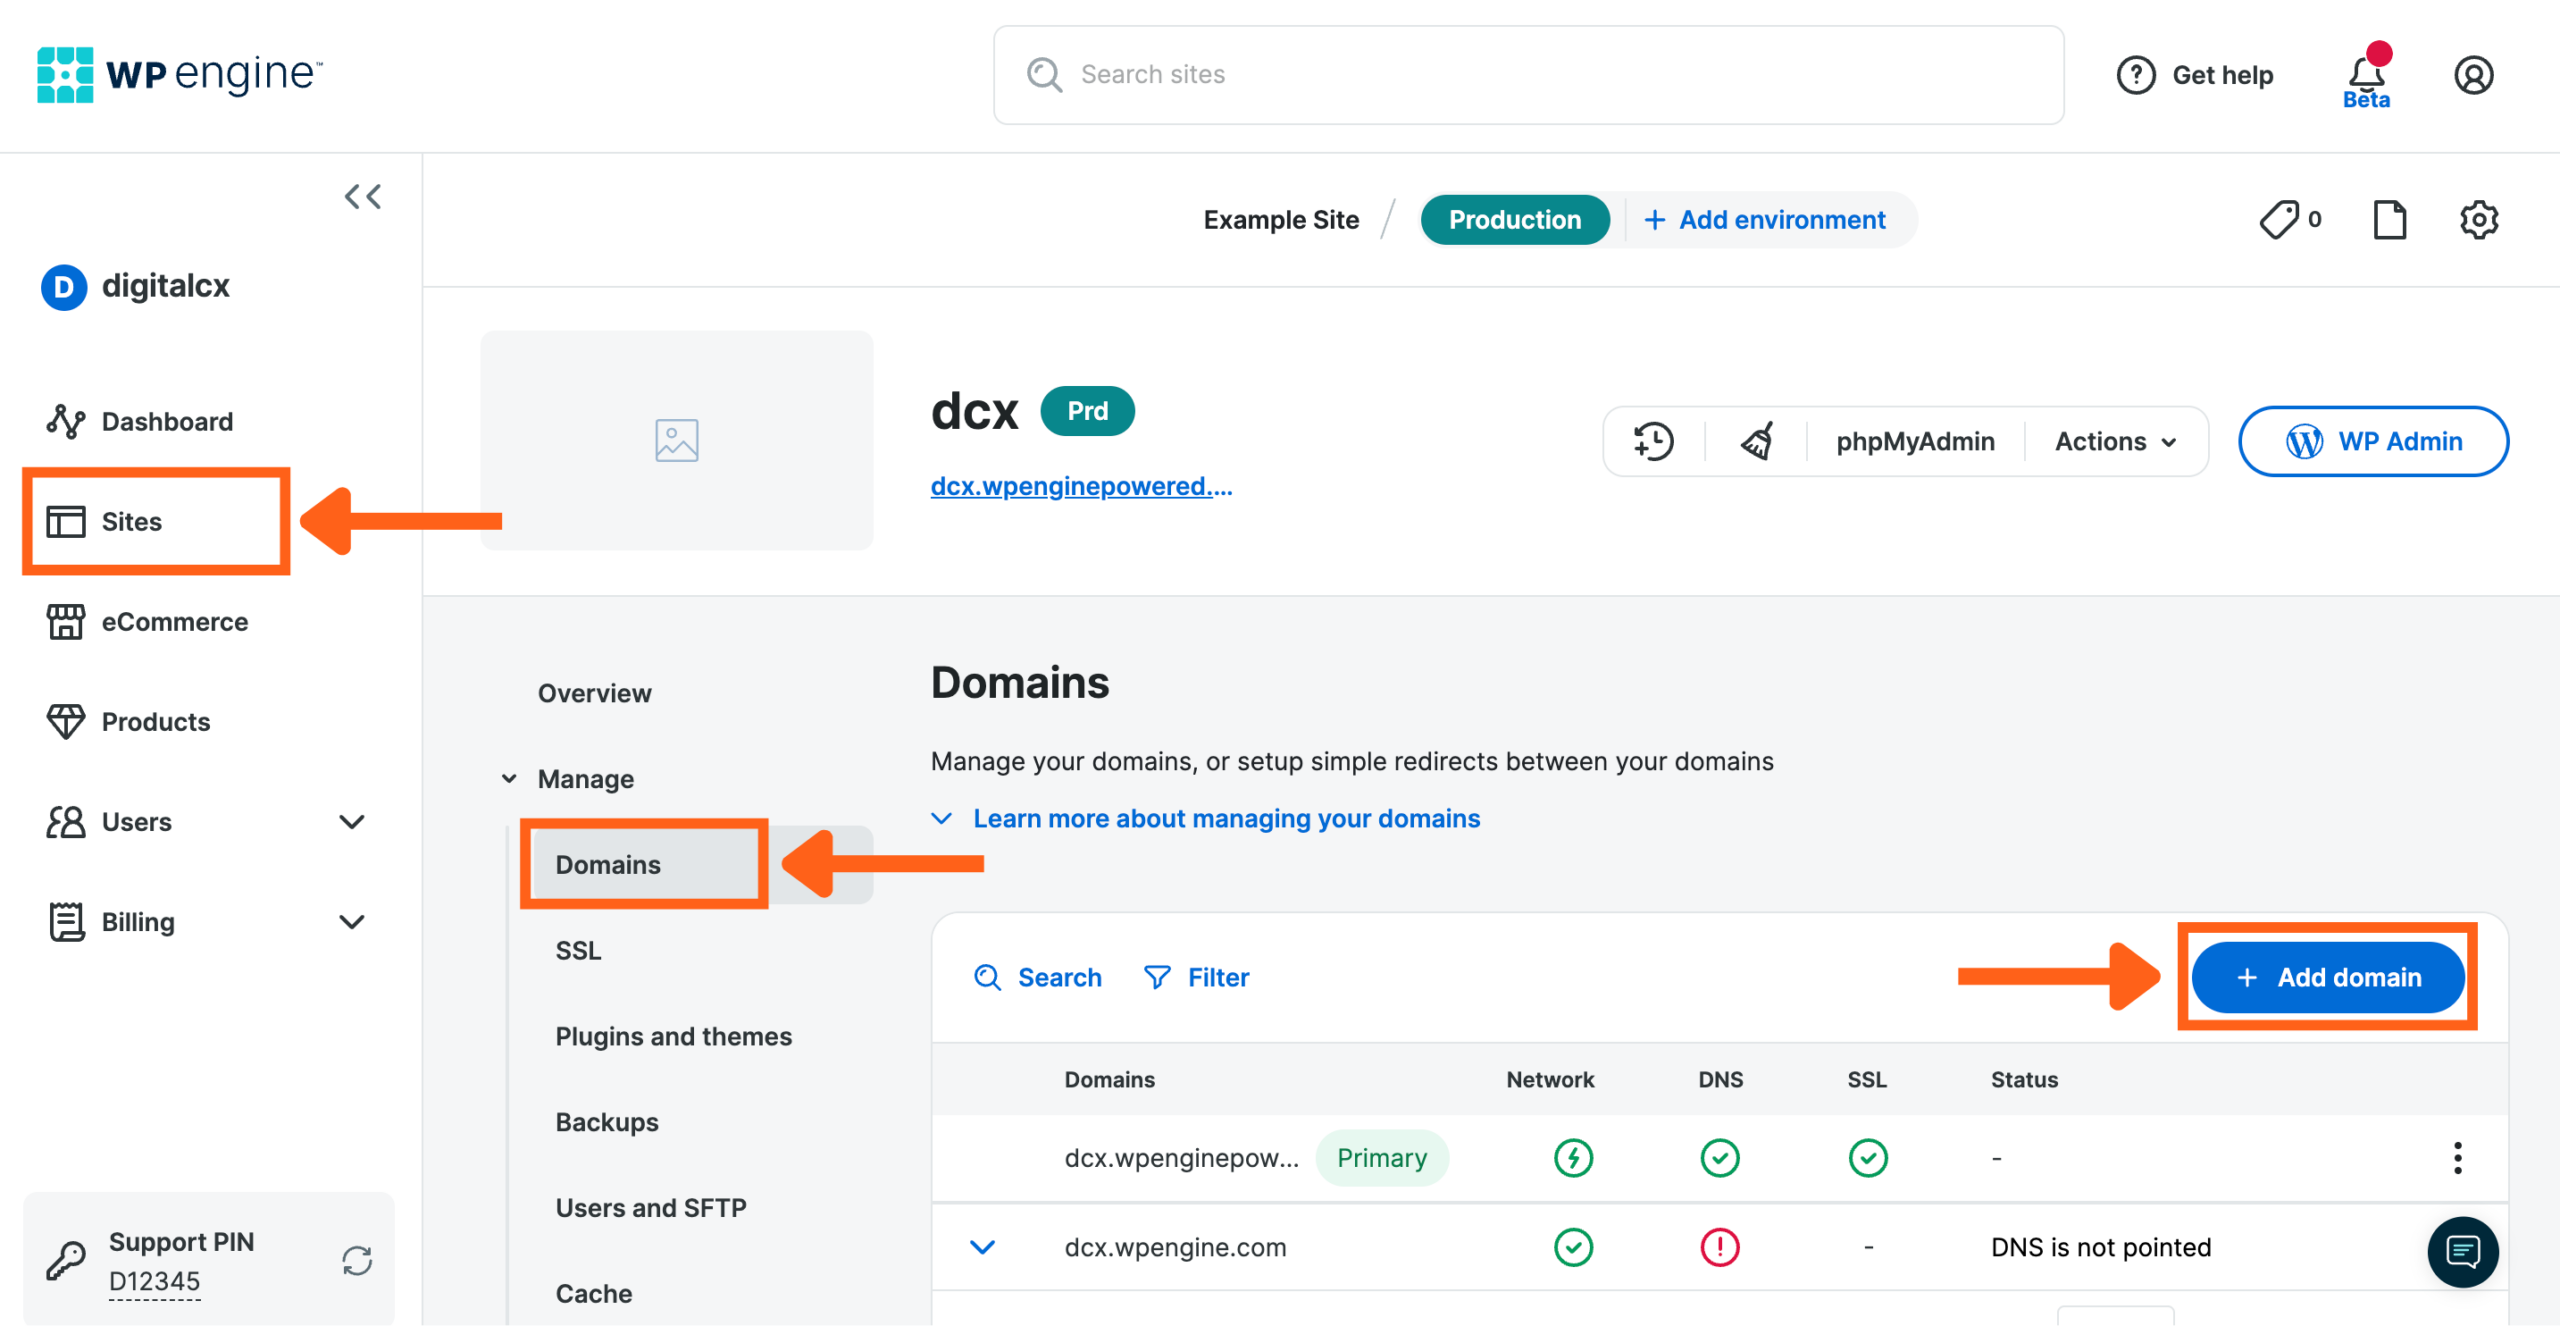
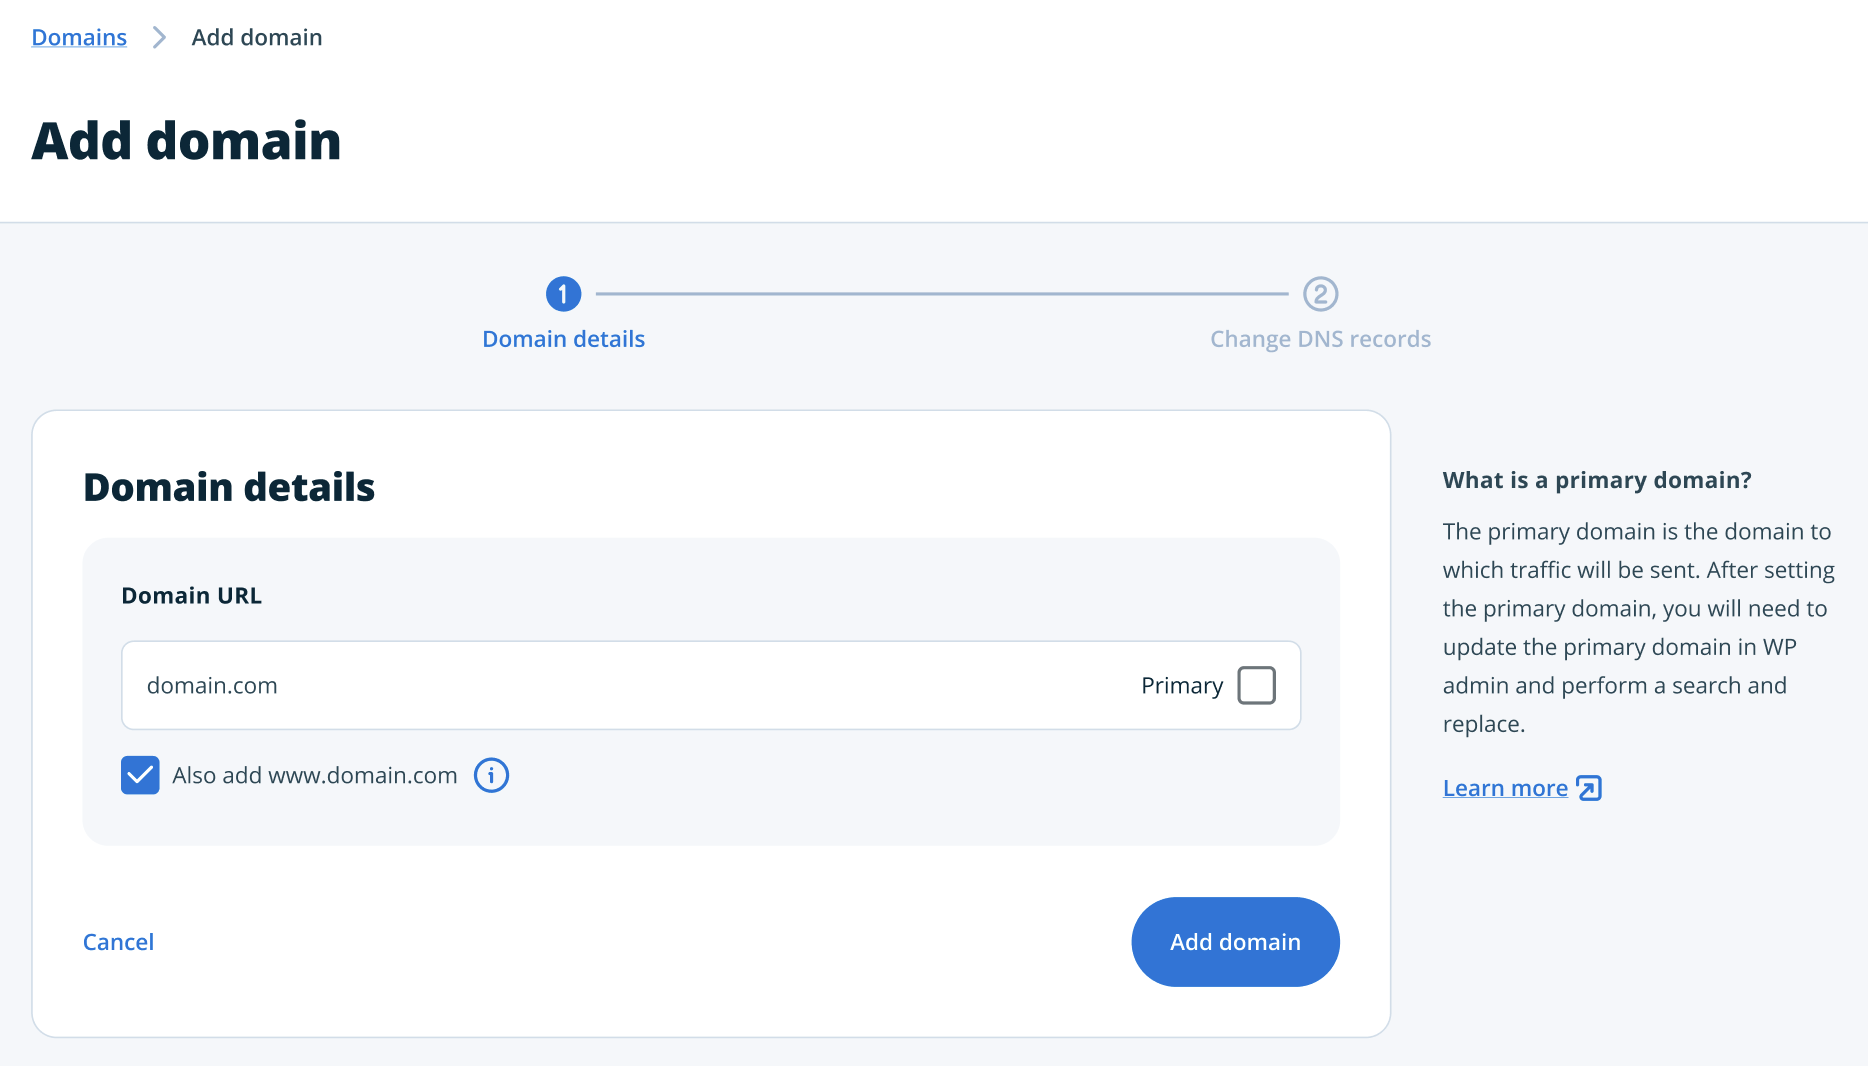
- Domain – Enter your domain name into the field.
- Also add … – Choose whether to also add the common variant. Depending on the domain entered above, this will be the same domain with or without “www”.
- Primary – Sets the domain entered as the Primary domain in the User Portal. Learn more about the Primary domain here.
- Click Add domain
- To finish going live, DNS must be pointed to WP Engine. If you want to pre verify the domain before pointing DNS to reduce downtime, skip to the pre-verification section below.
- Option 1: Automatic – If available, log in to the domain provider to point DNS automatically. Learn more about using automatic DNS configuration here.
- Option 2: Manual – If automatic DNS configuration is not available, or not needed, point DNS to WP Engine manually instead. Learn more about manually updating DNS here.
If domain pre-verification options are presented, skip to the pre-verification section below.
NOTE
Don’t forget to update the WordPress domain settings. Learn more here.
Verify Domain Ownership
Global Edge Security and the advanced network utilize a highly performant Edge network. This network allows WP Engine to configure performance and security benefits on your behalf. Domain ownership must be verified when pointing DNS to WP Engine. This verification process happens automatically after pointing DNS, and can take anywhere from a few minutes to 4 hours.
If a domain is currently serving live traffic, downtime can be minimized by pre-verifying domain ownership. Domain pre-verification confirms domain ownership by checking for a uniquely generated TXT record before DNS is pointed to WP Engine.
Domains that are not currently serving live traffic do not need to pre-verify. Domain verification will occur automatically without pre-verification. Additionally, a domain that is already pointed to WP Engine does not need to pre-verify if moved to another environment.
| Verification | Pre-Verification |
|---|---|
| Required. Occurs automatically after pointing DNS. | Optional. Configured prior to pointing DNS. |
| Recommended for sites not serving live traffic, may increase downtime. | Recommended for sites already serving live traffic, to reduce downtime. |
NOTE
Due to the internal routing structure CloudFlare uses, pre-verification is not possible for Global Edge Security or the advanced network when using CloudFlare to manage DNS.
Therefore, if you have your own CloudFlare account and you are using it to manage your DNS, skip this pre-verification process and point your domain as usual.
Domain Pre-Verification
- From the “Domains” page, click Add Domain
- Enter the domain name
- Select whether or not to include the common variant (either “www” or “non-www” depending on which was entered previously)
- Select whether or not to set the domain as Primary in the User Portal
- Click Add Domain
- On the next page, select whether you want to configure your DNS using the Automatic method (if supported by your DNS host) or Manual method.

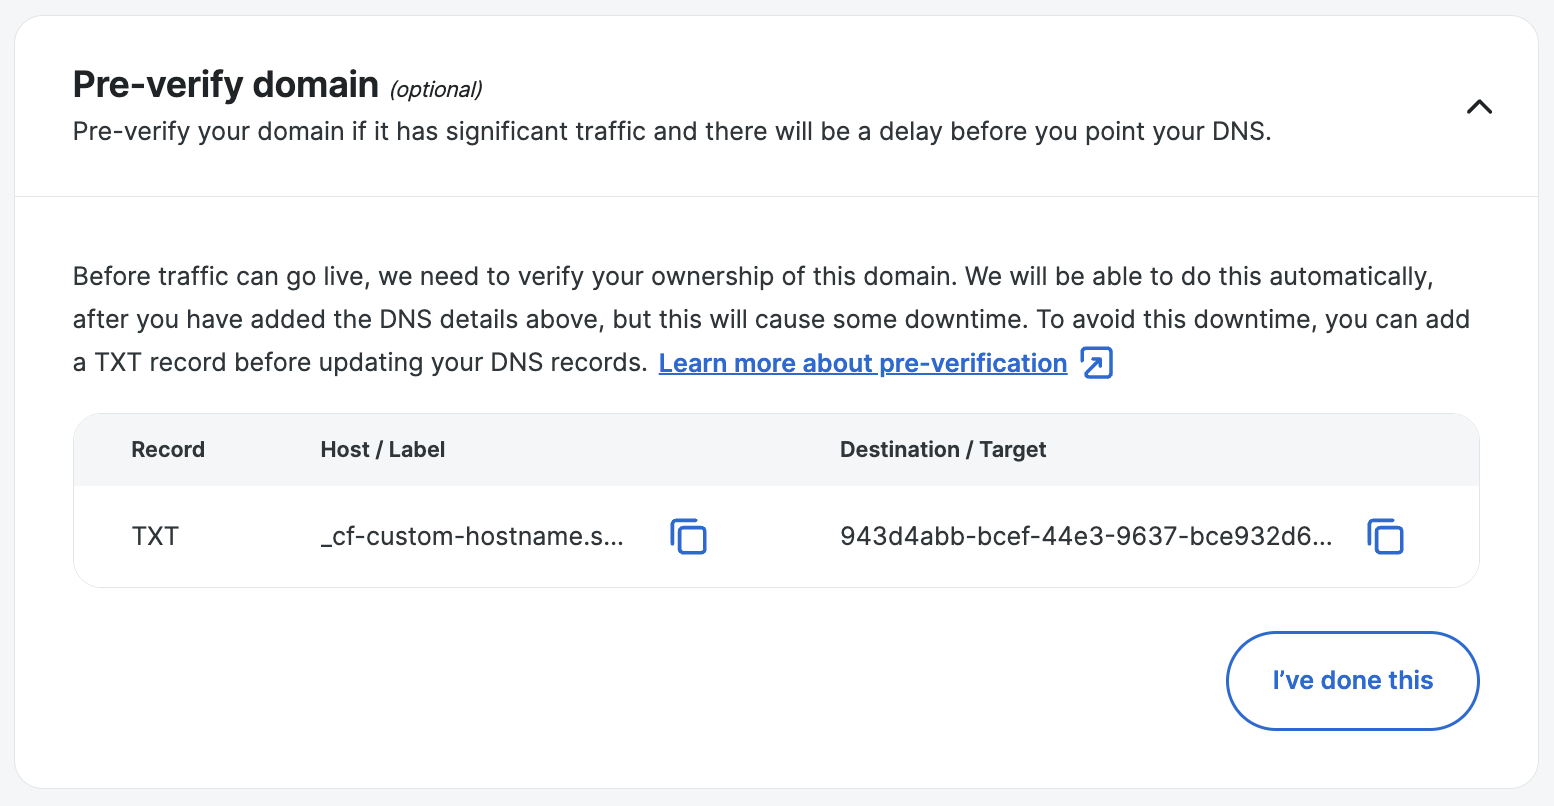
- Scroll to “Pre-verify domain” and expand the dropdown
- IMPORTANT: Do not log in to the domain provider to point DNS automatically, OR point DNS manually yet.

- IMPORTANT: Do not log in to the domain provider to point DNS automatically, OR point DNS manually yet.
- Based on your selected method (Automatic or Manual) add the verification TXT record:
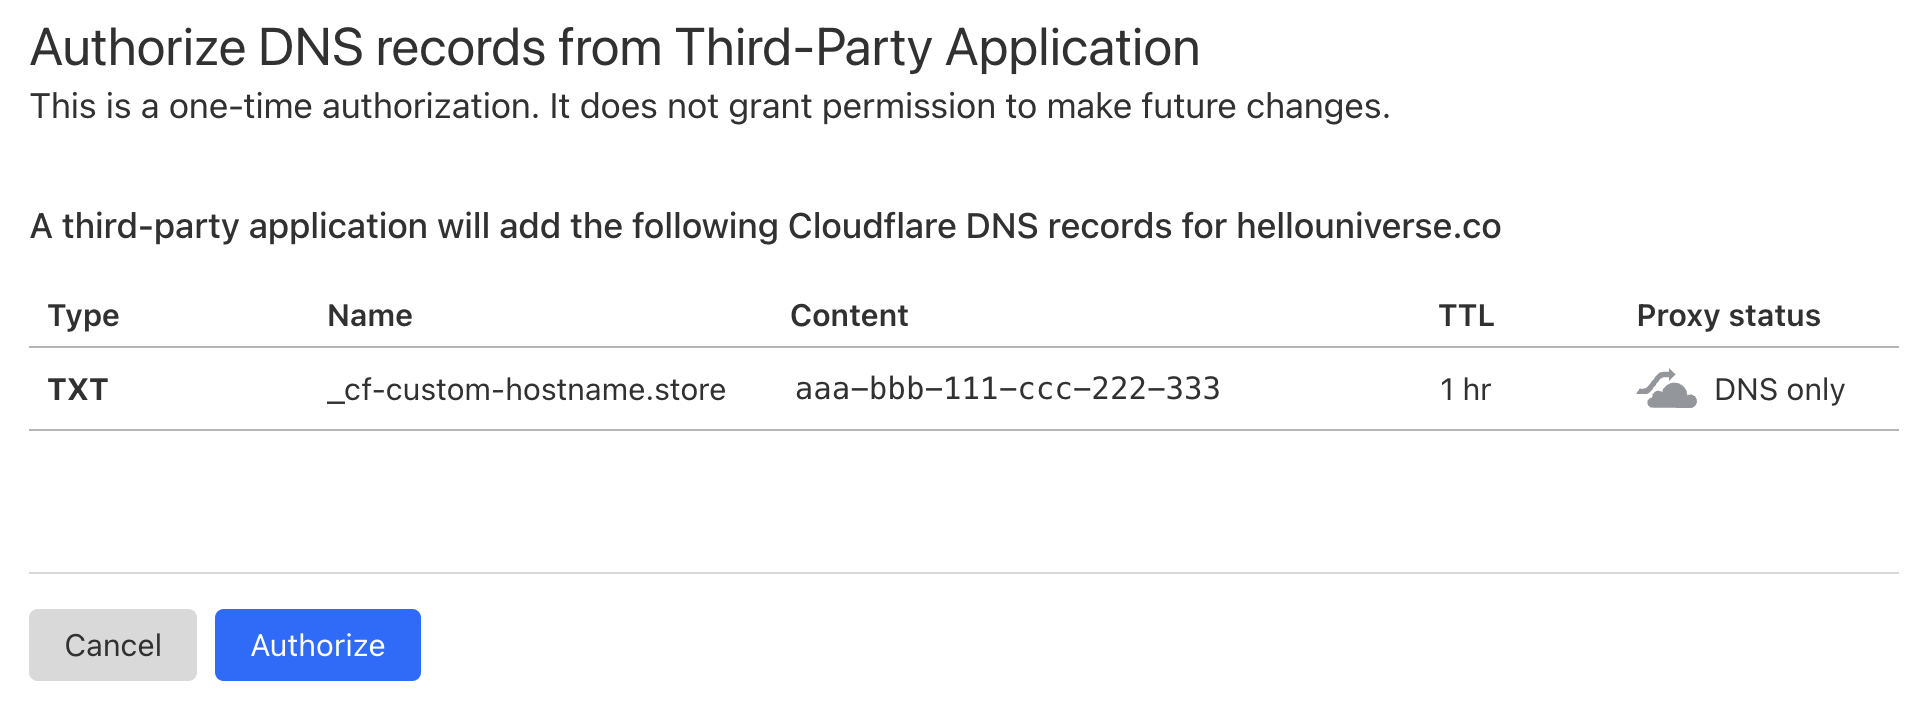
- Automatic:
- Click Verify with Entri and follow the prompts to connect to your DNS host.

- Authorize Entri to automatically add the TXT record. This will look different based on the DNS host. Here’s an example from Cloudflare:
- Click Verify with Entri and follow the prompts to connect to your DNS host.
- Manual
- Log in to your DNS provider and add a TXT record with the name and value exactly as shown.
- Adding a TXT record is only for verification purposes and does NOT affect live traffic.
- Certain DNS management services may require adding cf-custom-hostnames instead of cf-custom-hostname.yourdomain.com as the name/host.
- If there is already a TXT record for _cf-custom-hostname, delete it and replace it with the record provided.
- Example record:

- Click I’ve done this to return to the main “Domains” page in the WP Engine User Portal.
- Log in to your DNS provider and add a TXT record with the name and value exactly as shown.
- Automatic:
- Refresh Status to fetch the updated pre-verification status
- Expand the domain dropdown on the main “Domains” page and click Refresh OR expand the three dot menu icon and select Refresh Status.
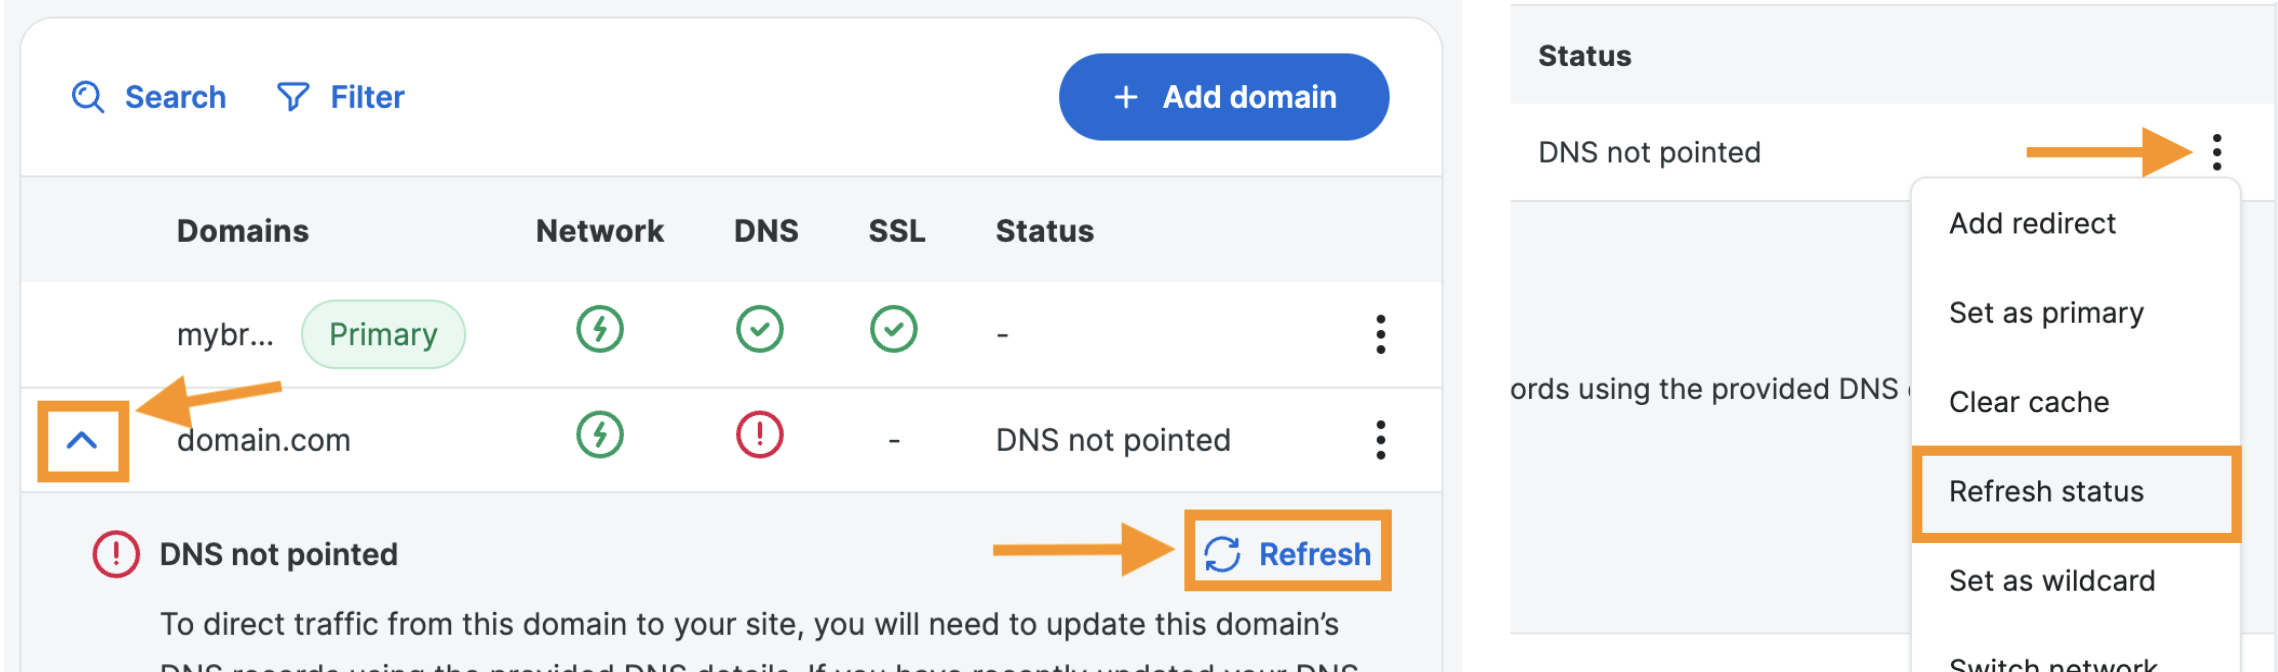
- Expand the domain dropdown on the main “Domains” page and click Refresh OR expand the three dot menu icon and select Refresh Status.
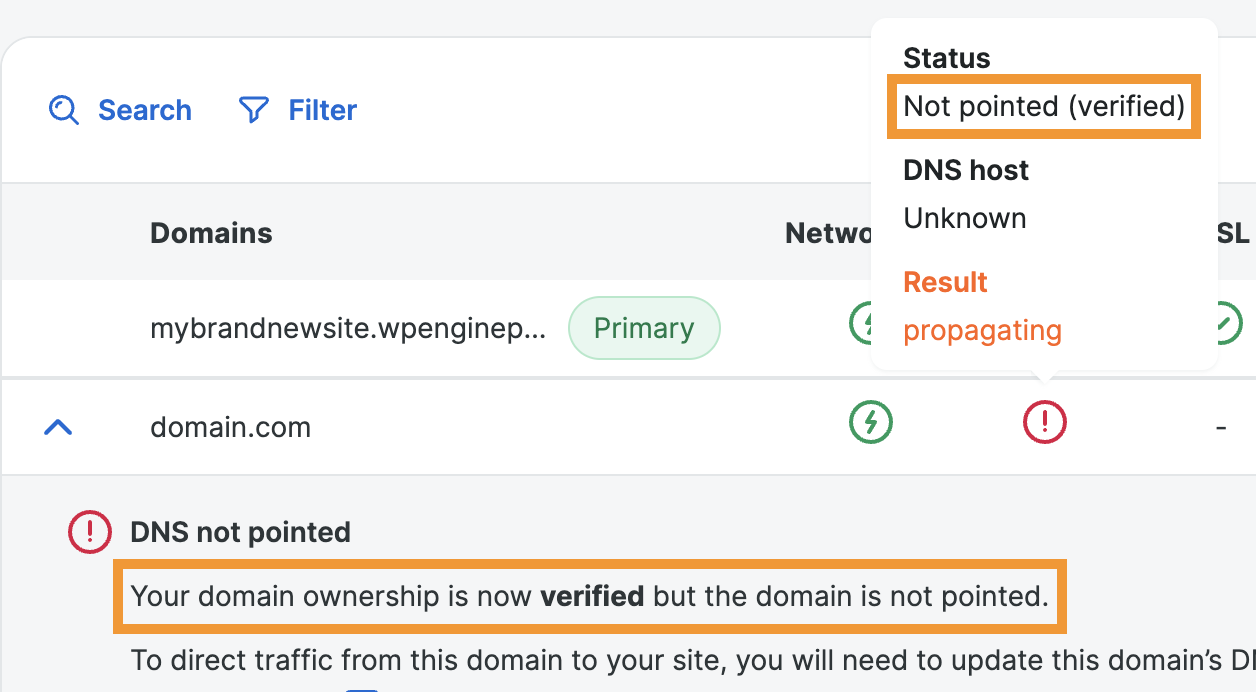
- When domain ownership has been verified:
- The DNS status will read Not pointed (verified). When the domain status is expanded, it will read Your domain ownership is now verified but the domain is not pointed.
- This verification status check typically takes a few minutes. You may need to refresh the page.
- The DNS status will read Not pointed (verified). When the domain status is expanded, it will read Your domain ownership is now verified but the domain is not pointed.
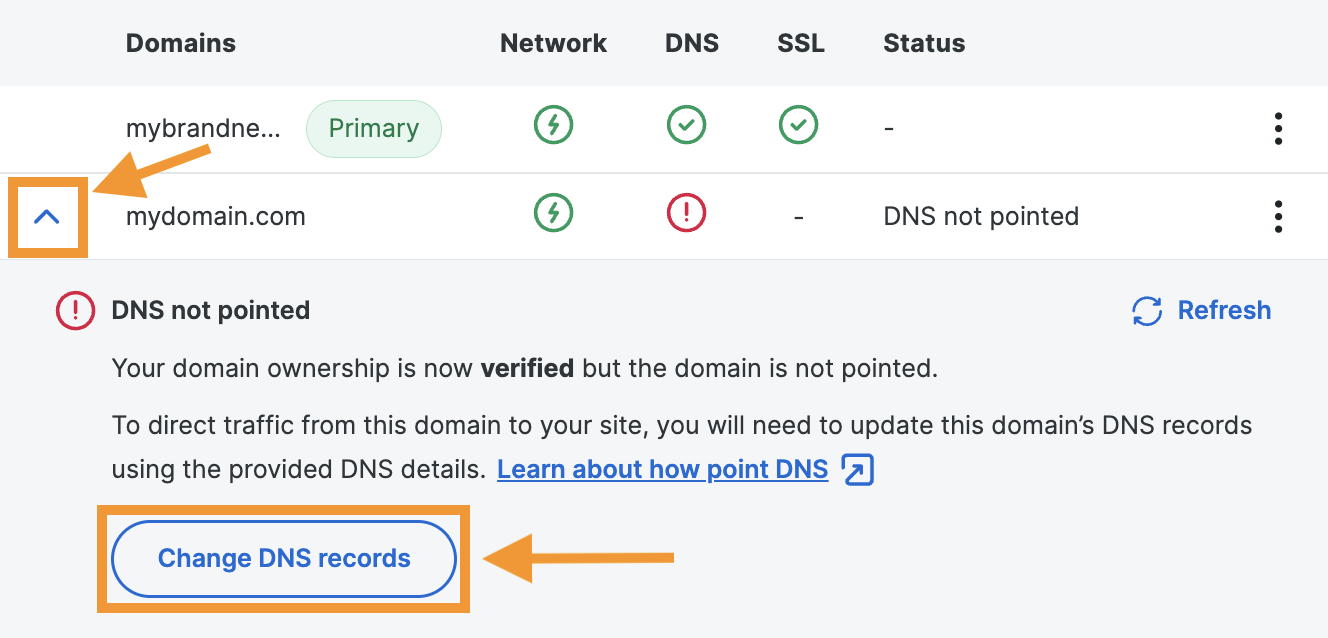
- After the domain has been verified, it’s time to point DNS.
- Expand the domain section and click Change DNS records
- Option 1: Automatic – If available, you will be prompted to log in to your DNS provider to point DNS automatically. Learn more about automatic DNS configuration here.
- Option 2: Manual – If automatic DNS configuration is not available, or not needed, point DNS to WP Engine manually. Learn more about manually updating DNS here.
- After DNS has been updated, the status shown on the main “Domains” page will be updated automatically. To manually start the fetching process, click Refresh in the expanded domain dropdown or Refresh Status under the three dot menu icon.
Once DNS has been verified as pointing to the advanced network or Global Edge Security, Cloudflare’s network SSL will enable automatically. In this case, HTTPS will be forced on all pages automatically and no additional SSL needs to be added. If additional SSL is needed (like Let’s Encrypt or a third-party certificate) this can be managed on the “SSL” page instead.
Primary Domain
The “primary” domain is a WP Engine configuration setting designed to help ensure domain and platform functionality operate as expected. The primary domain should be set to the main domain of the environment that will resolve in the browser once live. In a multisite, this is the main site domain.
The primary domain has many functions, but most significantly it’s used when running the automated database search and replace when copying or restoring a site. Be sure to set the correct primary domain when going live.
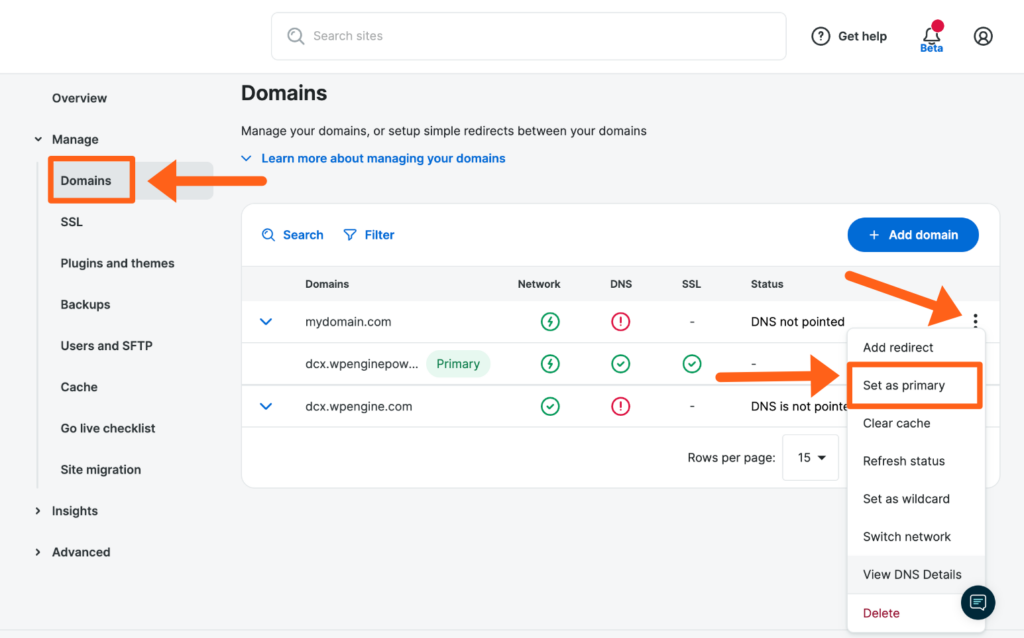
- Next to the domain that should be made primary, open the 3 dot menu icon
- Click Set as Primary
NOTE
A Primary domain cannot be a subdirectory (EX: domain.com/blog). For more information, review this guide.
Domain-level Redirect
A domain-level redirect tells the WP Engine platform to immediately send requests from one domain to another. For example, if your primary domain is mydomain.com then requests to www.mydomain.com should immediately forward. Doing this as a domain-level redirect in the User Portal will ensure the redirect can be performed as quickly as possible. A domain-level redirect will also ensure any 301/302 redirects configured in the User Portal for a domain will function for all domains redirected to it, now and in the future.
- Locate the domain name to redirect
- Click the 3 dot menu icon to the right
- Select Add redirect
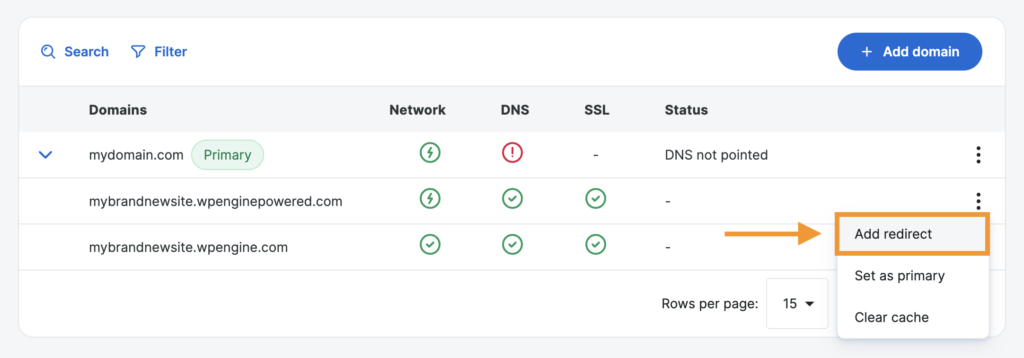
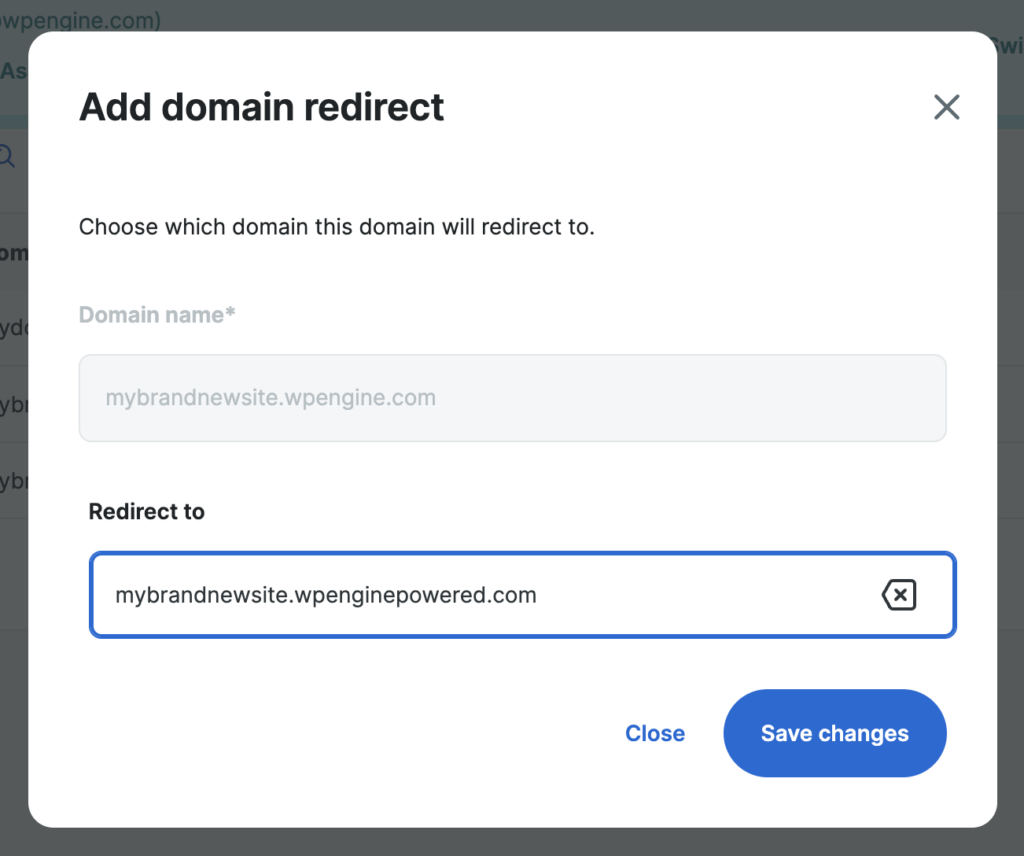
- From the dropdown, select the domain you’d like to Redirect to
- Click Save Changes
You may find that redirecting at the domain level impedes a redirect set elsewhere, causing a broken redirect or a redirect loop. Additionally, if you’re attempting to set a 301 or 302 redirect from the User Portal and cannot select the desired domain from the dropdown, there is like a conflicting domain-level redirect set. In cases such as these, the domain-level redirect would need to be removed or updated to another domain.
Finally, only top level domains and subdomains can be redirected using a domain-level redirect, as only these can be added to the Domains list. To redirect a subdirectory or subfolder, see the Web Rules Engine instead.
Duplicate Domains
To ensure a domain can direct traffic to the intended environment, it can only be applied to one environment at a time. The same domain cannot be added to multiple environments across any WP Engine accounts. The following error will be shown if attempting to add a domain that is already associated with another environment.
Validation failed: Name is already in use on different backend. Please choose a unique name.
The search bar at the top of the User Portal can be used to search for the domain across all of the accounts you have access to.
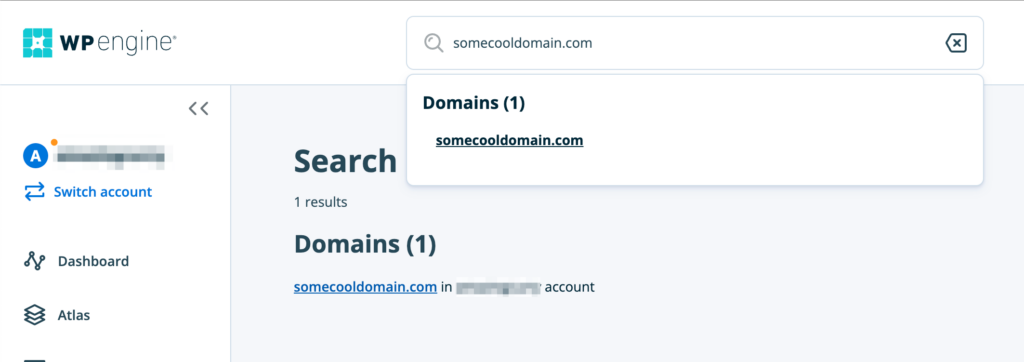
Visit the Domains page of the environment where the domain is applied, and using the three dot “more actions” menu, delete the domain. The domain can then be added to the new environment without error.
If the domain does not come up when using the User Portal search function, you do not have access to the environment where it is applied. If this is the case, please proceed with the duplicate domain dispute process below.
Duplicate Domain Dispute Process
If you do not have access to the environment where the domain is currently applied, you will need to verify ownership of the domain so WP Engine Support can relocate it on your behalf.
- Log in to your DNS provider and add the following TXT record:
wpe-verification=yourenvironmentname- Be sure to replace
yourenvironmentnamein this record with the specific name of the environment you’d like the domain added to.
- Contact WP Engine Support
- Our team will verify ownership via this DNS record then add the domain to the requested environment.
Domain Status
Updating a website’s DNS can be overwhelming. With over 130,000 customers hosted on WP Engine, we know the struggles of managing tons of domains. We want to make it easy to understand the status of your domain’s DNS records and if they are properly configured to serve traffic from your WP Engine environment.
The domain SSL, DNS, and Network statuses are displayed in columns next to each domain in the User Portal on the main “Domains” page.
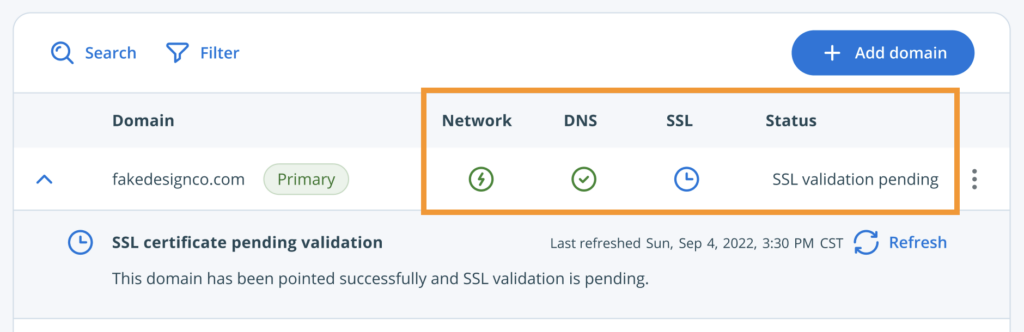
If a change has been made, the status can be checked by expanding the dropdown section for the domain and clicking the Refresh option to the right or by clicking Refresh Status under the three dot menu icon.

Domain Status Descriptions
SSL – Indicates if the SSL has been enabled or not. This column displays the status of both network SSL and domain SSL. Hovering over the status in this column will display SSL issuer and expiration date.
Once DNS has been verified as pointing to the advanced network or Global Edge Security, Cloudflare’s network SSL will enable automatically. In this case, HTTPS will be forced on all pages automatically and no additional SSL needs to be added be added. If additional SSL is needed (like Let’s Encrypt or a third-party certificate) this can be managed on the “SSL” page instead.
- Error
- There is no SSL certificate, or the domain is not accessible.
- Expired
- The SSL certificate has expired.
- Enabled
- SSL has been added.
Network – The network this domain uses. Compare network options here.
- Legacy Network
- This is the legacy network address. DNS should no longer be pointed to this legacy CNAME, as it will reach end-of-life in the future.
- The advanced network domain or Global Edge Security (GES) domain should be used when pointing DNS instead.
- Advanced Network
- WP Engine’s more performant and secure advanced network. In most cases, DNS will be pointed to the advanced network.
- Read about the advanced network here.
- Global Edge Security
- Global Edge Security is a paid product extension and will be applied at a network level to increase security and performance. If GES is applied to your plan, DNS should be pointed to this network.
- Learn more about GES here.
DNS – Current domain verification and DNS state at the last check. Use the three-dot actions menu and click “Refresh status” to fetch a more current state.
- DNS not pointed (not verified)
- Domain ownership is not verified, and DNS has not been pointed to WP Engine.
- Domain verification occurs after pointing DNS to WP Engine. Speed this process up by pre-verifying the domain before pointing DNS.
- DNS not pointed (verified)
- Domain ownership has been verified, and DNS has not been pointed to WP Engine. Learn how to point DNS here.
- Pointed
- DNS has been confirmed pointing to WP Engine.
- Also displays the detected DNS provider, where DNS is pointed from.
Glossary
We understand DNS and domain management can be confusing and filled with terminology that may not be familiar. We’ve provided some definitions below to commonly used words and phrases on WP Engine to help reduce confusion where possible. Note that these terms are defined in the context of WP Engine and may be slightly different on other hosts. Additionally, examples provided may not be exact, but hope to provide more context and understanding.
Web host – A provider of servers that allow web content to be published to the internet. WP Engine is a managed host for WordPress. WP Engine exclusively hosts WordPress websites and actively optimizes our server configuration to provide the most secure, fastest, and best hosting experience possible. WP Engine is not a DNS host or domain registrar.
DNS – A set of rules to connect a domain and “point” traffic to a website. A and CNAME are the most common types of DNS records that direct traffic to a specific location.
Domain registrar – Where a domain is purchased and “registered” (EX: GoDaddy, Google Domains, Namecheap).
DNS provider/host – Where DNS records are configured. This may be the domain registrar, or some other host (EX: Cloudflare or Sucuri). The DNS provider will always be where the nameservers are pointed to in the domain name registrar’s settings.
IP address – A static set of numbers that identify a specific server. EX: 12.34.56.78 (Similar to the street address of a business.) WP Engine will provide this value.
A record – A type of record that only points to a static IP address. (If a business has only provided a static street address, manual updates are required when the business moves to a new location to ensure packages can still be received.)
CNAME value – A domain name managed by WP Engine to be pointed to when configuring a CNAME record. WP Engine will provide this CNAME value.
CNAME record – A type of record that points to a domain name. Used for subdomains and in some cases, apex domains. On WP Engine, we manage and provide the CNAME value used to point a CNAME record. By pointing with a CNAME, traffic can be directed “flexibly” as the true destination is managed by WP Engine. (Like a P.O. box for a business. If the business moves, mail can still reach the business at the original address.)
Apex domain – The topmost domain name, excluding any prefix or subdomain. For example: domain.com or wpengine.com. Note that this does not include www.domain.com. The apex domain is also called the “root” domain, “top-level” domain, or the “non-www” domain. Apex domains can be pointed using A records or a CNAME record (with some DNS providers).
Subdomain – Any prefix of the apex domain is a subdomain. For example, the “www” prefix will create the subdomain www.domain.com and the prefix “blog” will create the subdomain blog.domain.com. It’s recommended to point subdomains using a CNAME record.
Wildcard – A catch-all rule that will encompass all subdomains and direct them to the same location. Denoted with an asterisk. For example: The wildcard *.domain.com includes www.domain.com, blog.domain.com, shop.domain.com, etc.
Live traffic – The domain is already receiving visitors, organic traffic, bots, etc. This is important when migrating because downtime will occur when updating DNS, and traffic should be interrupted as minimally as possible. For example, if you’re migrating a store to WP Engine that is currently receiving orders, this website should be considered “live”. Live traffic may be less important in the case of a static blog, where content is not often updated.
Primary domain – A setting in WP Engine that will prioritize this domain above any other assigned domains. This is especially important for redirects and web rules, to reduce “hops” and total time taken to resolve a page. As well as when copying an environment, as a search and replace is run to accurately update between primary domains.
NEXT STEP: Update your website’s URL in WordPress