


Continuous Integration with CodeShip
If you work with a team of developers, chances are you want to use Continuous Integration (CI) and/or Continuous Deployment (CD) tools. These tools allow multiple developers to check out the code they wish to edit, make changes, merge it back into a common repository, and automate tests against the changes. Additionally, some CI/CD tools also allow for automated deployments when tests are successful, or at predetermined intervals. In this article we explain how to set up a CI/CD pipeline using CodeShip and WP Engine. In this scenario, developers deploy changes to GitHub, Bitbucket, or GitLab. CodeShip detects the change, runs any automated tests or build scripts, and deploys to WP Engine using git push.
Getting Started
Before getting started with your CI/CD pipeline on CodeShip, this guide assumes you have: an existing GitHub, GitLab, or Bitbucket account for your team, an existing WP Engine account and site, and a CodeShip account (either Basic or Pro will work). Once you’ve ensured you have these requirements, you can follow these steps to set up your pipeline:
- Sign into codeship.com
- Add a new Project and select your SCM. This is your Git source (GitHub, GitLab, Bitbucket)
- Authorize your SCM account to connect with CodeShip.
- Select the repository you would like to use for this project from the list
- Under Project Settings, copy your Project SSH Key and add the key in your User Portal. Give it a name (Codeship-yourname for example) and click Add Developer.
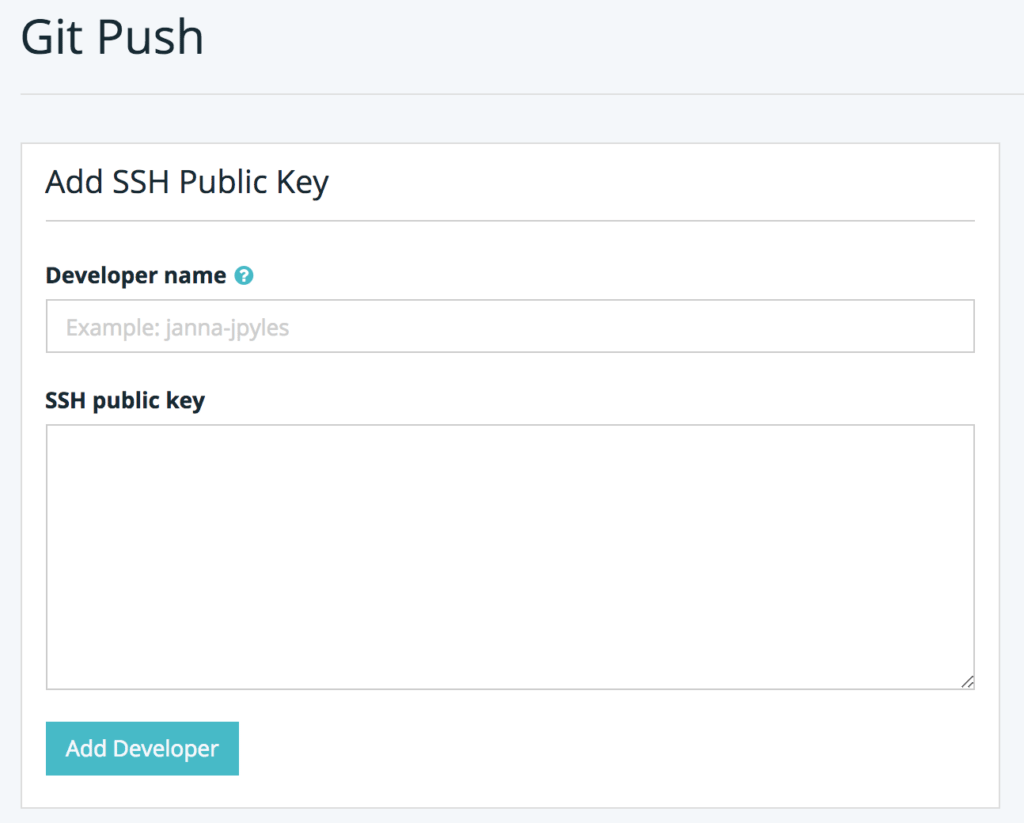
- Remember: Allow 10-15 minutes for your git key to be registered fully
- Your project will have two branches which should each have a deployment pipeline: develop and main. In this setup, your staging remote can be used for the develop branch, and production for main if you choose.
- Last, add automation by adding in a Deployment pipeline for develop and main. Choose a custom script, and paste the following (change out the environment name on the main branch):
# deployment pipeline commands
git config --global user.name "CodeShip deployment"
git config --global user.email "[email protected]"
git remote add staging [email protected]:mystagingenvironment.git
git push staging HEAD:main- Optionally, you can also add any automated tests or build scripts to your CodeShip project. These scripts should be run on the CodeShip servers as a general best practice.
Test Setup
Once you have connected the pieces of your pipeline, you can test your setup. To test the automation, make a small change (a space or comment will work) in your local repository and push it to your connected Git source (SCM). From this point, the CodeShip automation should pick up the change and automatically deploy to WP Engine. You can check to see the file change using SFTP if needed.
Caveats
- If you have added or removed files on your site via SFTP and not through your SCM, these changes are not automatically synced to your remote repository. In cases where files need to be deleted, you should remove them via SFTP and then git push with the –force flag.
- If you are versioning files which have to be built (processed and/or compressed) such as CSS or JS, the build process should happen on CodeShip servers as a general best practice.
- If your build scripts have specific dependencies, they should be ignored in the git push process using the .gitignore file.
Pushing Multiple Branches
The CI/CD pipeline becomes more complex if you have multiple branches you manage within the same site (for example, a plugin branch and a theme branch). Because of this, our friends at Linchpin have created a custom script for this scenario using Environment Variables. The setup process looks a little different when using this script to manage multiple branches:
- Sign into codeship.com
- Create a new project
- Connect to your SCM–you will need to authorize access to your repository in this process.
- Add the public key from your projects General settings page on CodeShip to a machine user on GitHub and provide this user with access to your repository.
- Add the public key from your projects General settings page on CodeShip to WP Engine as a git user.
- Setup environment variables on CodeShip–this gives the script the ability to pipe in multiple options without storing those variables in the script itself.
- Add deployment pipelines for production and staging as Custom Script deployments on CodeShip.
- Perform a test push to confirm your workflow is working correctly
Linchpin has put together a fantastic guide to these steps as well as the environment labels their script uses. We highly recommend checking out this especially relevant guide for an in-depth look at the way Linchpin integrates with GitHub, CodeShip, and WP Engine in this type of setup.
NEXT STEP: Best practices for developing while using version control