Manual Migration Process
At WP Engine, we strive to ensure every customer has a great experience, which includes a seamless migration from your old host to WP Engine. One of the great features of our platform is our WP Engine Automated Migration Tool, which you can use to easily migrate your site’s content and database with one click.
Most sites will be able to use the WP Engine Automated Migration plugin to get their content and database to WP Engine. However, for those who are unable or simply don’t want to use this plugin, this guide will assist you with the steps to migrate your site manually.
About Manual Migrations
If you’re unable to use our Automated Migration Tool, or simply prefer the manual method, that’s okay! We have a helpful checklist available from your User Portal which offers guided navigation through the entire Manual Migration process. It also offers some useful tools to help guide you, such as:
- Tracking migration progress – Exporting your database and wp-content folder from your old host and importing them both into the WP Engine platform.
- Personalized instructions – SFTP credentials and domain configuration
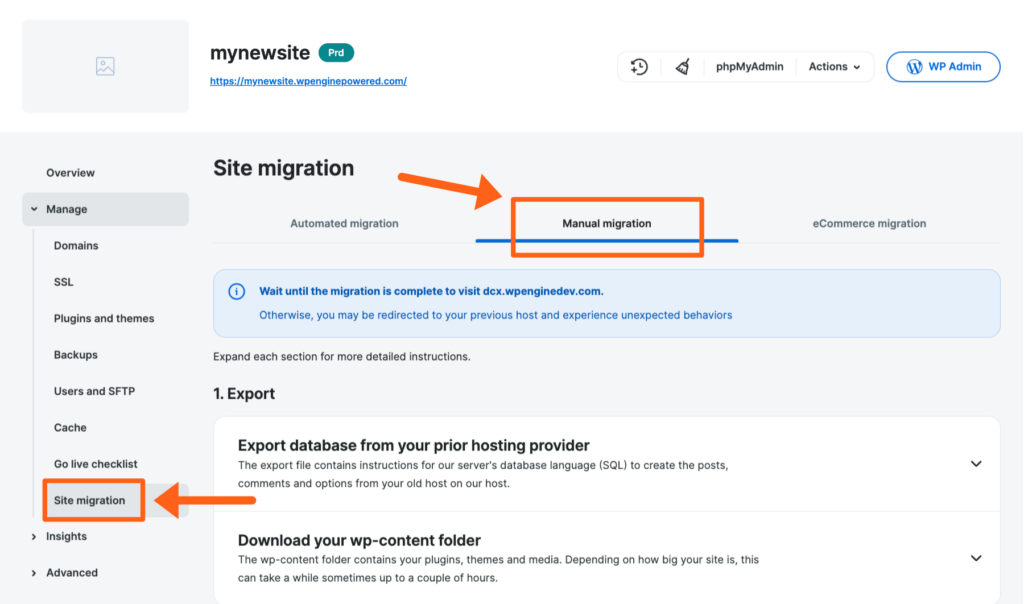
Access Manual Site Migration Page
- Log in to the User Portal
- Click on the environment name you wish to migrate to
- Select Site Migration (You may have to expand the Manage dropdown section)
- Click Manual migration

The process is divided into two primary sections, with two steps in each section: Export and Import.
Export
The export process creates a copy of your existing site’s content and saves it to your local machine. This content is then used in the second “import” portion of the process.
You will need to export two sets of data from your existing site: Database and wp-content.
Export Database
The database contains data like your post content, users, orders and even some settings. The export file itself stores this information as SQL which is used to create the posts, comments, and options from your old host when imported to our servers.
Learn how to export the database from your prior hosting provider using our guide.
Need to export a database from a WP Engine environment? Use a backup instead.
Export wp-content
The wp-content folder contains your plugins, themes, and media. As these are typically the largest files on your site, this particular export process may take a while.
Learn how to export the wp-content from your prior hosting provider using our guide.
Need to export wp-content from a WP Engine environment? Use a backup instead.
Import
The import process takes both data sets acquired in the previous export processes (database and wp-content) and loads them onto WP Engine’s servers.
Import Database
Importing the database requires that you first clear your default WordPress® database on the WP Engine environment your new website will live.1 Then you will import your exported database file to WP Engine.
Learn how to import your database to WP Engine with our guide.
NOTE
If you have a large database, simply include the .sql database file with your zipped wp-content in the next step. If you encounter issues, please contact Support.
Import wp-content
To import your wp-content to WP Engine, you will simply upload the wp-content directory as a .zip to WP Engine using the form on the page.
When the file is uploaded, you’ll see a success notification on the screen letting you know that we’ve received your file. We’ll unzip your file and let you know via email when it’s time for the next step.
NOTE
If you prefer to upload and import the content yourself, this can be done using SFTP or SSH Gateway.
NEXT STEP: Going live with a domain on WP Engine
