


WordPress Multisite
WordPress multisite is a powerful WordPress feature that allows multiple subsites to share a database and site assets (like plugins, themes, and WordPress core files) with a main site. Multisite’s can be powerful when used correctly, but may require more involved set up or maintenance than you’re used to. In this guide we’ll discuss when and when not to use a multisite, how to use multisite on with WP Engine hosting setup, and how to deploy a multisite.
Multisite is included with Premium plans. Shared plans, Growth and above, can purchase the multisite add-on from the Modify Plan page. Multisite cannot be purchased for Lite or Startup plans. Learn more about purchasing plan add-ons.
Enable Multisite
For the multisite to function as intended on WP Engine, you must have the multisite plan add-on and the environment must be converted to multisite in the User Portal. This setting in the User Portal impacts domain routing and SSL and should not be skipped. This is the recommended method when converting to a multisite network on WP Engine.
NOTE
Multisite is not supported on Lite or Startup plans. The multisite add-on can be purchased for Shared plans above Startup, and is included with Premium plans. Learn more here.
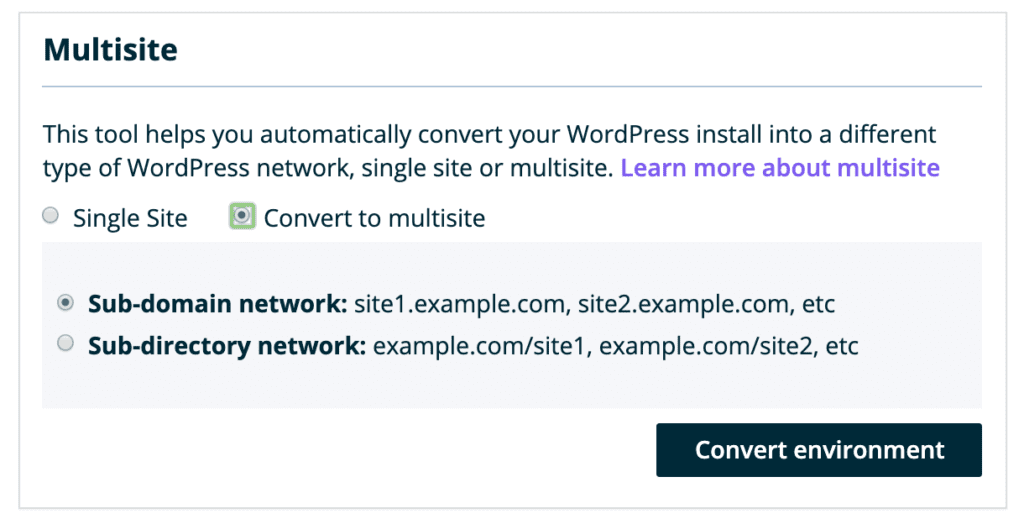
Use the following steps to convert a WordPress environment to either a subdomain or a subdirectory multisite network:
- From the Sites page, click the environment name
- Select Utilities
- Under Multisite, select Convert to Multisite
- Select your multisite type and click Convert Environment
- Sub-domain network:
site1.example.com,site2.example.com, etc - Sub-directory network:
example.com/site1,example.com/site2, etc
Disable Multisite
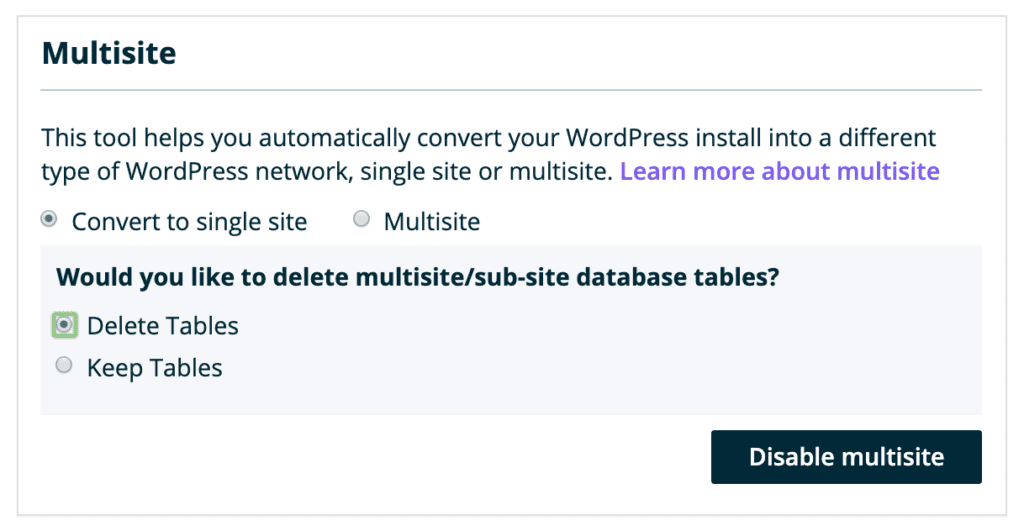
If you wish to convert a multisite back to a single site, use this method in the User Portal. This process will allow you to keep or discard multisite tables and will ensure the site remains configured correctly as a single site on WP Engine.
- From the Sites page, click the environment name
- Select Utilities
- Under Multisite, select Convert to Single Site
- You’ll be prompted with “Would you like to delete multisite/sub-site database tables? ”
- Delete Tables — Deletes any database tables for subsites you’ve added to this network
- Keep Tables — Keeps any database tables for subsites you’ve added to this network
- Click Disable Multisite
About Multisite
WordPress Multisite is a feature that allows you to create a “network” of subsites within a single instance of WordPress. This network shares a file system, database, and are typically variations of the same domain. There are two types of multisites: subdomain (EX: site.domain.com) and subdirectory (EX: domain.com/site). Administrators can also map custom domains to any of their existing subsites.
A multisite includes a new user level called Superadmin. An Administrator can have access to one or several subsites in the network, as assigned by a Super Admin. A Super Admin will have access to every site within the network by default, as well as the Network Admin settings.
Most multisite network-wide changes (such as enabling plugins or themes) are done through the Network Admin. To get to the Network Admin:
- Log in to any site on the multisite network with a Super Admin level user
- Click My Sites at the top left
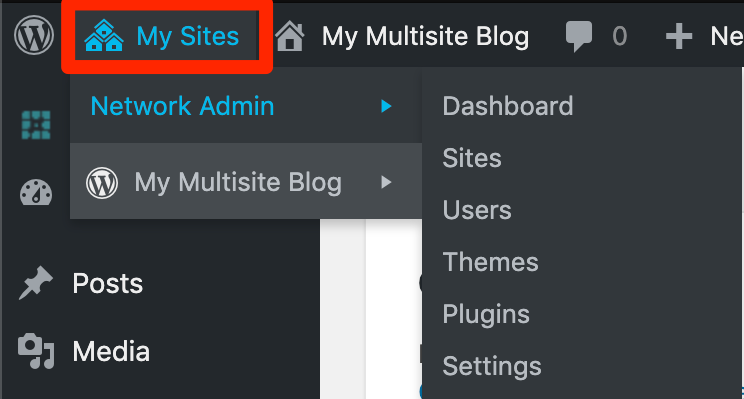
If you do not see My Sites, you are either not logged in as a Super Admin level user, or your multisite network is not properly configured.
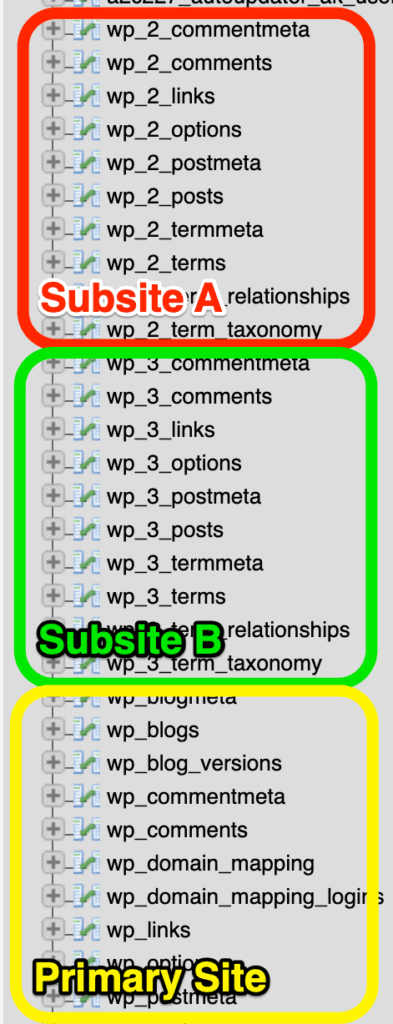
In a multisite, the database will be shared but there will be a numbered subset of tables for each subsite. Individual subsites can have their own users, plugins, and themes enabled specifically for them due to these separate, numbered tables.
Plugins and themes can only be installed or uninstalled from the Network Admin by Super Admin level users. Multisites will use the same directory for plugins and themes within the wp-content folder. Plugins and themes can then be set to Network Enable or Network Activate by a Super Admin.
Network Enable — The plugin or theme can be turned on or off from each subsite’s wp-admin area.
Network Active — The plugin or theme is forced as active for all subsites. It cannot be disabled from any individual subsite’s admin area.
When to Use Multisite
There are several reasons you may want to use Multisite.
- All sites within the Multisite network share the same WordPress core files, theme, and plugins, meaning updates only have to happen once each time, rather than logging into several individual sites.
- Easy managing of subdomains of your root domain in one central dashboard.
When to Not Use Multisite
There are also reasons why you should choose to not use a Multisite. Do not use a multisite:
- If you are unsure if a Multisite would be a good fit for your needs. When in doubt, stick with a single site.
- If you manage multiple unrelated sites which do not use the same theme, plugins, or design scheme.
- If you manage a single site.
- If each of your sites has a strong level of customization.
- If each of your sites use the same theme but with different custom functions added.
- If you have not added the Multisite add-on to your Growth or Scale plan.
Custom Main Site Domain
Multisite is a powerful tool for hosting many WordPress websites under the same domain. The primary site in the network is called the parent, primary, or main site. The main site can load under a custom domain name. Newly created subsites will also use this domain, either as a subdomain or subdirectory, depending on the type of network.
Mapping a custom domain to the main site in a multisite requires the following steps:
- Confirm the environment has been converted to multisite in the User Portal
- Add the new domain to the User Portal
- Point DNS for the domain
- Map the new domain to the main site in WordPress (detailed below)
When these steps have been completed, the domain will route traffic to the main site and be secured with SSL. Additional SSL (such as a wildcard SSL) can be added using this guide.
If there are issues with domain routing or SSL on the new domain, be sure the environment has been converted to a multisite in the User Portal. This setting will impact network routing, and must be enabled to ensure the network functions as expected.
WordPress Main Site Domain Mapping
Changing the primary domain of a WordPress multisite requires updates in several locations. The two primary steps to update a main site domain are: Update the database and update the wp-config.php file.
You will need access to the database and SFTP, or SSH Gateway before proceeding.
Update Database
Updating a multisite domain begins in the database of the website. Be sure to consistently use the same version of your domain, and not switch the spelling or change between www/non-www.
We recommend using the non-www variation (EX: domain.com) instead of the www version (EX: www.domain.com) to ensure your subsites write their dependent URLs correctly.
NOTE
If your site uses a custom database prefix, this will impact the table names listed below. If this is the case then replace wp_ with your prefix in the following table names, or change your database prefix.
- Open phpMyAdmin to view the database. If you’re not sure how to open the database, review our guide here.
- These steps use phpMyAdmin, but this process can also be done using SSH Gateway.
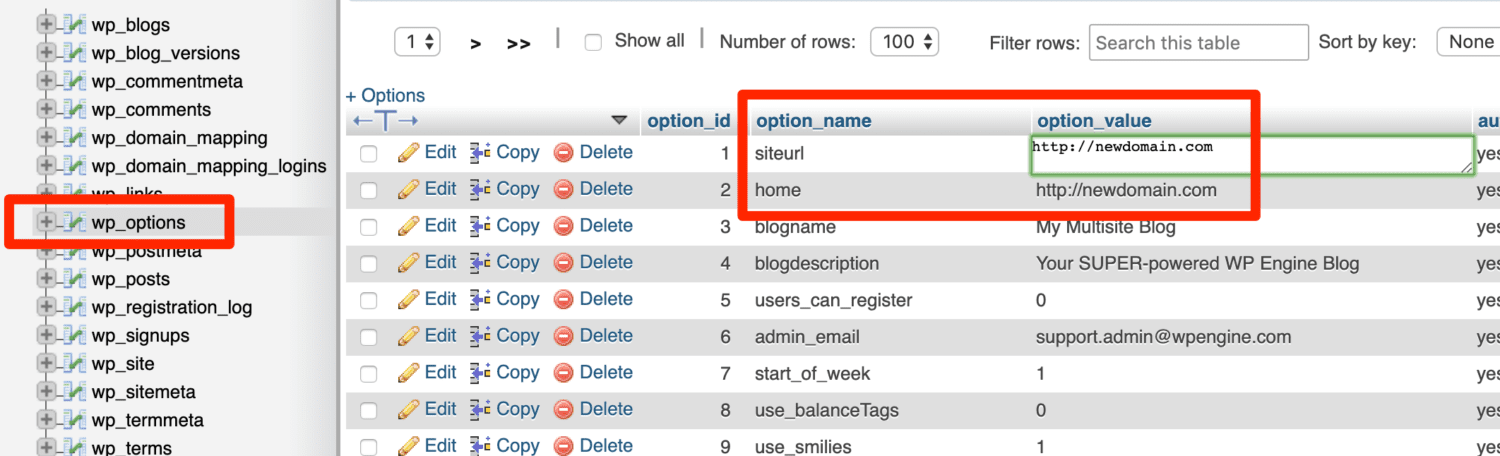
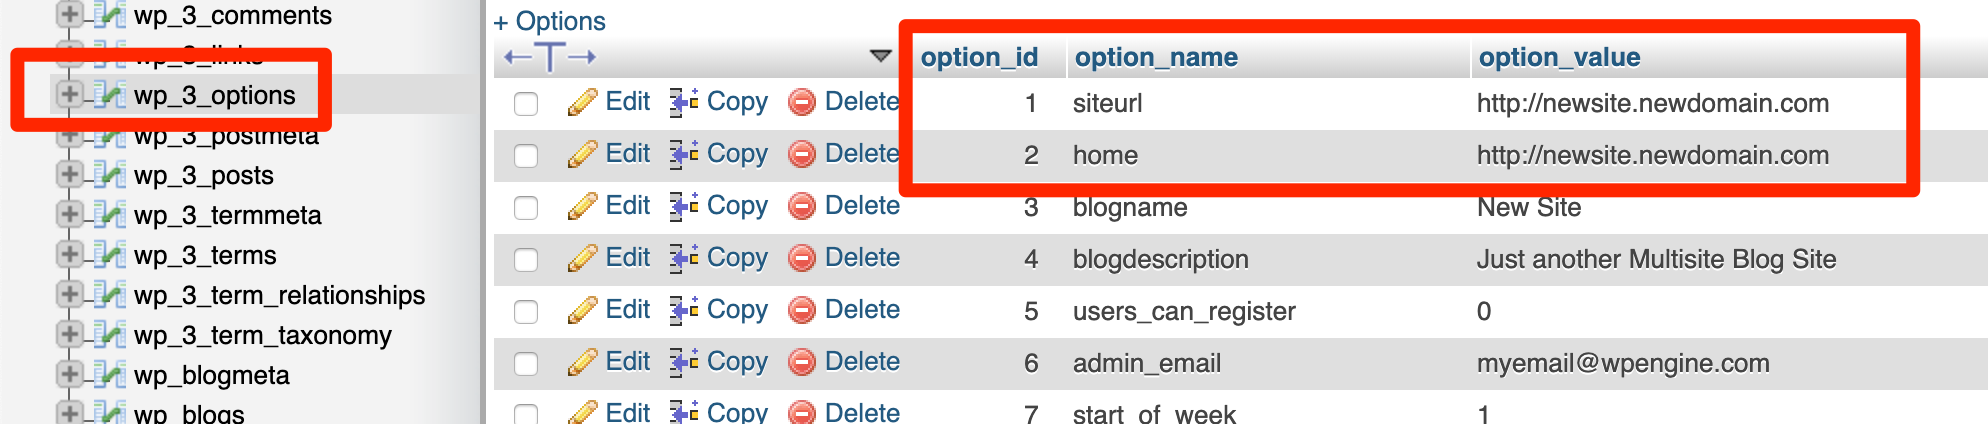
- On the left, click
wp_yourenvironment - Locate the
wp_optionstable in list and click on it to open - Find the option name and double click on the the option value next to it:
siteurl- This option should use the protocol, either http or https. EX:
http://newdomain.com
- Hit the ENTER or RETURN key to save the change
- Find the option name and double click on the the option value next to it:
home- This option should use the protocol, either http or https and exactly match the domain used previously. EX:
http://newdomain.com
- Hit the ENTER or RETURN key to save the change
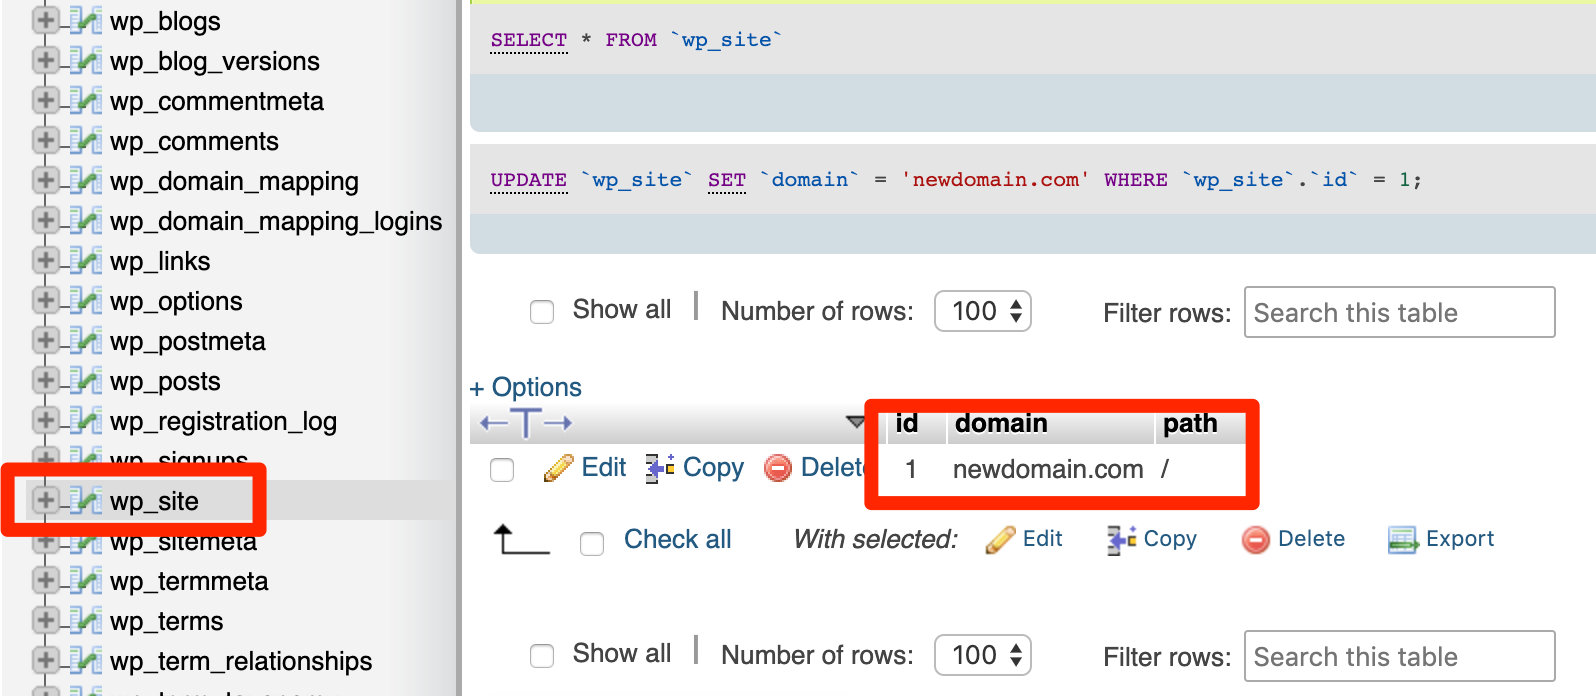
- On the far left, click on the table called
wp_site - Double click on the the domain value
- Update this to your domain name without http/https protocol. EX:
newdomain.com - Hit the ENTER or RETURN key to save the change
- On the far left, click on the table name
wp_sitemeta - Locate the following meta key and click the meta value next to it
siteurl- This option should use the protocol (http or https) and exactly match the domain used previously. It should include a trailing slash
/at the very end. EX:http://newdomain.com/

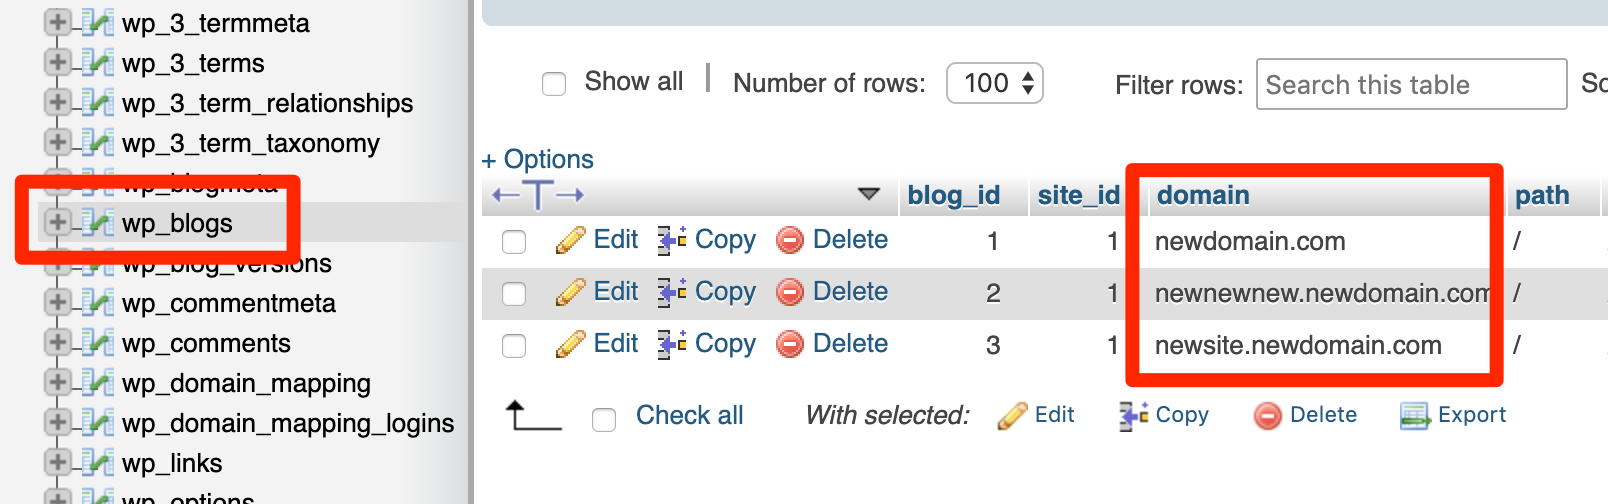
- On the far left, click on the table name
wp_blogs - If you have already added subsites you may see several rows here. Each value in the domain column should have its domain updated to reference your new domain. Do not include protocol (http/https) here.
- Subdirectory multisite: The domain column should simply list your old domain through any the rows. Update all rows to your new domain.
- EX:
coolsite.wpengine.comwould becomenewdomain.com
- EX:
- Subdomain multisite: The domain column will show several subdomains of your old domain. Keep the subdomain and simply append it to your new domain instead.
- EX 1:
coolsite.wpengine.comwould becomenewdomain.comandnewsite.coolsite.wpengine.comwould becomenewsite.newdomain.com. - EX 2:
oldsite.comwould becomenewdomain.com, andnewsite.oldsite.comwould becomenewsite.newdomain.com
- EX 1:
- Subdirectory multisite: The domain column should simply list your old domain through any the rows. Update all rows to your new domain.
NOTE
The next database changes are required only if you have already added subsites. Skip to the next section if you have not yet added any subsites.
- Each subsite has a set of database tables with a specific number added to the prefix. There may be several tables, it will vary by how many subsites you’ve already added.
- On the far left open each additional
wp_#_optionstable - Update the following option values:
siteurlhome- These should include http/https protocol.
List of Database Locations
If you’re comfortable with the database and simply need a brief list of the locations, they are found here. We’ve also noted where the http or https protocol should be included.
| Table | Option | Protocol? | Notes |
|---|---|---|---|
| wp_options | home | Yes | |
| wp_options | siteurl | Yes | |
| wp_site | domain | No | |
| wp_sitemeta | siteurl | Yes | Include trailing slash |
| wp_blogs | domain | No | Update all rows |
| wp_#_options | siteurl | Yes | Update all # options tables |
| wp_#_options | home | Yes | Update all # options tables |
Be sure to also update the wp-config.php file as detailed below.
Update wp-config.php
The last step requires modifying the WordPress configuration file on your website.
- Connect to your site using SFTP or SSH Gateway
- Download the wp-config.php file, located in your site’s root directory
- Update the following line to use your Primary Domain:
define( 'DOMAIN_CURRENT_SITE', 'newdomain.com' );- Do not include http/https protocol here.
- Save and upload the modified file, overwriting the original.

If you see the following lines, delete them. They will overwrite your database defines in some areas and will cause issues:
define( 'WP_HOME', 'http://somedomain.com' );
define( 'WP_SITEURL', 'http://somedomain.com' );
Custom Subsite Domain
The most powerful feature of WordPress is the ability to have multiple sites under one parent network multisite environment. The primary site in the network is called the parent, primary, or main site. Additional sites in the network are called subsites.
A custom domain can be mapped to a subsite, allowing it to be accessed at a completely different URL than the main site’s domain. For example, subsite.domain.com or domain.com/subsite could be accessed as mytotallynewsite.com
Mapping a custom domain to a subsite in a multisite requires the following steps:
- Confirm the environment has been converted to multisite in the User Portal
- Add the new domain to the User Portal
- Each domain that will be mapped to a subsite should be added to the User Portal.
- Point DNS for the subsite domain
- At this time only Advanced Network is supported for subsite domains.
- DNS can be pointed using CNAME records (recommended), A records, or a wildcard CNAME record.
- Map the new domain to the subsite in WordPress (detailed below)
When these steps have been completed, the domain will route traffic to the specified subsite and be secured with SSL. Additional SSL (such as a wildcard SSL) can be added using this guide.
If there are issues with domain routing or SSL on the new domain, be sure the environment has been converted to a multisite in the User Portal. This setting will impact network routing, and must be enabled to ensure the network functions as expected.
WordPress Subsite Domain Mapping
In WordPress 4.5, Native Domain Mapping was added to WordPress core. This removes the need for a plugin to map a custom domain to a subsite. This is the recommended method for a new multisite and a multisite that is not already using the legacy MU Domain Mapping method.
- Open the multisite’s Network Admin
- Open the Sites page
- Click Edit near the subsite to be updated
- Change the Subsite Address (URL) to the new domain.
- Be sure to include http or https protocol:

Multisite Deployment Best Practices
When deploying a multisite using the Copy Environment tool, a search and replace is performed to ensure main and subsite URLs are updated appropriately. In this article we discuss the best practices when copying a multisite network to ensure all URLs are updated correctly.
NOTE
This article refers to copying/deploying a multisite network using the WP Engine Copy Environment tool.
When the database is included in the Copy Environment process, a search and replace is run automatically to update URLs for the main site (the first site in the network) and any subsites to ensure they load correctly. It’s important to ensure your domain is configured correctly in both the WP Engine User Portal and the WordPress settings prior to initiating the deployment. To review the multisite domain configuration steps, see our guide.
- When using custom domains, it’s recommended to use the non-www version of URLs. For example,
domain.comand notwww.domain.com. This applies to both the main site and any subsites.
- When the main site is using a custom domain, this custom domain should be set as primary in the User Portal. Additionally, the WP Engine subdomain for the main site (EX:
install.wpengine.com) should be redirected to that custom primary domain within the User Portal. Learn more about the primary domain and domain redirects in this guide.
- Finally, we recommend mapping custom subsite domains only using the native domain mapping settings (preferred) or the domain mapping plugin (legacy). If you are using some alternate domain mapping solution then it’s possible your URLs will not be updated as expected when using the Copy Environment function. In this case, URL updates may need to be performed manually on the target environment to avoid redirects or broken URLs.
Search and Replace
The Copy Environment tool will automatically replace both the main and subsite domains on the target multisite network. Learn more about the search and replace process here. The domain that will load on the target environment will vary slightly based on your specific multisite configuration.
A search and replace will look for the source environment’s main site domain and replace it with the target environment’s main site domain. The main site domain can either be the WP Engine default domain (example.wpengine.com), or it can be a custom domain (somedomain.com). For best results, we recommend using the non-www version (domain.com) as the main site domain, and not the www version (www.domain.com).
- EX 1:
sourcedomain.comtodestinationdomain.com - EX 2:
source.wpengine.comtodestination.wpengine.com - EX 3:
domain.comtodestination.wpengine.com - EX 4:
source.wpengine.comtodestinationdomain.com
Subsite URLs will be searched and replaced in the same way: the domain is updated from source to target, and the subsite name is retained to maintain the subdomain or subdirectory formatting.
- EX 1:
site1.source.wpengine.comtosite1.destination.wpengine.com - EX 2:
source.wpengine.com/site1todestination.wpengine.com/site1
If the subsites are using custom domains, the URL will be reformatted to include that custom domain. This main site domain will be updated as normal. Both subdirectory and subdomain subsites will have their custom domains rewritten as subdomains.
- EX 1:
sourcedomain.comtosourcedomain-com.destination.wpengine.com - EX 2:
sourcedomain.comtosourcedomain-com.destinationdomain.com
Special Considerations
The amount of time the copy process will take depends on the size of the website: Larger websites will take longer to copy than smaller websites. We recommend performing a copy during a low traffic period and if you have an eCommerce website, it may be wise to also enable maintenance mode first.
There are certain situations where you may choose to include, exclude, or partially include the database in your deployment. When copying the database partially, you can choose to include or exclude specific tables. These considerations are detailed below.
If a database table exists on both the source and destination environments and is included in the copy, the table will be overwritten. We always recommend assessing which data is needed prior to copying an environment, and especially when deploying to a Production environment.
Domain Mapping Plugin (Legacy)
When using the legacy domain mapping plugin for custom subsite domains, our system will not copy the wp_domain_mapping and wp_domain_mapping_logins tables. These tables contain the information necessary to load the subsites over their assigned custom domains.
By excluding these tables automatically, only the unmapped subsite URLs will exist instead. These unmapped URLs will be searched and replaced as normal based on the examples above.
If you decide to run a partial database copy, these tables need to be included or excluded specifically based on the desired outcome.
WooCommerce
All eCommerce websites include important “live” data (such as new orders) that you do not want to be overwritten. We advise particular caution when copying to Production environments for this reason.
The database can be excluded entirely, which would only replace the file system. Or, the database can be partially copied, which could include content such as posts, but with WooCommerce tables excluded.
The WooCommerce tables we recommend excluding can be found here.
Copy a Subsite to Another Site
Copying a subsite from one environment to another, such as separating a subsite into its own single-site environment, is not possible using the Copy Environment tool. This should be done using native WordPress import/export tool, or a third party tool instead.
- Login to the dashboard of the subsite you wish to migrate
- Select Tools
- Click Export
- Select All Content
- Click Download Export File
- Login to the dashboard of the target site
- If you are migrating to another multisite, create a new subsite first
- Select Tools
- Click Import
- Select WordPress
- Click Choose File
- Select the file exported in Step 5
- Click Upload File and Import
These steps will migrate all posts, pages and media used within them however this does not migrate any themes or plugins. These will need to either be added again manually or by copying the plugin/theme directories over using SFTP or SSH Gateway.
NEXT STEP: Change the multisite primary domain