Robots.txt and WordPress
Maintaining your site’s Search Engine Optimization (SEO) is crucial to driving organic traffic its way. However, there are some pages – such as duplicate content or staging areas – that you may not want users to find through search engines. Fortunately, there’s a way to prevent engines like Google from accessing specific pages and displaying them to searchers. By editing your site’s robots.txt file, you can maintain control over which content shows up in Search Engine Results Pages (SERPs).
NOTE
WP Engine restricts search engine traffic to any site using the environment.wpengine.com domain. Shared accounts can only use custom domains on Production environments. This means Staging, Development and any other non-live environment will not see custom changes reflected in the robots.txt file.
About Robots.txt
A robots.txt file includes instructions for search engines about how to discover and extract information from your website. This process is called ‘crawling’. Once a page has been crawled, it will be indexed so the search engine can quickly find and display it later.
The first thing a search engine crawler does when it reaches a site is look for a robots.txt file. If there isn’t one, it will proceed to crawl the rest of the site as normal. If it does find that file, the crawler will look within it for any commands before moving on.
There are four common commands found within a robots.txt file:
Disallowprevents search engine crawlers from examining and indexing specified site files. This can help you prevent duplicate content, staging areas, or other private files from appearing in SERPs.Allowenables access to subfolders while the parent folders are disallowed.Crawl-delayinstructs crawlers to wait a certain amount of time before loading a file.Sitemapcalls out the location of any sitemaps associated with your website.
Robots.txt files are always formatted in the same way, to make their directives clear:

Each directive starts by identifying the user-agent, which is usually a search engine crawler. If you want the command to apply to all potential user-agents, you can use an asterisk *. To target a specific user-agent instead, you can add its name. For example, we could replace the asterisk above with Googlebot, to only disallow Google from crawling the admin page.
Understanding how to use and edit your robots.txt file is vital. The directives you include in it will shape how search engines interact with your site. They can help you by hiding content you want to steer users away from, benefiting your site’s overall SEO.
NOTE
Need to block a user agent, or other traffic? Create access rules in the Web Rules Engine.
Robots.txt on WP Engine
In order to restrict traffic to non-live environments, WP Engine disallows bots to crawl and/or index a site that is using a WP Engine subdomain (example.wpengine.com) via a default robots.txt virtual file. This is to prevent the website from being indexed on an incorrect domain, which can impact SEO when the site is taken live. Only environments using a custom domain will see modifications made to the robots.txt file.
Remember: Premium accounts can add a custom domain to any environment, but shared accounts can only add custom domains to Production environments. This means that in many cases Staging and Development environments will not reflect custom changes made in the robots.txt file.
Test a Robots.txt File
You can check to see if you have a robots.txt file by adding /robots.txt to the end of your site’s URL in your browser (EX: https://wpengine.com/robots.txt). This will bring up the file if one exists. Just because your file is there, however, doesn’t necessarily mean it’s working correctly.
Fortunately, testing your robots.txt file is simple. You can just copy and paste your file into a robots.txt tester. The tool will highlight any mistakes within the file. It’s important to note that changes you make in a robots.txt tester’s editor will not apply to the actual file – you’ll still have to edit the file on your server.
Some common mistakes include disallowing CSS or JavaScript files, incorrectly using ‘wildcard’ symbols such as * and $, and accidentally disallowing important pages. It’s also important to remember that search engine crawlers are case sensitive, so all the URLs in your robots.txt file should appear just as they do in your browser.
Create a Robots.txt File with a Plugin
If your site lacks a robots.txt file, you can easily add one within WordPress® by using the Yoast SEO plugin.1 This saves you the hassle of creating a plain text file and uploading it to your server manually. If you prefer to create one manually, skip to the Manual Robots.txt File Creation section below.
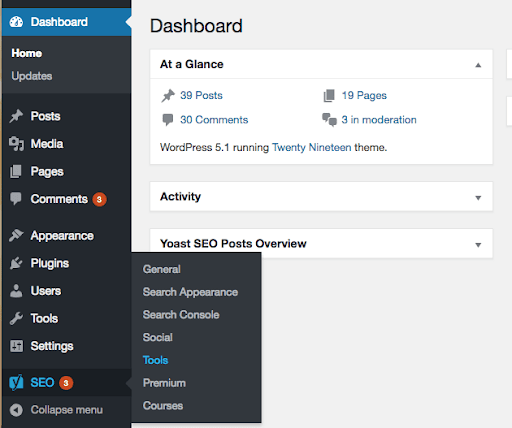
To start, you’ll need to have the Yoast SEO plugin installed and activated. Then you can navigate to your WordPress admin dashboard, and select SEO > Tools from the sidebar:

This will take you to a list of helpful tools that Yoast users can access to efficiently enhance their SEO.
Use the File Editor to Create a Robots.txt file
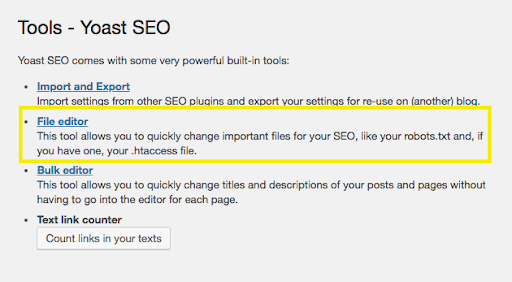
One of the tools available in the list is the file editor. This enables you to edit files related to your website’s SEO, including your robots.txt file:

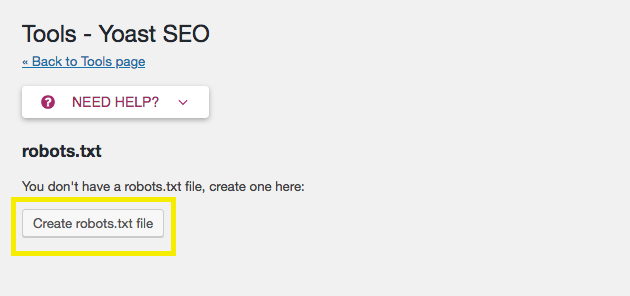
Since your site does not have one yet, you’ll want to select Create robots.txt file:

This will take you the file editor, where you’ll be able to edit and save your new file.
Edit the Default Robots.txt File and Save It
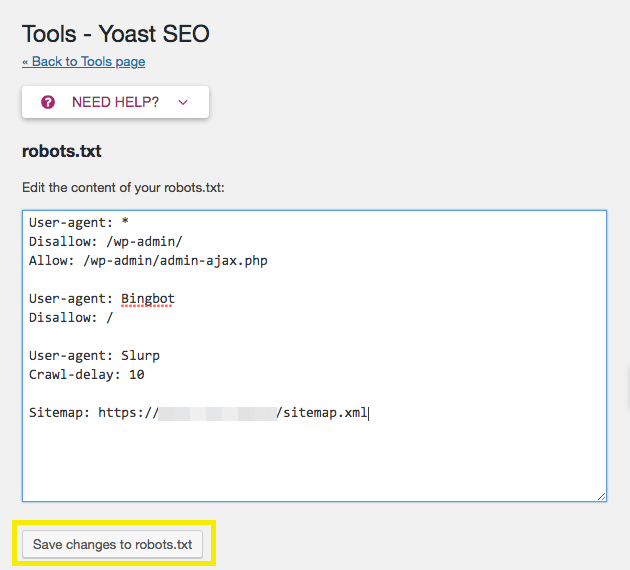
By default, a new robots.txt file created with Yoast includes a directive to hide your wp-admin folder, and allow access to your admin-ajax.php file for all user-agents. It’s recommended that you leave this directive in the file:

Before saving your file, you can also add any other directives you wish to incorporate. In this example, we’ve disallowed Bing’s crawlers from all our files, added a crawl delay of ten milliseconds to Yahoo’s crawler Slurp, and directed crawlers to the location of our sitemap. When you’re finished making your own changes, don’t forget to save them!
Manual Robots.txt File Creation
If you need to create a robots.txt file manually, the process is as simple as creating and uploading a file to your server.
- Create a file named
robots.txt- Make sure the name is lowercase
- Make sure that the extension is
.txtand not.html
- Add any desired directives to the file, and save
- Upload the file using SFTP or SSH Gateway to the root directory of your site
NOTE
If there is a physical file in the root of your site called robots.txt, it will overwrite any dynamically generated robots.txt file created by a plugin or theme.
Using the robots.txt File
The robots.txt file is broken down into blocks by user agent. Within a block, each directive is listed on a new line. For example:
User-agent: *
Disallow: /
User-agent: Googlebot
Disallow:
User-agent: bingbot
Disallow: /no-bing-crawl/
Disallow: wp-admin
User-agents are typically shortened to a more generic name, but it is not required.
Mozilla/5.0 (compatible; Googlebot/2.1; +http://www.google.com/bot.html)becomes simplyGooglebot- The Robots database be found here.
Directive values are case-sensitive.
- The URLs
no-bing-crawlandNo-Bing-Crawlare different.
Globbing and regular expressions are not fully supported.
- The
*in the User-agent field is a special value meaning “any robot”.
Restrict all bot access to your site
(All sites on a environment.wpengine.com URL have the following robots.txt file applied automatically.)
User-agent: *
Disallow: /
Restrict a single robot from the entire site
User-agent: BadBotName
Disallow: /
Restrict bot access to certain directories and files
Example disallows bots on all wp-admin pages and the wp-login.php page. This is a good default or starter robots.txt file.
User-agent: *
Disallow: /wp-admin/
Disallow: /wp-login.php
Restrict bot access to all files of a specific type
Example uses the .pdf file type
User-agent: *
Disallow:  /*.pdf$
Restrict a specific search engine
Example using Googlebot-Image to the /wp-content/uploads directory
User-Agent: Googlebot-Image
Disallow: /wp-content/uploads/
Restrict all bots, except one
Example allows only Google
User-agent: Google
Disallow:

User-agent: *
Disallow: /
Adding the right combinations of directives can be complicated. Luckily, there are plugins that will also create (and test) the robots.txt file for you. Plugin examples include:
If you need more help configuring rules in your robots.txt file, we recommend visiting Google Developers or The Web Robots Pages for further guidance.
Crawl Delay
If you’re seeing bot traffic that is higher than desired, and it’s impacting server performance, adjusting the crawl delay may be a good option. Crawl delay allows you to limit the time a bot must take before crawling the next page.
Note
The default crawl-delay for all sites is 10 seconds. This is what’s in the server’s default robots.txt file and can be overridden when you add a custom robots.txt file with one of the methods outlined in this article.
To adjust the crawl delay use the following directive, the value is adjustable and denoted in seconds:
crawl-delay: 10
For example, to restrict all bots from crawling wp-admin, wp-login.php and set a crawl delay on all bots of 600 seconds (10 minutes):
User-agent: *
Disallow: /wp-login.php
Disallow: /wp-admin/
Crawl-delay: 600
NOTE
Crawl services may have their own requirement for setting a crawl delay. It’s typically best to check in with the service directly for their required method.
Adjust crawl delay for SEMrush
- SEMrush is a great service, but can get very crawl-heavy which ends up hurting your site’s performance. By default SEMrush bots will ignore crawl delay directives in your robots.txt, so be sure to login to their dashboard and enable Respect robots.txt crawl delay.
- More information can be found with SEMrush here.
Adjust Bingbot crawl delay
- Bingbot should respect
crawl-delaydirectives, however they also allow you to set a crawl control pattern.
Adjust the crawl delay for Google
Read more in Google’s support documentation
Open the Crawl Rate Settings page for your property.
- If your crawl rate is described as calculated as optimal, the only way to reduce the crawl rate is by filing a special request. You cannot increase the crawl rate.
- Otherwise, select the option you want and then limit the crawl rate as desired. The new crawl rate will be valid for 90 days.
NOTE
While this configuration is disallowed on our platform, it’s worth noting that Googlebot crawl delay cannot be adjusted for subdirectory hosted sites, like domain.com/blog.
Best Practices
The first best practice to keep in mind is: Non-production sites should disallow all user-agents. WP Engine automatically does this for any sites using the environmentname.wpengine.com domain. Only when you are ready to “go live” with your site should you add a robots.txt file.
Secondly, if you want to block a specific User-Agent, remember that robots do not have to follow the rules set in your robots.txt file. Best practice would be to use a firewall like Sucuri WAF or Cloudflare which allows you to block the bad actors before they hit your site. Or, you can contact Support for more help blocking traffic.
Last, if you have a very large library of posts and pages on your site, Google and other search engines indexing your site can cause performance issues. Increasing your cache expiration time or limiting the crawl rate will help offset this impact.
NEXT STEP: Disagnosing 504 errors
