Smart Plugin Manager (SPM)
Plugins and themes can be updated in the WordPress® admin dashboard by visiting the Updates tab.1 However this can be time consuming- and what if an update causes an issue? Smart Plugin Manager is a WP Engine feature that automatically manages all of your WordPress plugins and themes to keep your environments secure. Smart Plugin Manager will check that the updates are working as expected, and that the update did not cause any visual problems on your site. In the event that a plugin or theme update causes an issue, Smart Plugin Manager will automatically revert the updates and restore your site to its previous state.
Smart Plugin Manager can be purchased for Shared and Premium plans from the Products page and is included with Managed Hosting Plus, Secure Hosting, and eCommerce plans. Learn more about purchasing product extensions.
Was this video helpful?
About Smart Plugin Manager
Smart Plugin Manager (SPM) runs a script daily to check if there are any updates available for your plugins or themes. Smart Plugin Manager is deployed on individual environments, using one license per install and can be deployed on multisite networks (read more on this here). You can select the time of day you’d like the update service to check for updates from the Settings page.
If your WordPress site fulfills a basic purpose, such as providing marketing information for your business, we recommend enabling Smart Plugin Manager on your Production environment. If you do a lot of custom development or your website utilizes multiple applications (such as an eCommerce site), we recommend using Smart Plugin Manager on your Staging environment first so you can check that the updates don’t cause any issues with custom code or third-party applications. If you’re happy with the results, feel free to enable it on your Production environment.
Successful Updates
Utilizing a proprietary set of tests and machine learning algorithms, after plugin and theme updates are run, Smart Plugin Manager checks for server response errors, broken code, and visual changes immediately after plugins have been updated. Some example visual errors that will cause a reversion and restoration are missing images and forms, misplaced iconography, PHP errors, and other visual indicators that the plugin updates causes a material change to your site.
Smart Plugin Manager makes a judgement on site functionality based on a set of verification tests. We’re constantly improving the technology and verification mechanisms so false positives/negatives may occur. If an update breaks your site but was passed by Smart Plugin Manager, you can restore using WP Engine’s backup system. Likewise, if Smart Plugin Manager believes the updates broke your site when it seems to be fine, you can still manually update your plugins. If you experience one of these issues, please contact Support.
What happens if visual regression testing (VRT) doesn’t notice the visual change and therefore doesn’t rollback? It’s impossible to know exactly what percentage of changes VRT will catch. In general, VRT should catch significant changes, but it doesn’t guarantee it will always do so for all websites.
Failed Updates
If a plugin fails to update, we will stop trying to run the updates and you will receive a notification alerting you to which plugin(s) or theme(s) failed to update so you can investigate. Smart Plugin Manager will attempt updates for three more days.
If updates are performed successfully but we detect an issue after updating, such as a 4XX/5XX error or a material change to the look of your site using visual regression testing (VRT), the system will automatically revert your site back to the state prior to running the updates. VRT is the Visual Regression Test that SPM performs to check for any visual changes to the site before updating the plugins and is the primary reason SPM will fail to update plugins/themes.
The system will attempt to update each plugin/theme individually and will skip updating the plugin or theme to the specific version that caused the failure while still updating the other components. You will need to manually update the plugin or theme that causes the failure before it will properly update automatically.
Be sure to also check your website against Smart Plugin Manager’s limitations, detailed in this section.
Cache
WP Engine caches will be cleared after an SPM update. Varnish, object, Advanced Network, and Global Edge Security caches will be cleared. (Learn more about WP Engine’s caching here.)
Certain plugin and themes will have their cache cleared automatically after updates if that item has updates managed by Smart Plugin Manager. SPM runs post-update jobs for the following:
- Advanced Custom Fields
- Elementor
- Popup Maker
- Redirection
- WooCommerce® 1
WP Engine Headless Platform Support
Smart Plugin Manager supports WordPress sites connected to WP Engine Headless Platform apps. When SPM detects a redirect from WordPress homepage to a WP Engine Headless Platform app, then SPM allows WordPress sitemap to include URLs to the WP Engine Headless Platform app. After updating WordPress plugins SPM can test both WordPress pages and Headless WordPress app pages listed in the sitemap.
We recommend using the FaustWP plugin with configured front-end site URL and enabled public route redirects.
SPM does not turn on maintenance mode when WordPress is connected to the Headless WordPress app, to not limit access to WordPress data.
Multisite Support
Smart Plugin Manager supports multisite for WordPress, although there are some caveats. Additionally, SPM will enable maintenance mode on all subpages when updates are running.
If you wish to use SPM on a multisite network, we recommend the following configuration:
- Activate plugins network-wide, or activate all plugins on the main site
- For private and commercial plugins, enter the license credentials, subscription key, or download key on the main site
- Use WP Engine’s backups instead of a 3rd-party WordPress plugin for backing up all of your subsites, to avoid keeping the main site for a long time in maintenance mode during SPM updates
Visual Regression Testing functions a little differently when applied to multisite networks. There are two ways pages will be tested for failures:
- In a multisite network with under 20 sites (19 subsites + main site), VRT will test;
- The homepage of the main site
- The homepage of all subsites
- Custom SPM sitemap
- Up to 20 URLs in total, including any homepages that will be tested above.
- Custom sitemap can be for the main site only and URLs only.
- In a multisite network with over 20 sites (19 subsites + main site), VRT will test;
- The homepage of the main site
- The homepage of up to 49 subsites
- A custom SPM sitemap will be ignored
- In a multisite network with over 50 sites (49 subsites + main site), VRT will test;
- The homepage of the main site
- The homepages of the first 49 subsites created
- A custom SPM sitemap will be ignored
- Subsites 51 and greater will not be checked
*The main site is defined as the site ID 1 and uses the wp_options table (as opposed to wp_2_options, etc). This is the first site on the network and the site that cannot have the domain updated in the wp-admin.
Git Support
All of Smart Plugin Manager’s features, including the Visual Regression Test, Auto Site Rollback, and Notifications, can be leveraged for a Git-hosted plugin or theme by first connecting your website with Github. This means you can push updates to a custom plugin or theme via GitHub and have those updates download automatically to any website where Smart Plugin Manager is active.
In order to connect your website to the Github repository, we recommend using either the GitHub Updater or Plugin Updates Checker plugin. These tools can automatically make a pending update for your custom plugin or theme visible in the wp-admin area of your site, which will then notify Smart Plugin Manager to initialize that update. Details on how to configure a plugin or theme to sync these tools can be found in their own documentation: Github Updater Setup Guide and Plugin Update Check Getting Started Guide.
Finally, when utilizing Git on a website using Smart Plugin Manager the following should be added to the gitignore file:
# smart plugin manager specific
wp-content/plugins/*
wp-content/.logs/
autoupdater_maintenance_mode_enabled.tmp
Downloadable gitignore files including these SPM-specific paths can be found in the full Git guide here.
Visual Regression Testing (VRT)
Visual regression testing (VRT) refers to the process of visually checking a series of pages before and after updates are performed for discrepancies. This is especially powerful because basics tests only look for error codes, whereas VRT can be used to determine if the website looks incorrect.
Number of URLs to Test
The default number of pages that Smart Plugin Manager checks is 10. This changed from the initial default of 20 to provide the optimal balance between the number of URLs tested and the time that the website stays offline in maintenance mode. There is an option in the SPM Settings under the heading URLs to test, which allows you to set it back to 20 if you decide it’s necessary to test more pages for a site. This setting is labeled Number of test scenarios as pictured below.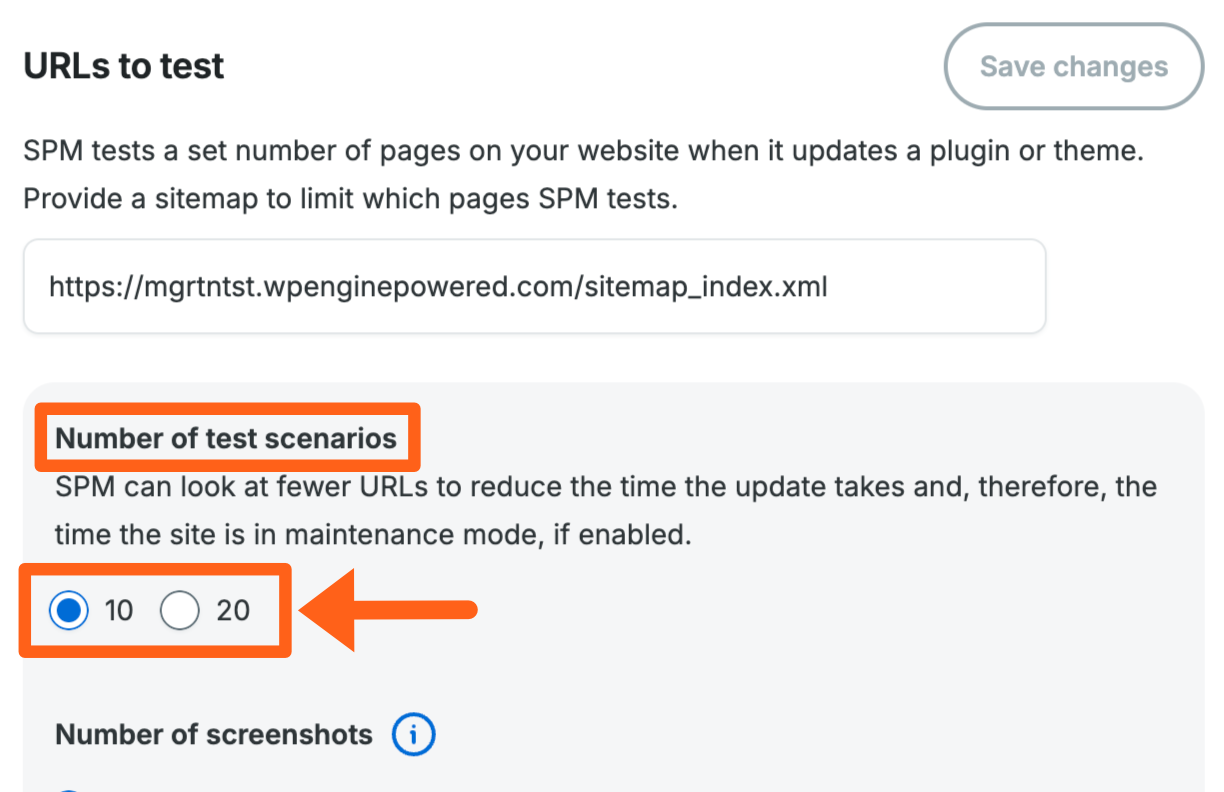
Testing Mobile and Desktop Screens
In the URLs to test section of the SPM Settings page for an environment, there is also a setting labeled Number of screenshots. This refers to the number of screenshots that you want to be tested on mobile or desktop screens.
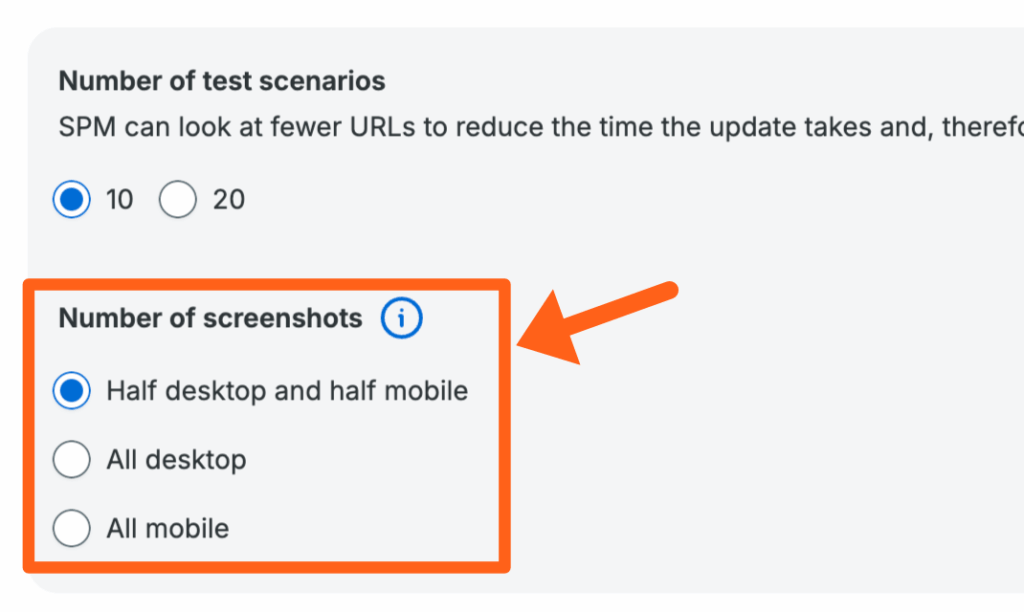
The options available are:
- Half desktop and half mobile – Selecting this option will cut your number of tested pages in half, and show desktop and mobile versions of each page. For example, if your number of test scenarios is set to 10, then 5 unique pages would be tested on desktop and mobile.
- All desktop – This option will show you the same number of desktop screenshot comparisons as test scenarios that you have selected. If your number of test scenarios is set to 10, then 10 unique pages would be tested on desktop screens.
- All mobile – This option will show you the same number of mobile screenshot comparisons as test scenarios that you have selected. If your number of test scenarios is set to 10, then 10 unique pages would be tested on mobile screens.
Sitemap Override
By default, Smart Plugin Manager will check 10 random pages, always including the homepage, after an update.
To ensure specific pages are always reviewed by Smart Plugin Manager, provide the URL to a custom sitemap you’d like Smart Plugin Manager to choose from instead. This sitemap should be entered into the SPM options as an absolute path.
Sitemap override is only available when editing options for a single environment. This setting can be found in the URLs to test section of the SPM Settings page for an environment, as pictured below.

Smart Plugin Manager checks the homepage by default. If you add a sitemap (whether through the sitemap setting or a sitemap plugin), it will check and run verification on up to 20 listed pages, including the homepage. If there are more pages listed in your sitemap than the setting for “Number of test scenarios”, it will check your homepage and a randomized 9 or 19 other pages from the entirety of the sitemap, depending on the setting you chose. If there is a failure on any page, Smart Plugin Manager will roll back the plugin updates and restore your entire site to its previous state.
Additionally, SPM can be told to ignore specific items if necessary. For example, a calendar widget is expected to vary visually but doesn’t indicate an update failure.
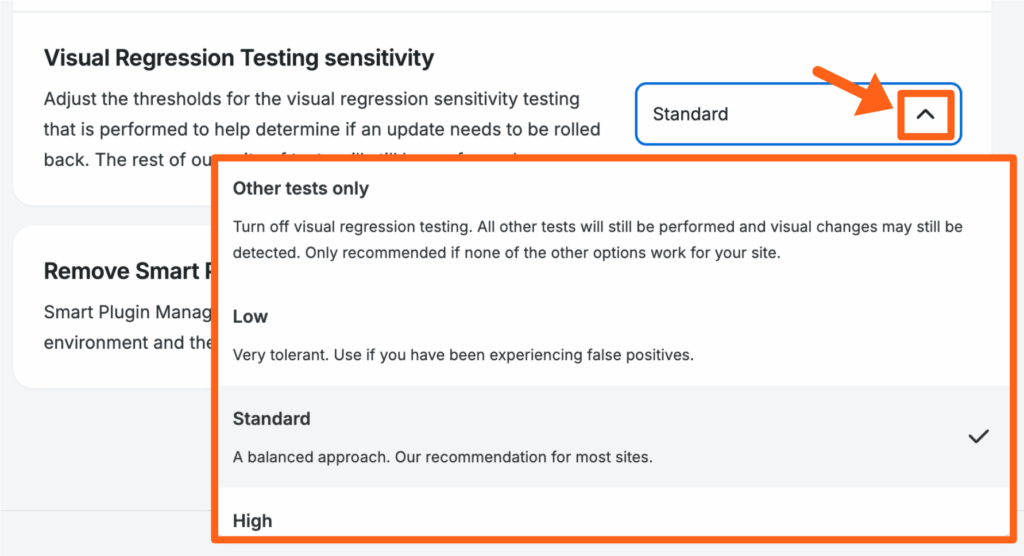
Visual Regression Testing Sensitivity
If you experience a false positive or a false negative with Visual Regression Testing, you can adjust the threshold for the visual regression testing sensitivity that is performed, to help determine if an update needs to be rolled back. The rest of our suite of tests will still be performed. The setting can be found on an environment’s SPM Settings page as shown below.
WooCommerce and VRT
For websites that have the WooCommerce plugin activated, VRT will automatically check the cart page, checkout page, my account page, up to 3 random category pages, and 13 random product pages. These specific URLs are:
/cart
/checkout
/my-account
/product-category/your-category-name
/product/your-product-name
In the case that you are not utilizing the above product or category URL structure, WooCommerce will be queried first for current URLs using the IDs (EX: domain.com/?product=111.)
If you prefer to override the VRT for these default URLs, this can be done simply by using a custom sitemap.
VRT Screenshot Comparison
To compare screenshots from visual regression testing in your SPM reports:
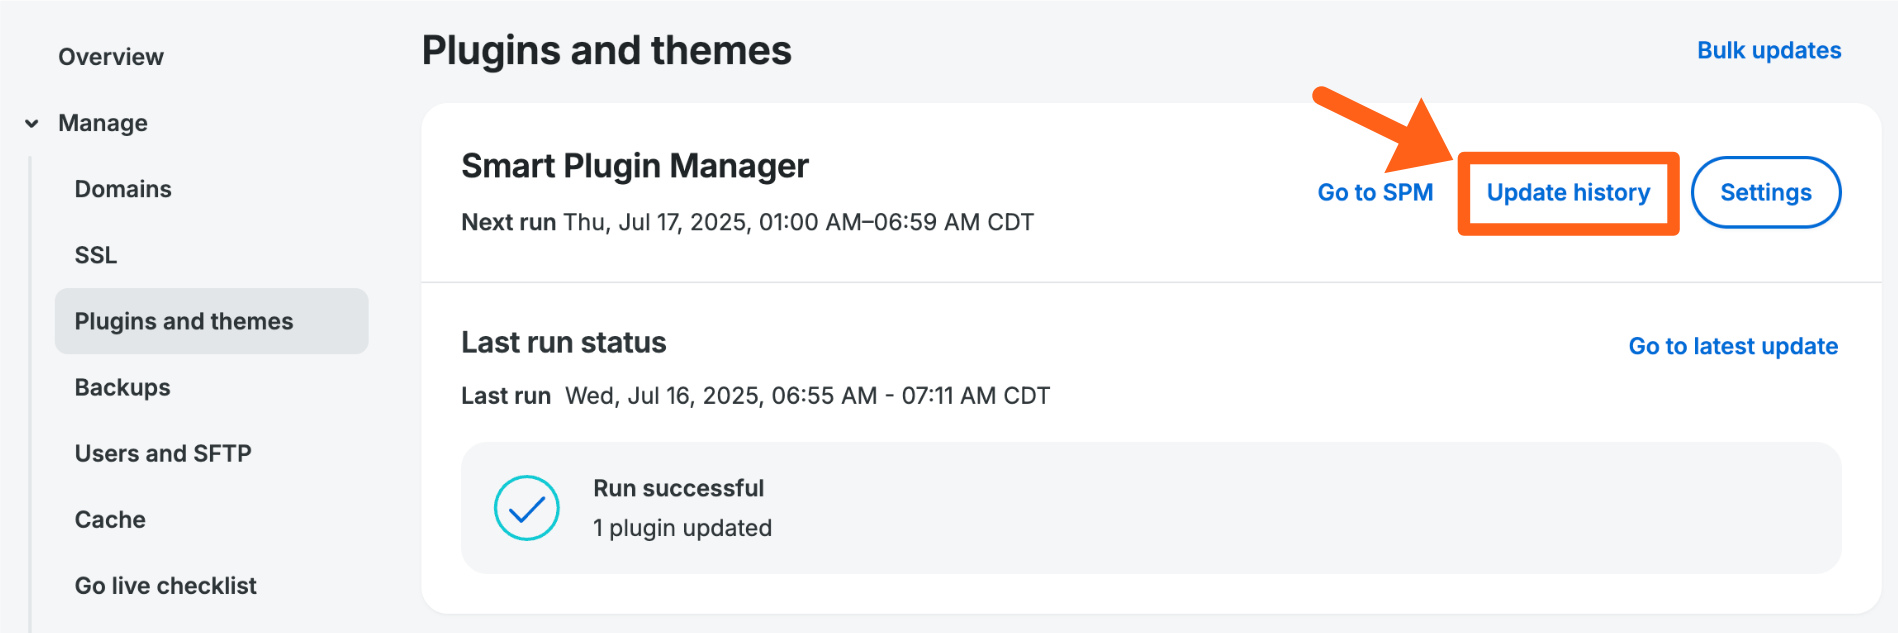
- Go to the Smart Plugin Manager page in the User Portal and select Open update history from the three dot menu next to an environment.
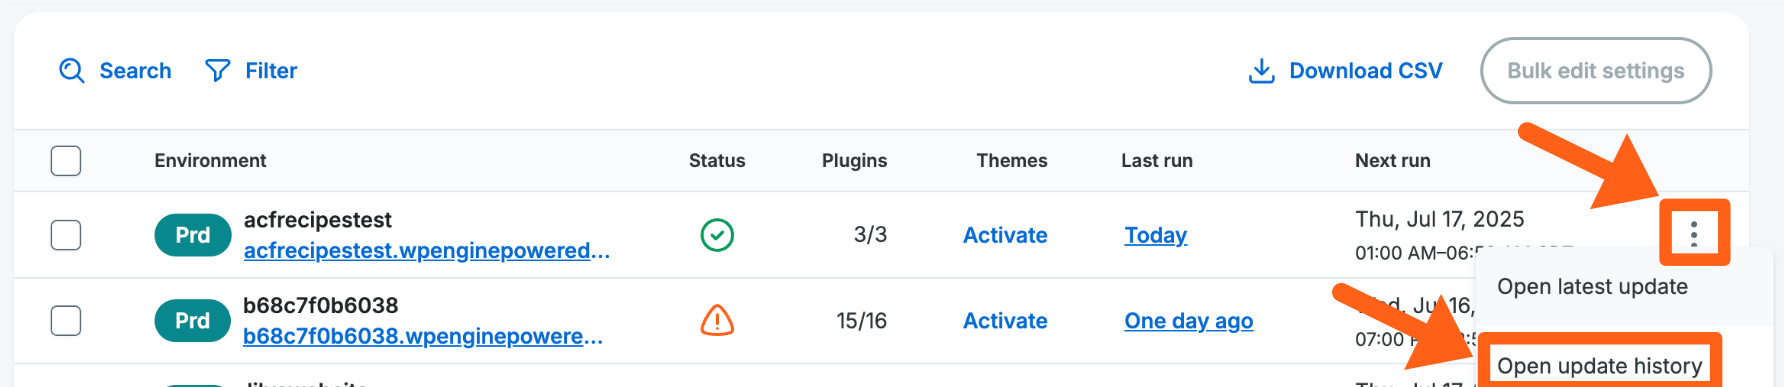
- You can also access the update history from the plugins and themes page for an environment.
- You can also access the update history from the plugins and themes page for an environment.
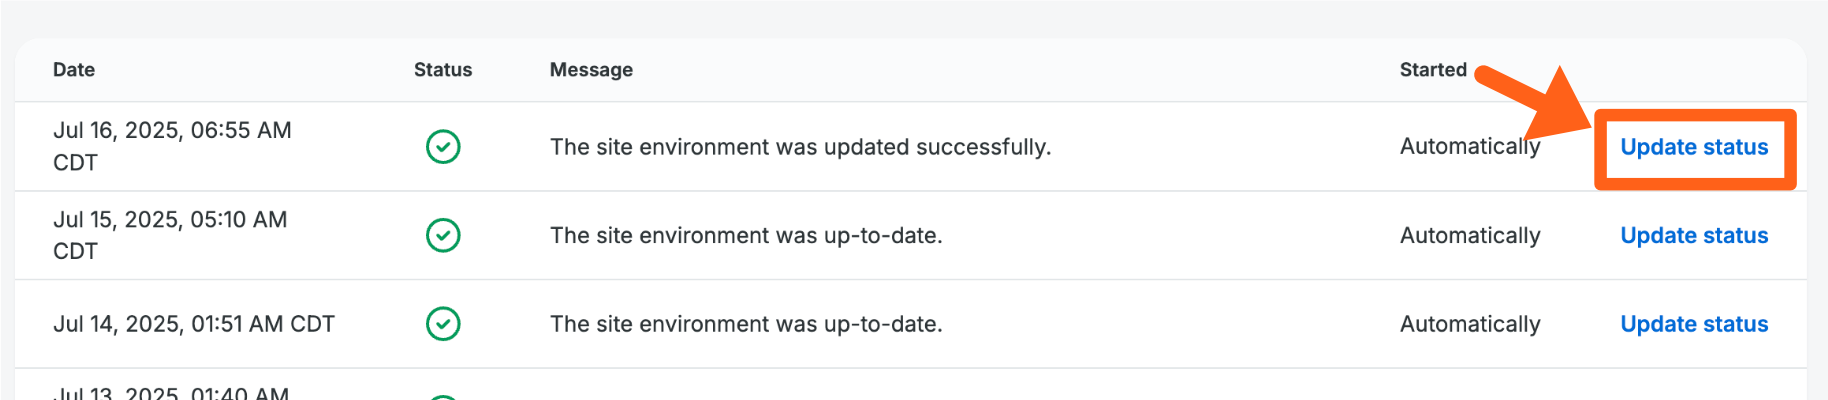
- Select Update status next to the report date that you want to view.
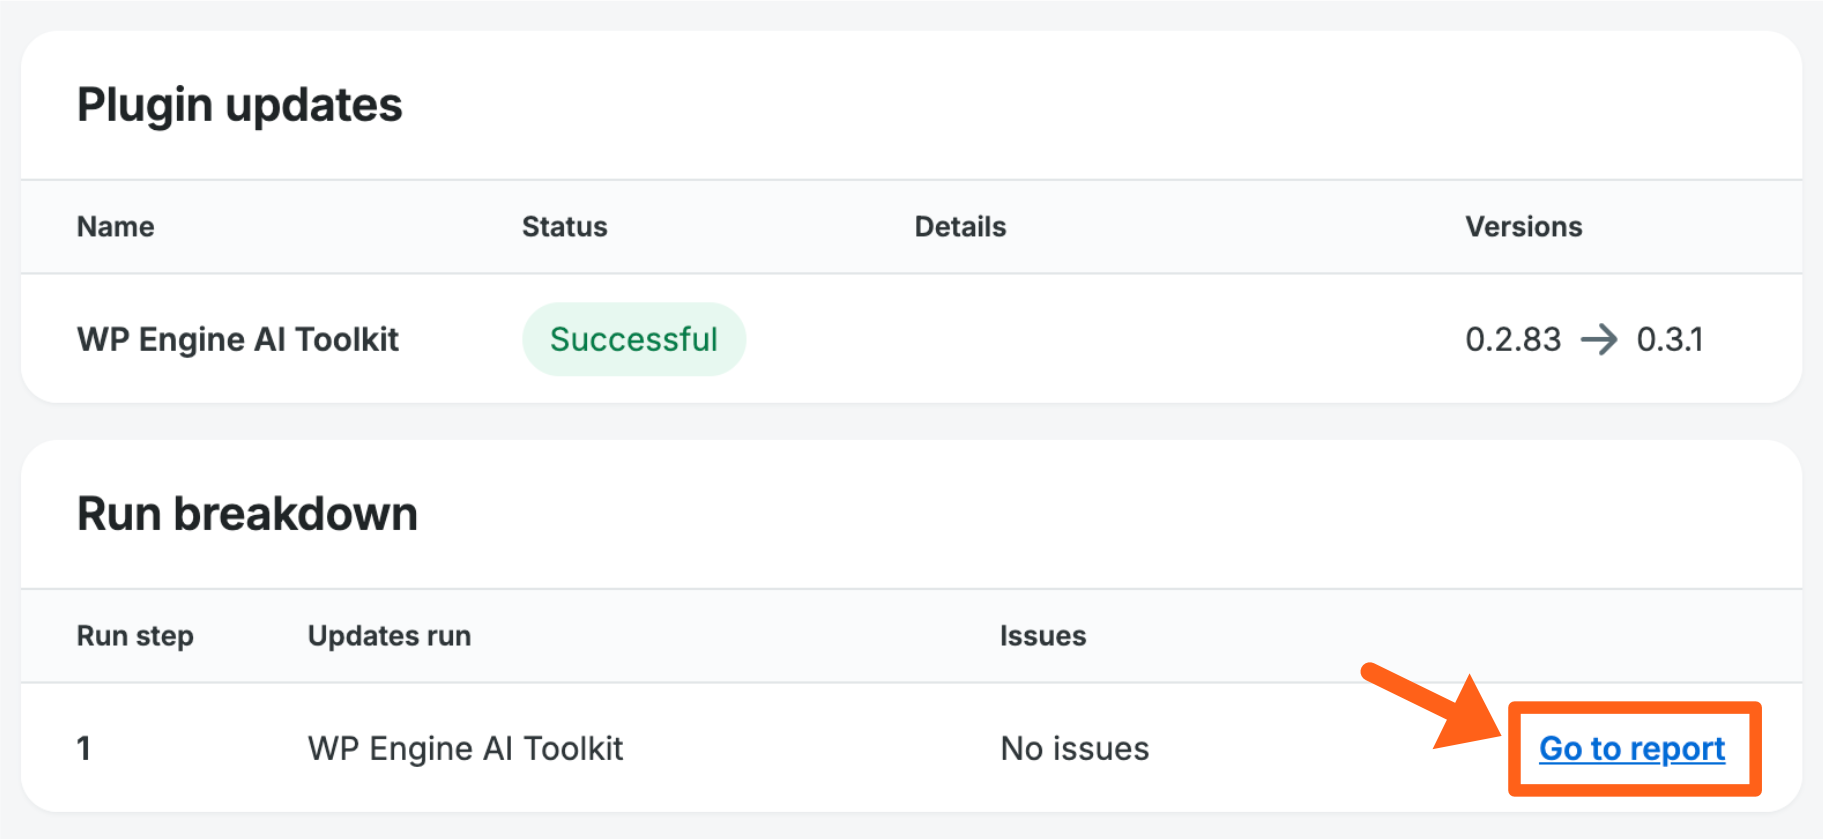
- Click on any of the Go to report links in the table.
- In the report, scroll down to the Screenshots section and click View next to any of the pages listed, to view screenshot comparisons for that page. The Type column will specify whether the screenshots where taken on a mobile or desktop screen.
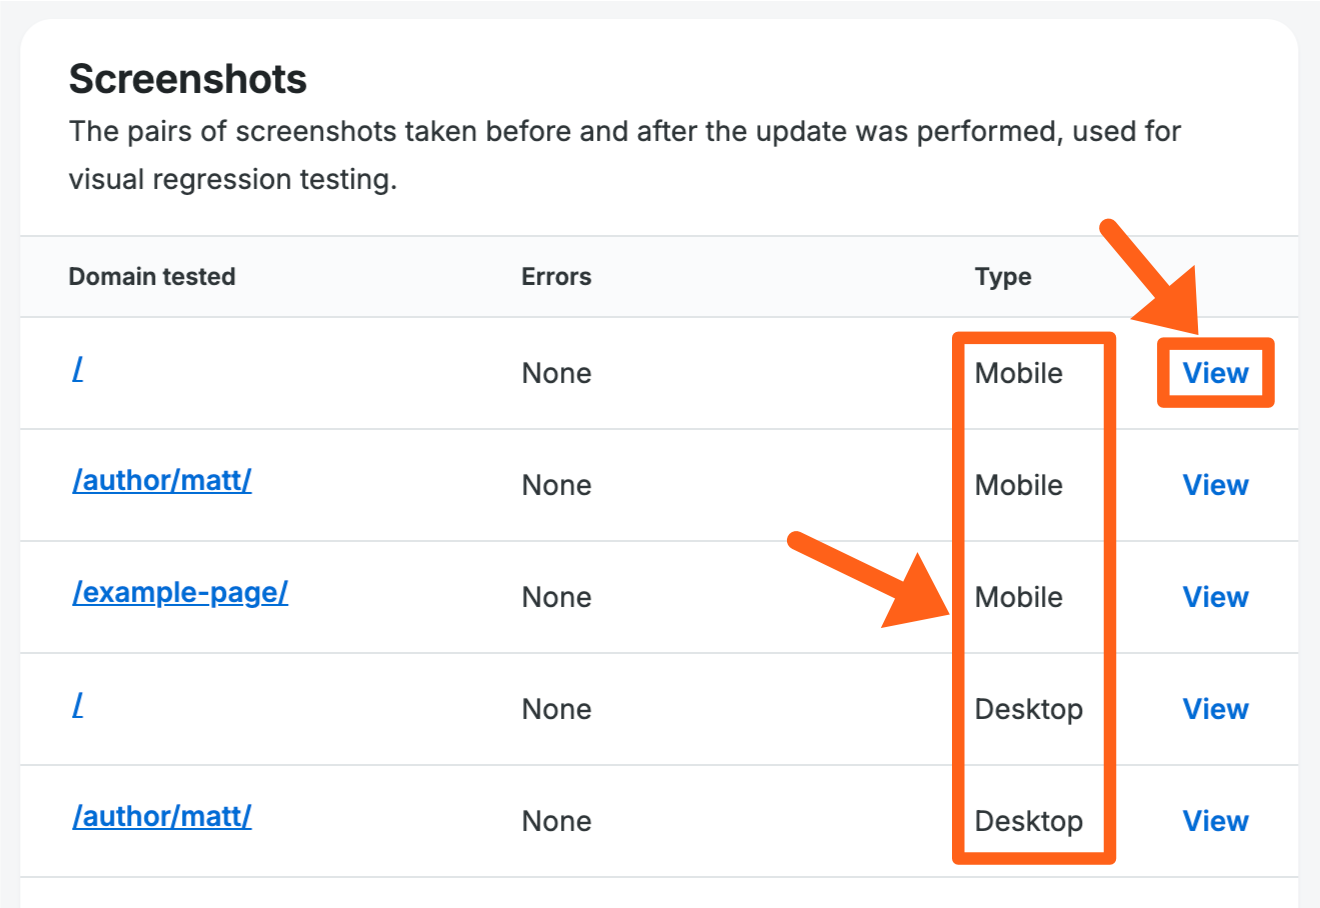
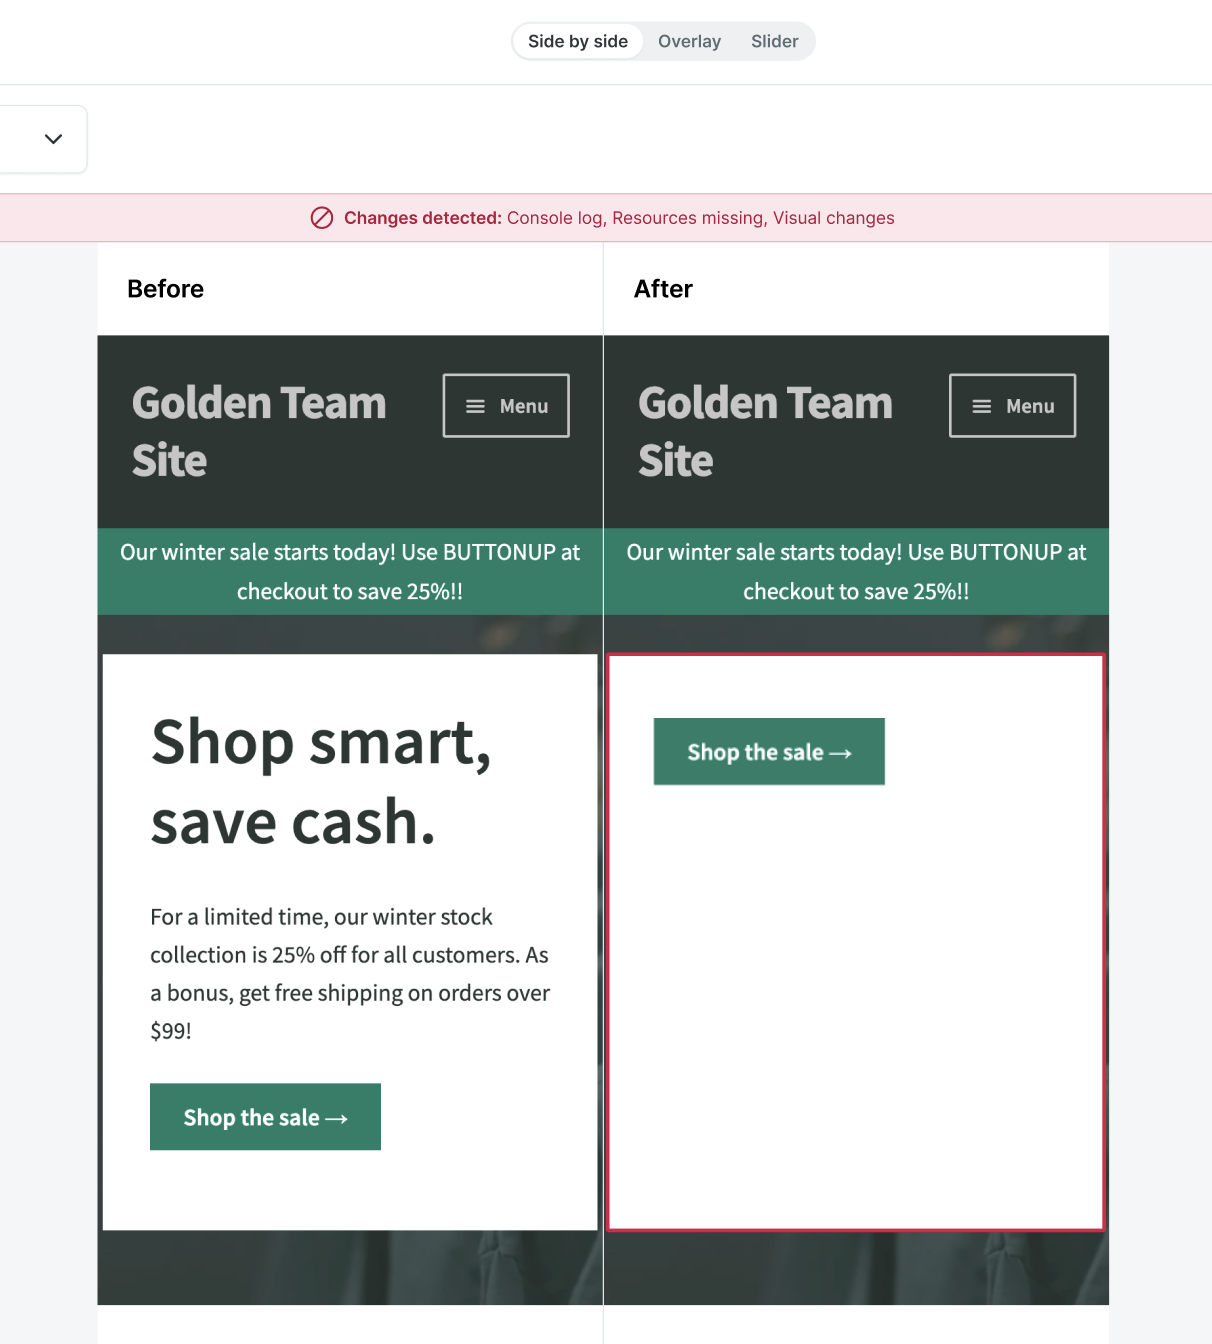
- You’ll see screenshots from before the SPM updates ran, and after the SPM updates ran. You’ll see a success message above the screenshots if insignificant changes were detected, or a failure message if significant changes were detected causing the SPM updates to be reverted. Below is an example of screenshots from a mobile screen, where significant changes were detected after plugins were updated.
Screenshot Comparison Types
There are multiple ways that you can compare screenshots for SPM visual regression testing including side by side, overlay, and slider. Follow the steps in the previous section to get to the screenshots popup and then use the selector in the top right to select one of the comparison types outlined below.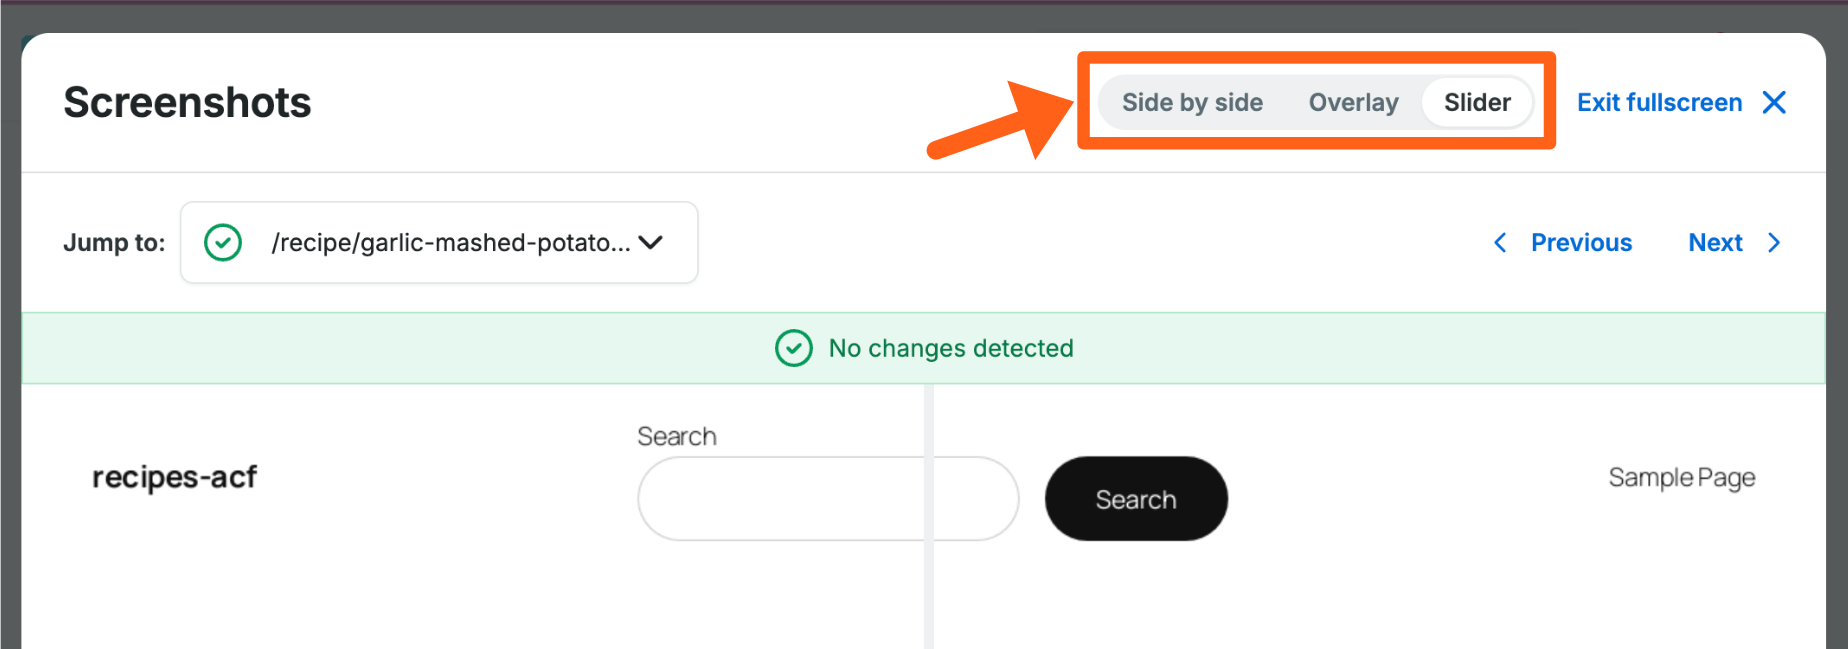
- Side by side – The side by side comparison simply places the before and after screenshots of the web page next to each other for you to visually compare.

- Overlay – The overlay comparison puts the before and after screenshots on top of each other with some opacity so that you can more easily see changes such as layout shifts. If there are no changes detected then the overlay should just look like a single screenshot.
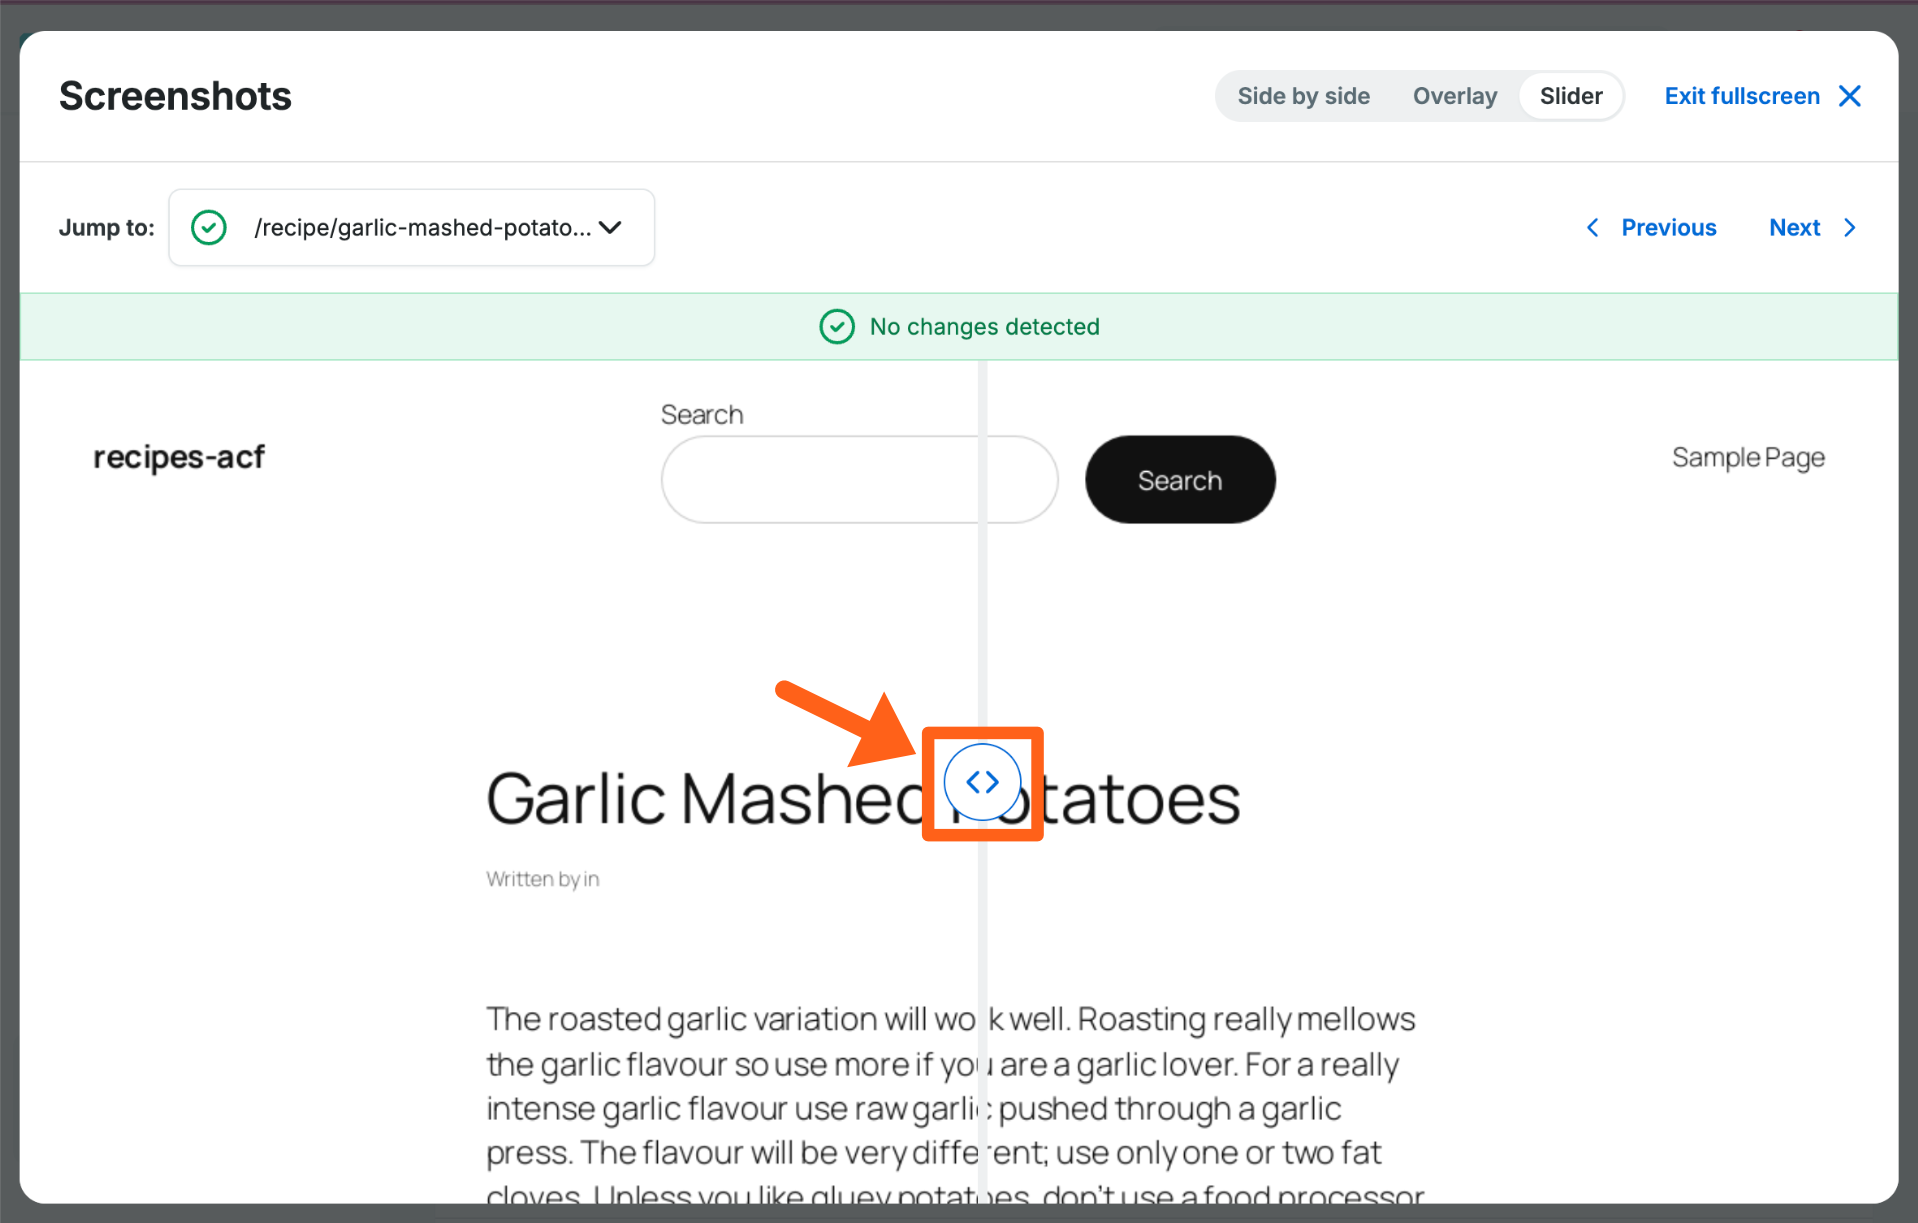
- Slider – The slider comparison also puts the before and after screenshots on top of each other, but adds a slider handle that you can grab in the middle of the images. You’ll see the before screenshot on the left side of the slider handle, and the after image on the right side of the slider handle. You can grab and drag the slider handle to the left to see more of the after screenshot, and drag it to the right to see more of the before screenshot.
Enable Smart Plugin Manager
Customers on shared WP Engine plans can add Smart Plugin Manager through the Modify Plans page. Customers on Premium plans, please reach out to your Account Manager through this page.
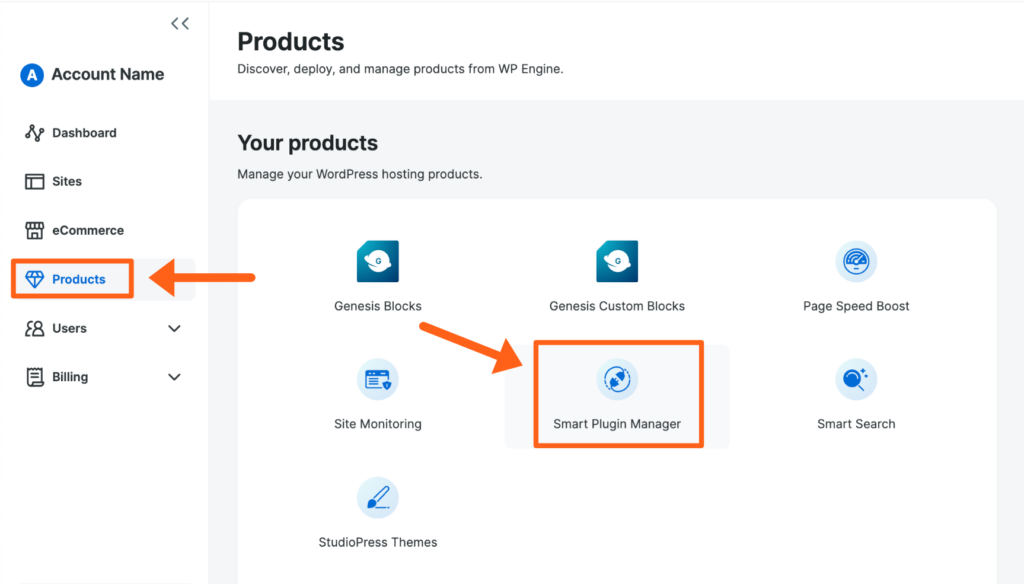
After purchasing the product extension, enable Smart Plugin Manager on the environment of your choice via the User Portal:
- Log into the User Portal
- Select Products from the main sidebar menu
- Click Smart Plugin Manager under Your products
- The direct link to this page is: https://my.wpengine.com/products/smart_plugin_manager
- Click Select or Add Environments
NOTE
The number of remaining licenses will display at the top left of this page.
- Select any environments you’d like to enable Smart Plugin Manager on.
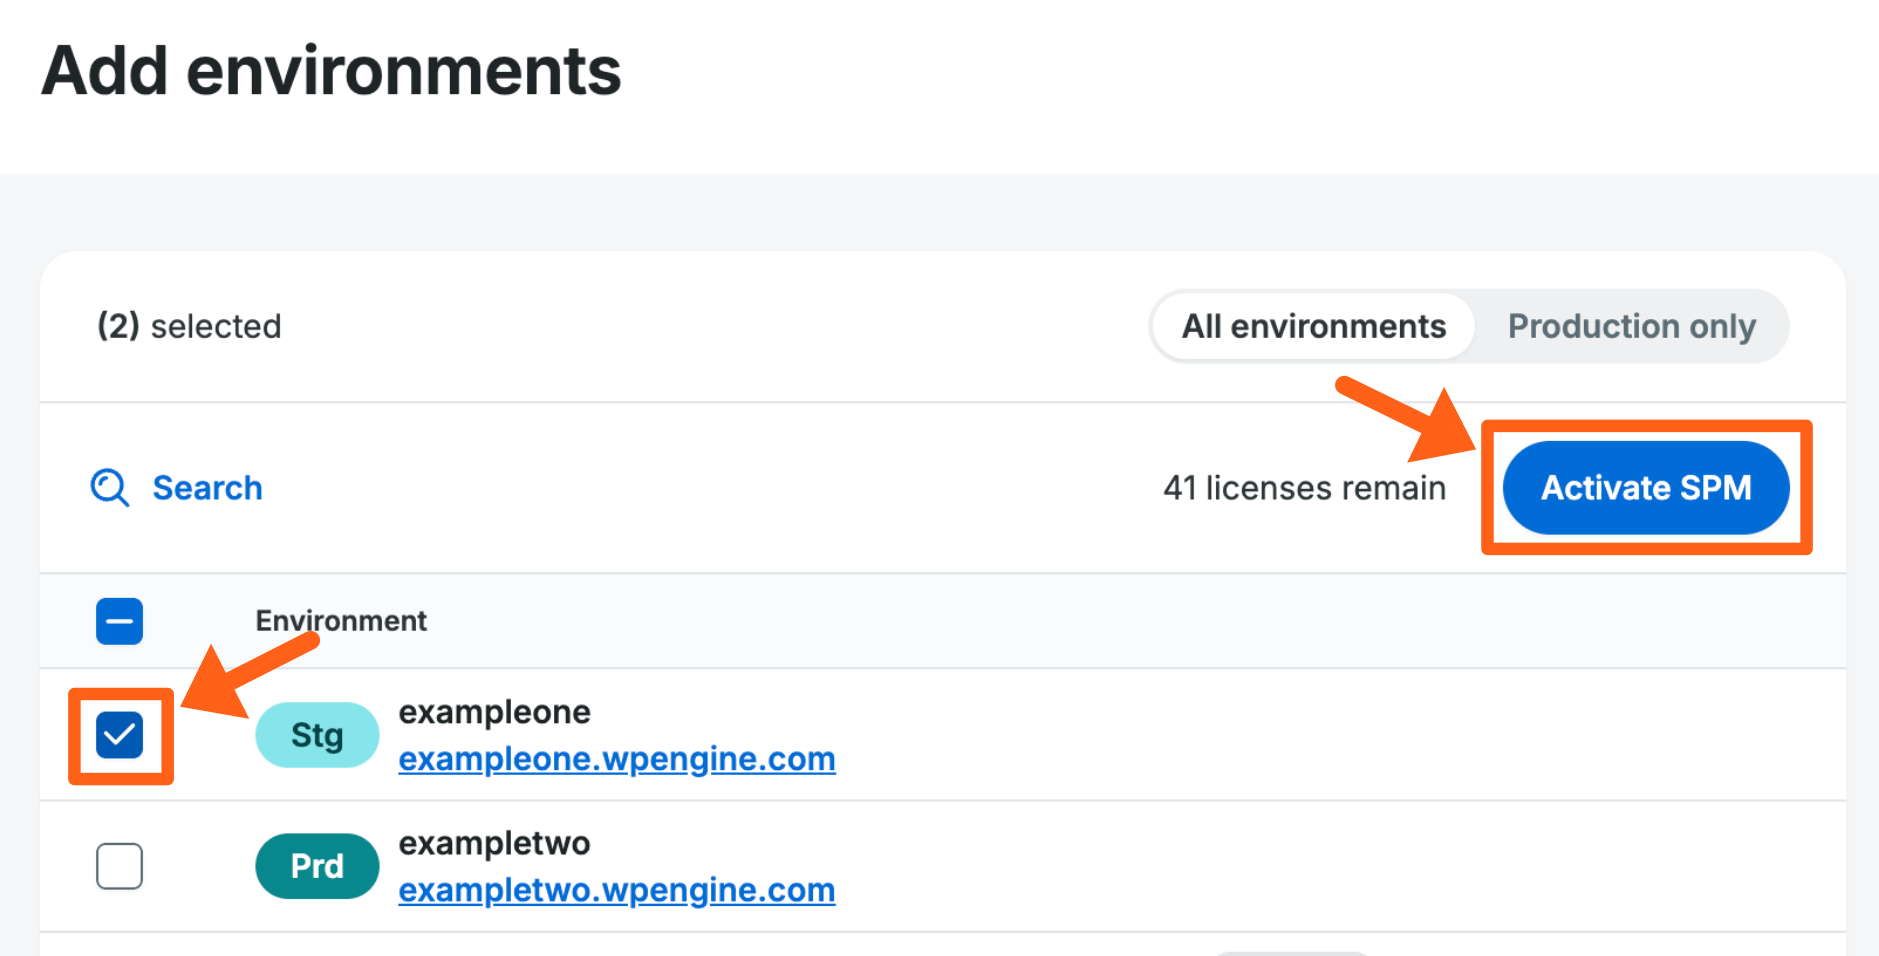
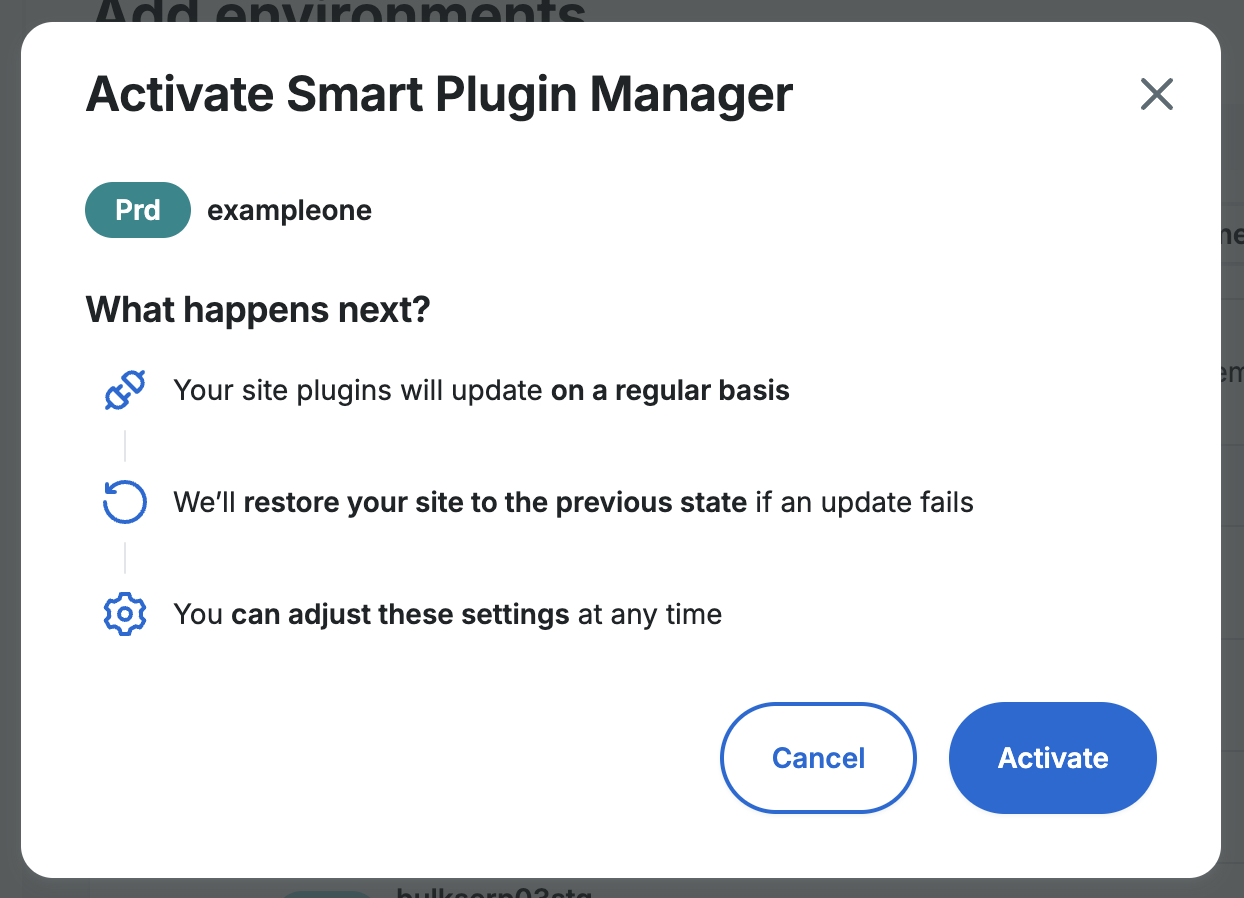
- Click Activate SPM.
- Click the Activate button on the popup.
- The “WP Engine Smart Plugin Manager” WordPress plugin will automatically be installed on these environments.
Smart Plugin Manager Status
Status by environment can be viewed at a glance from the Site Monitoring page in the User Portal.
- Log in to the User Portal
- Select Products from the left sidebar menu
- Click Smart Plugin Manager under Your products
- Locate the environment name
Statuses shown here are the following:
- Check – Plugins are up to date
- X – Plugins not updated
- Warning – There was an issue updating plugins
- Clock – Next run soon
- Plus – Activate an SPM license on this environment
A more detailed report about the previous Smart Plugin Manager run can be found by accessing the menu for a specific environment. This report contains the same information that is sent via email notice when the process completes.
- Click the 3 dot menu icon to the right
- Select Open latest update to see the most recent process details, or select Open update history to see a list of previous updates.

The status page will show if the updates failed or succeeded and if a rollback was necessary. The page also details which plugins were updated and to which version. This status page only shows the previous round of updates and is not cumulative.
Click any section to expand and view more information.
CSV Download
A comprehensive CSV can be downloaded from the SPM management page, by clicking Download CSV. This file contains environments and plugin names, as well as plugin/theme version, operation performed, and finally update date and time.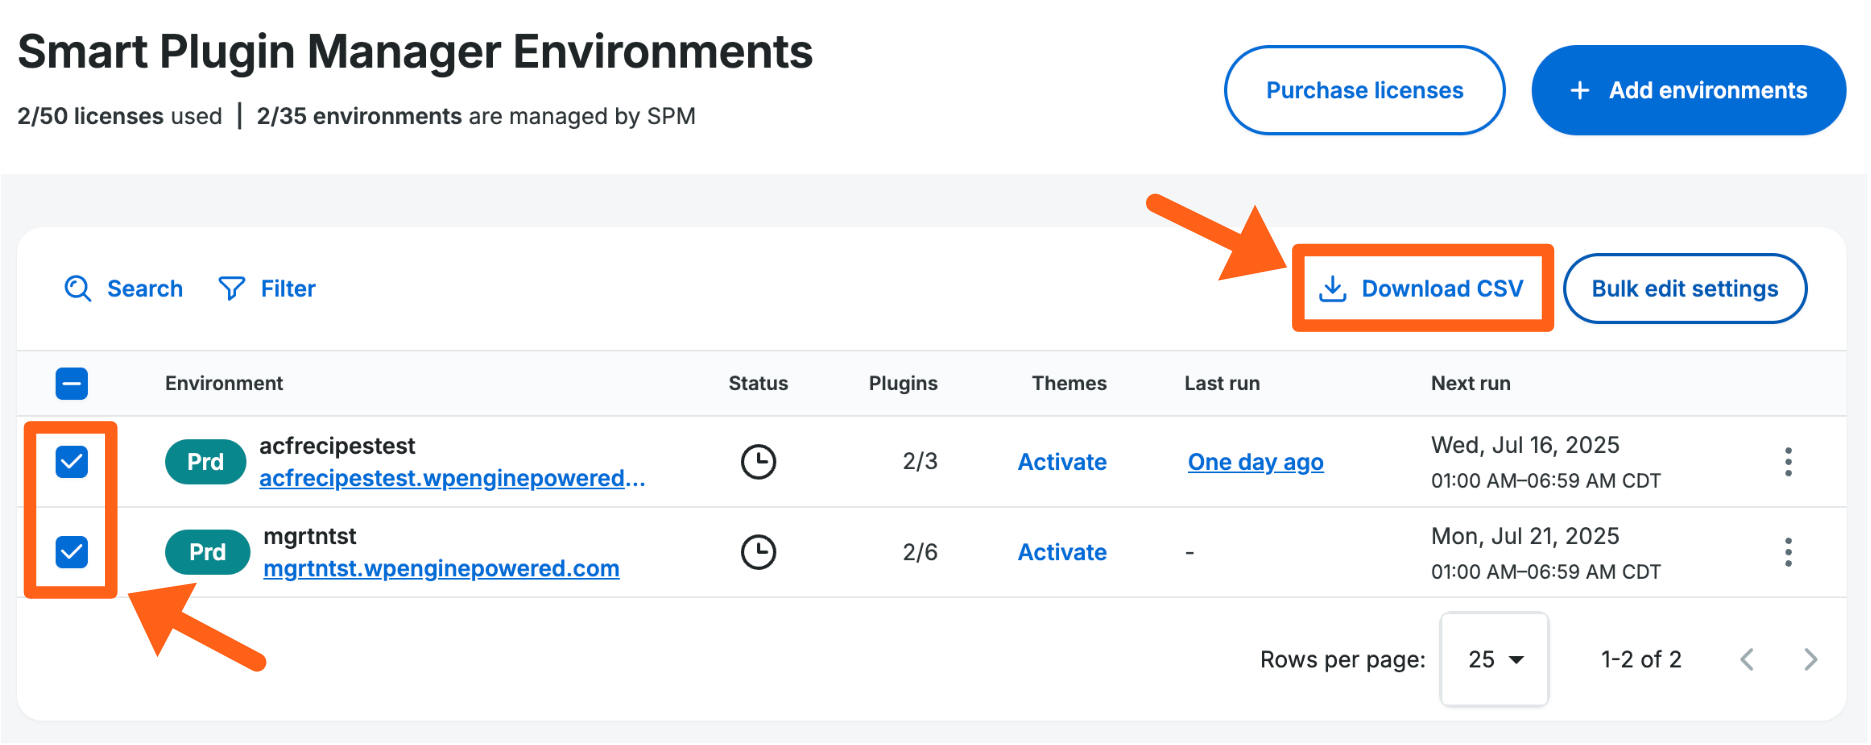
This CSV can also be downloaded from the Needs Updates and Bulk Updates pages.
Smart Plugin Manager Settings
There are two ways to access the settings for Smart Plugin Manager in the User Portal. The method you use depends on if you wish to edit the settings for one environment at a time, or multiple.
NOTE
Only full and owner level users can adjust SPM settings.
- Log into the User Portal
- Select Products from the left sidebar menu
- Click Smart Plugin Manager under Your products
- Check off environment(s) from the list to modify settings
- Alternatively you can click a single environment name to manage 1 environment
- Click Bulk edit settings
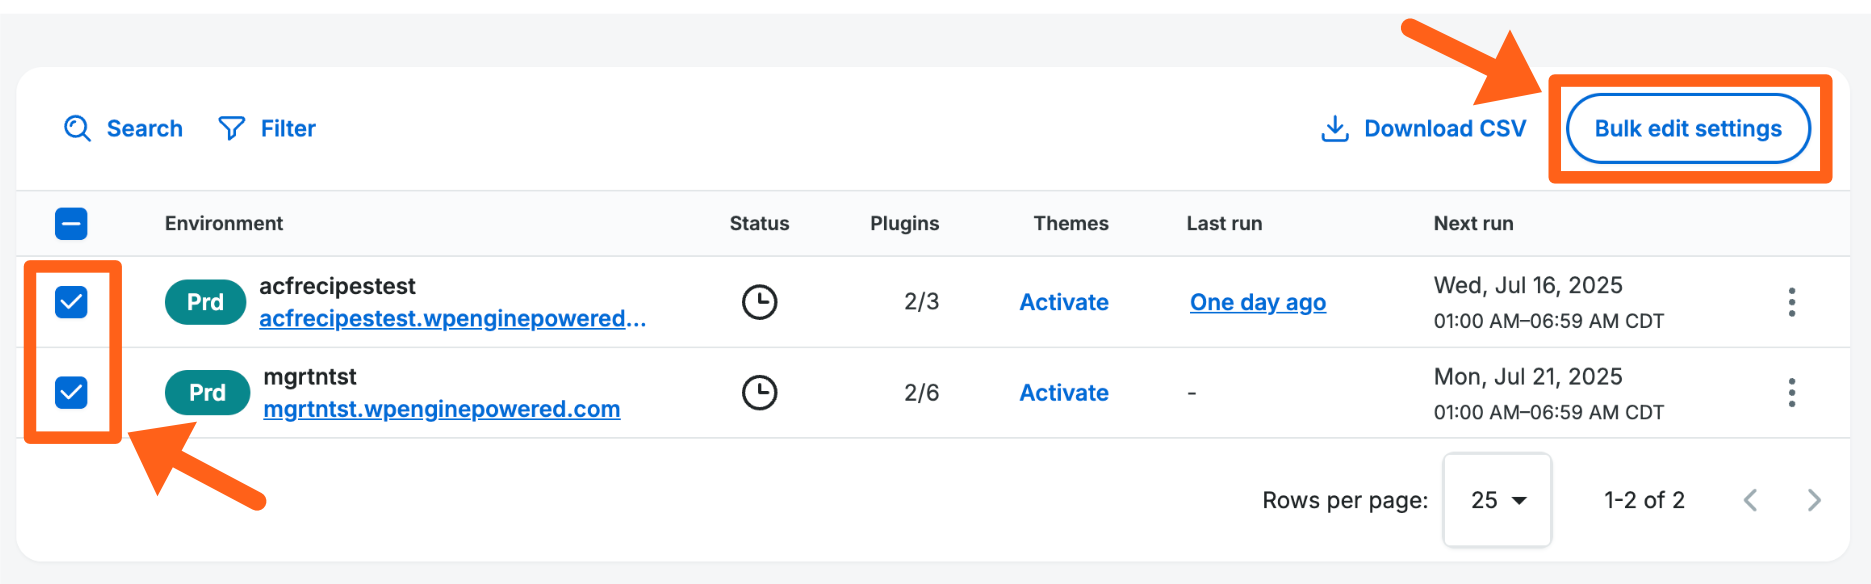
The available Smart Plugin Manager settings are as follows. Almost all settings can be updated for multiple environments in bulk.
- Update schedule
- Notification emails
- Auto rollback
- Maintenance mode
- Managed plugins
- Hidden content
- Managed themes
- Sitemap override *
- Visual regression testing sensitivity
- Release license
* Only available when selecting a single environment.
Update Schedule
Select a timeframe to begin the update process. It’s recommended to choose a low traffic period for your website. Scheduling can be set for individual environments or in bulk.
- Update frequency: Choose to begin updates Daily, Weekly, or Monthly.
- Days of the week: Select which days of the week updates may be performed.
- Update window: Choose a 6 hour timeframe in which to start performing updates. Updates may not complete during this time frame, especially for larger sites. Times are in your local time, or can be toggled to reference UTC. Note: Choosing a time-slot that overlaps with the next day may cause updates to be run on unselected days.
- Review selected days: View a calendar of future updates based on your selected schedule.

NOTE
From time to time, SPM may have too many updates scheduled in a time slot, and some updates are skipped. If this happens then a site receives a higher priority during the next run to make sure it doesn’t miss its schedule twice in a row.
Notification Emails
Enter email addresses, separated by commas, to receive notifications. Notifications can be sent for successful updates, or only if an update fails.
Auto Rollback
Smart Plugin Manager creates a backup using WP Engine’s automated backup and restore system prior to making any changes to the website. SPM will restore to this previous version (“roll-back”) if it determines using visual regression testing or error codes that the updated version may have altered the website.
Choose whether or not the rollback process should be automatic by toggling.
Test Updates on Staging
This feature lets you choose a staging environment that will be the source of versions for plugin and theme updates.
Note
When you have Test updates on staging enabled, the SPM update window will now be a more precise and predictable 2 hour window instead of the usual 6 hour window.
Prefer to watch a video?
Was this video helpful?
Before enabling this feature review the following notes:
SPM will update the environment (target) to the versions currently present on the selected staging (source) environment.
SPM is not required to be active on the source environment.
- The source environment can be managed manually or with SPM.
- Even though it’s not required, managing the staging environment with SPM ensures that non-working versions of plugins and themes are auto rolled back by SPM.
Selecting a source environment does not automatically enable SPM on the source environment.
There is no guarantee that an update that was successfully applied on the source environment will pass on the target environment, but the risk is much lower.
- It is very important to keep both environments synchronized.
Updates on the source environment do not automatically trigger SPM to run on the target environment.
- SPM will run at its regularly scheduled times based on the settings for each environment.
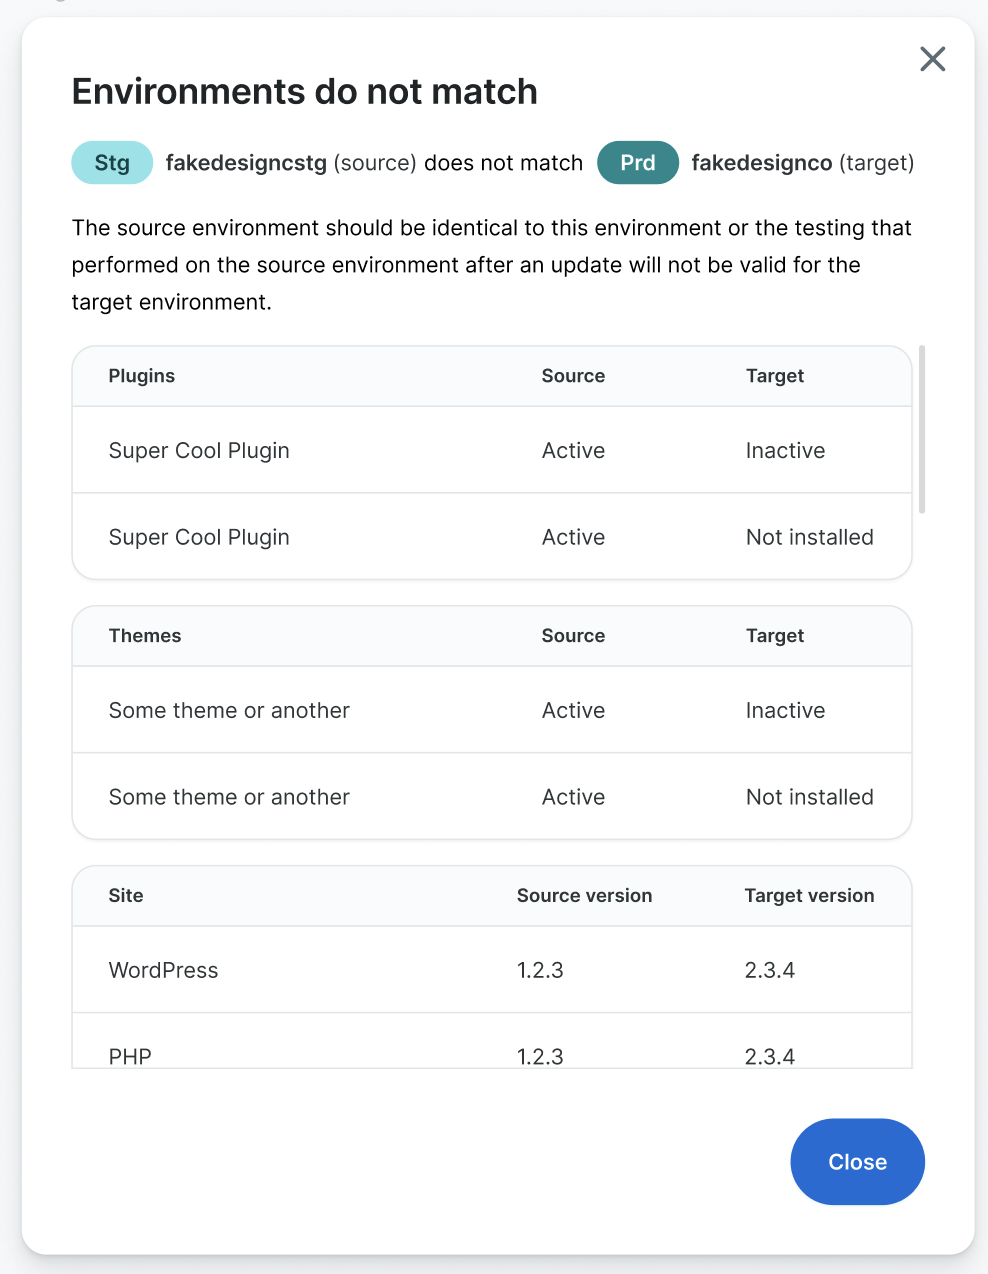
The source environment that you choose for testing must be identical to the current environment based on the following criteria:
- The same plugins must be installed and active.
- The same themes must be installed and active.
- The environments must be on the same PHP versions (as shown in the Overview page for an environment).
- The environments must be on the same WordPress major and minor versions. The first 2 numbers must match which are the major and minor versions as shown in the examples below:
- Matching example: source(6.6.1), target(6.6.2)
- Mismatched example: source(6.6.1), target(6.7.1)
Enable Test Updates on Staging
- Go to the SPM product page in the User Portal.
- Select an environment (Ideally this will be a production environment that you want to protect with this feature).
- Click Edit Settings in the top right.
- Scroll down to the Test updates on staging section.
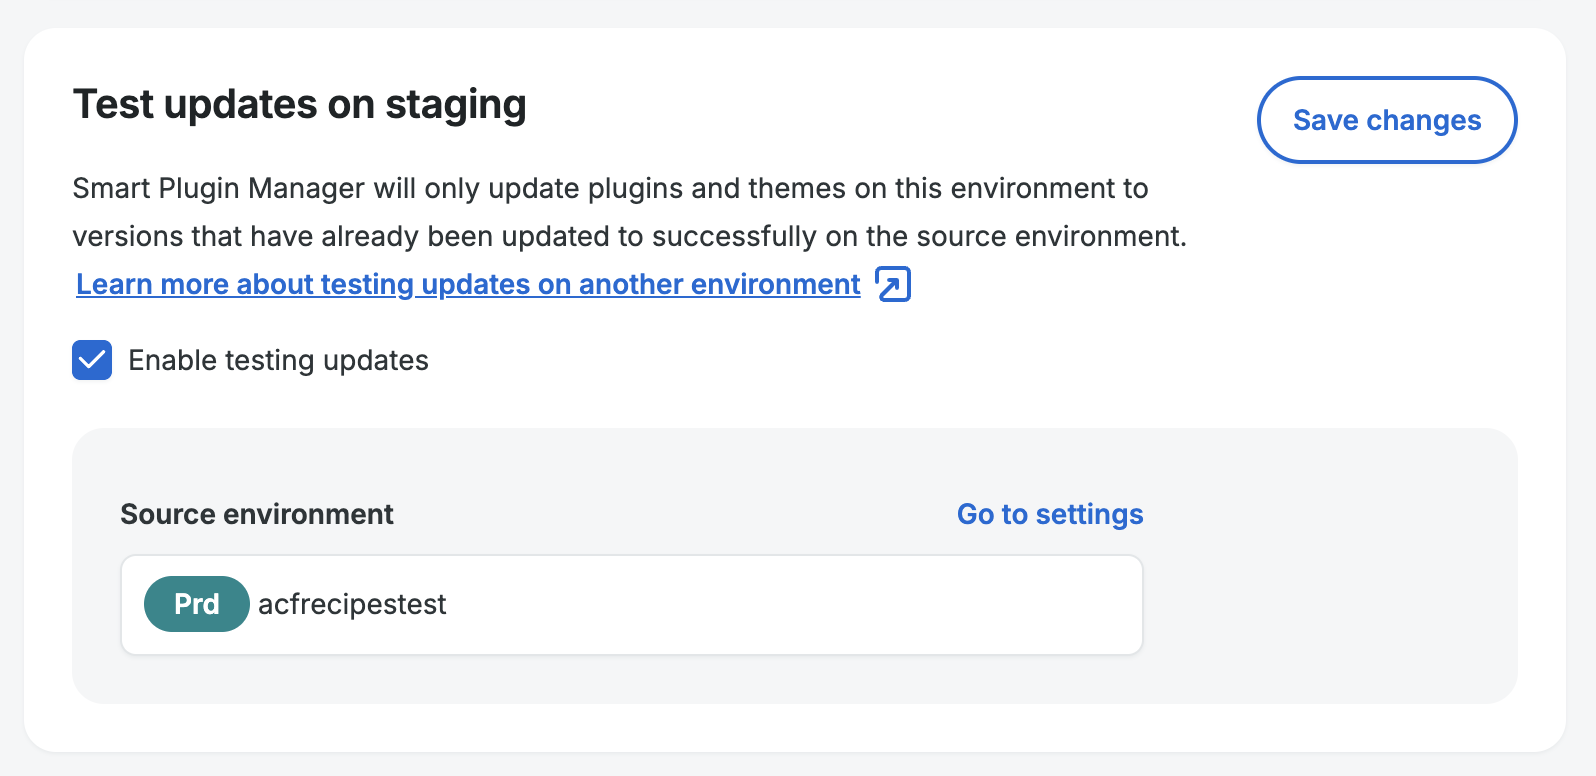
- Check the Enable testing updates checkbox.
- Click the environment select box under Source environment and select an environment to be used as the source for plugin and theme versions.
- Click the Save changes button in the top right.
- If the environments are not identical based on the above criteria, you will be shown a popup with a detailed list of the items that do not match between the two environments.
- If the environments are not identical based on the above criteria, you will be shown a popup with a detailed list of the items that do not match between the two environments.
Maintenance Mode
Turn maintenance mode on or off to protect against data loss or missed orders while Smart Plugin Manager is updating plugins.
Site visitors will see a default “Undergoing maintenance” page, temporarily denying any traffic to the site.
If you wish to customize this maintenance page copy the file wp-content/plugins/autoupdater/tmpl/offline.tmpl.php to wp-content/autoupdater/tmpl/offline.tmpl.php
and adjust the styling within it. It is not recommended to use any PHP code in this file.
To ensure maintenance mode can enable and disable correctly, Smart Plugin Manager IPs should be allowed in any additional caching layers (Sucuri, WP Optimize plugin, NitroPack, Cloudflare, etc).
Managed Plugins
Select which plugins Smart Plugin Manager should attempt to update or ignore. By default, Smart Plugin Manager will attempt to update all plugins. If you have selected multiple environments then all plugins will display, however only those plugins actually installed on an environment will be impacted by changing this setting.
To edit the plugins list:
- On the SPM settings page for an environment click the edit button next to Plugins in the Plugins and themes managed section.

- Check the boxes next to all plugins that you want to be updated by SPM.
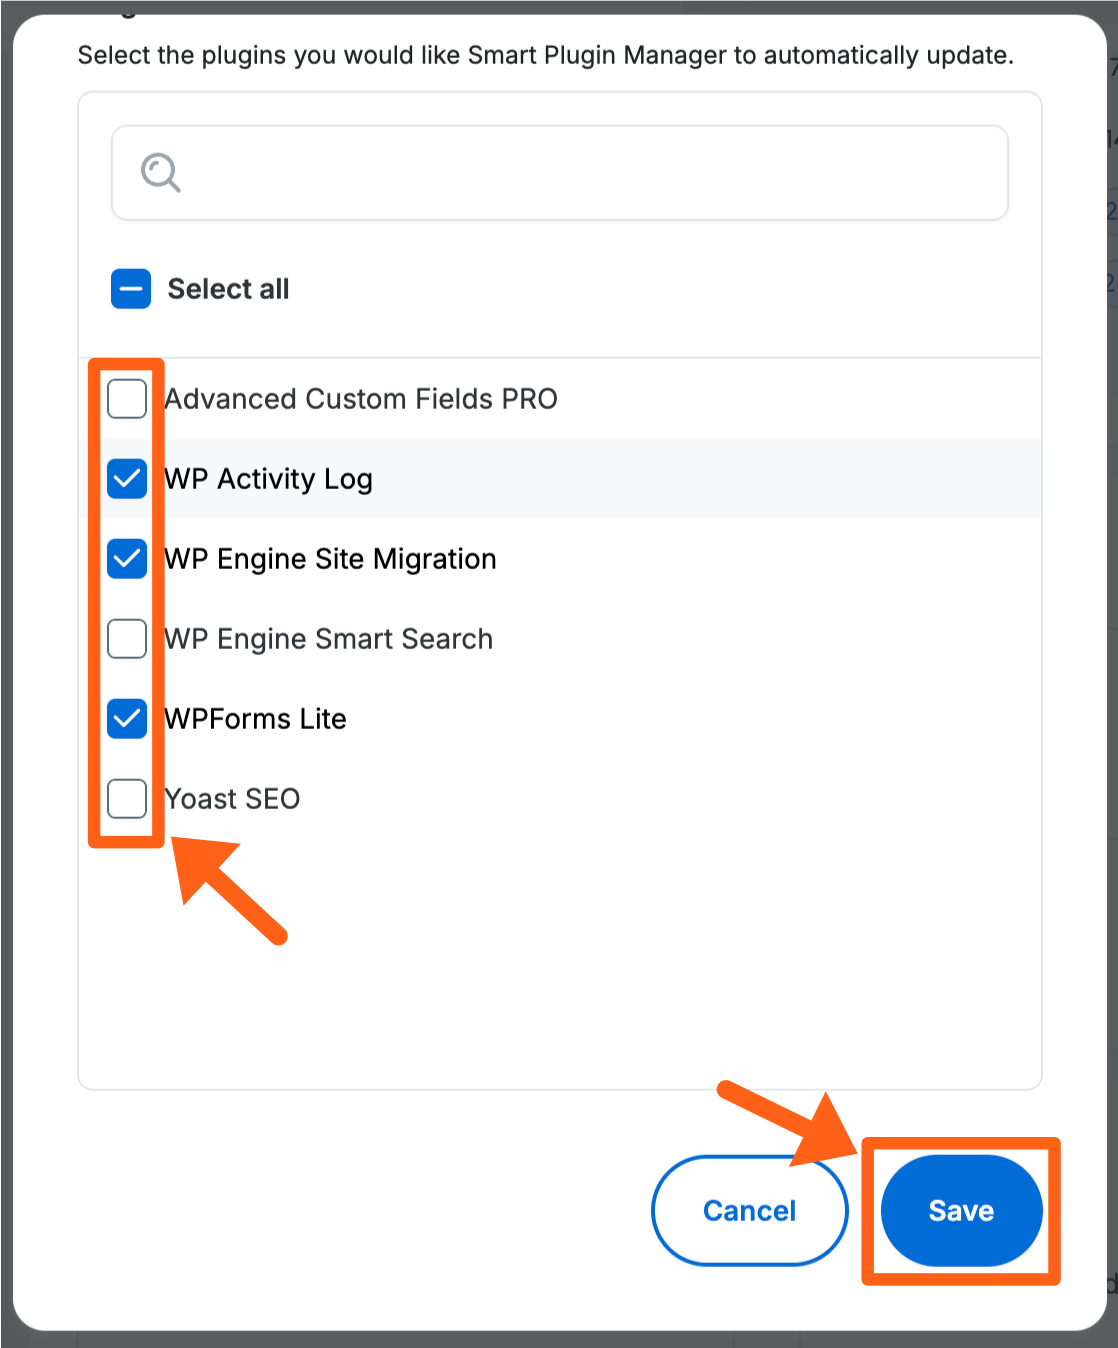
- Scroll down within the popup and click the Save button to save your changes.
Hidden Content
Smart Plugin Manager uses visual regression testing to help determine if an update failed. Use this to hide content that may change regularly, such as ads, recent posts, or calendars.
This field accepts CSS selectors separated using the Enter or Return key.

Managed Themes
Using the same processes and features as plugin updates, Smart Plugin Manager can also update themes. SPM can update themes that are publicly available on the WordPress repo, and cannot update any private themes or themes that require manual updates directly from a developer.
When updating a theme all of its files are typically overwritten, therefore custom content should be placed in a child theme. This is a default function of WordPress and is important to keep in mind when activating SPM managed theme updates.
Managed theme updates are disabled by default. To enable managed theme updates, simply click Activate, then select the themes that should be managed from the list.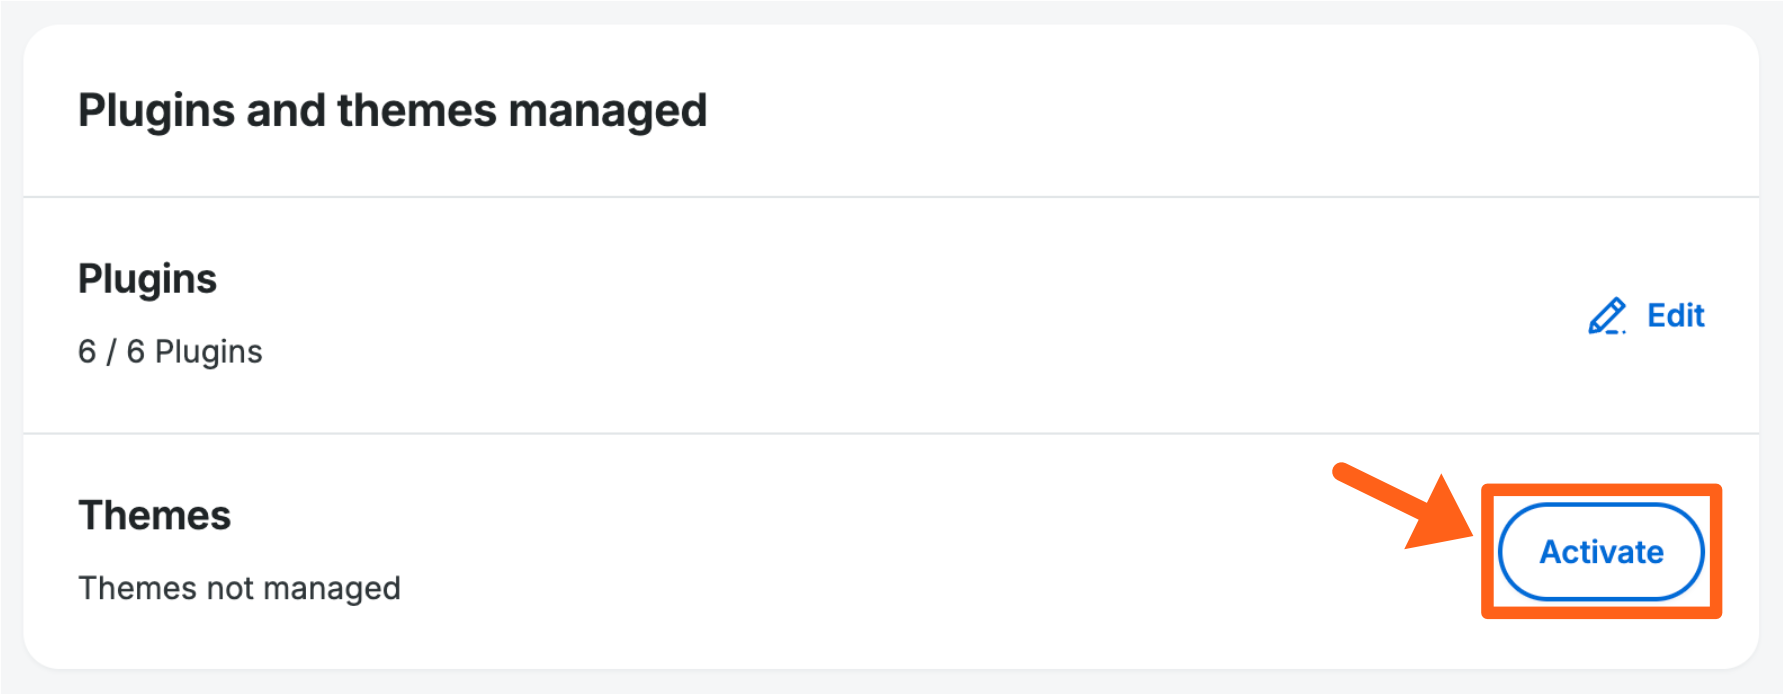
To edit the themes that are managed:
- On the SPM settings page for an environment click the edit button next to Themes in the Plugins and themes managed section.
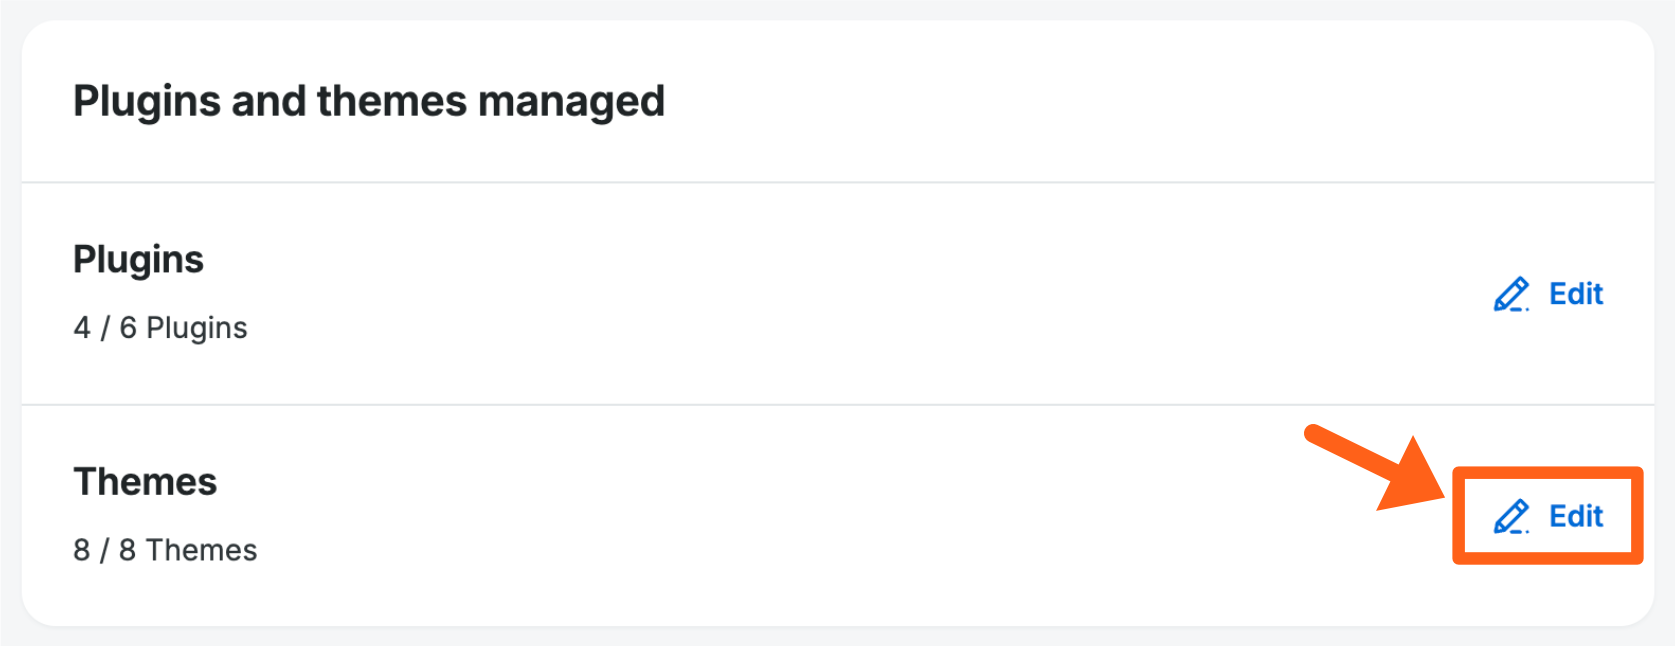
- Check the boxes next to all themes that you want to be updated by SPM.

- Scroll down within the popup and click the Save button to save your changes.
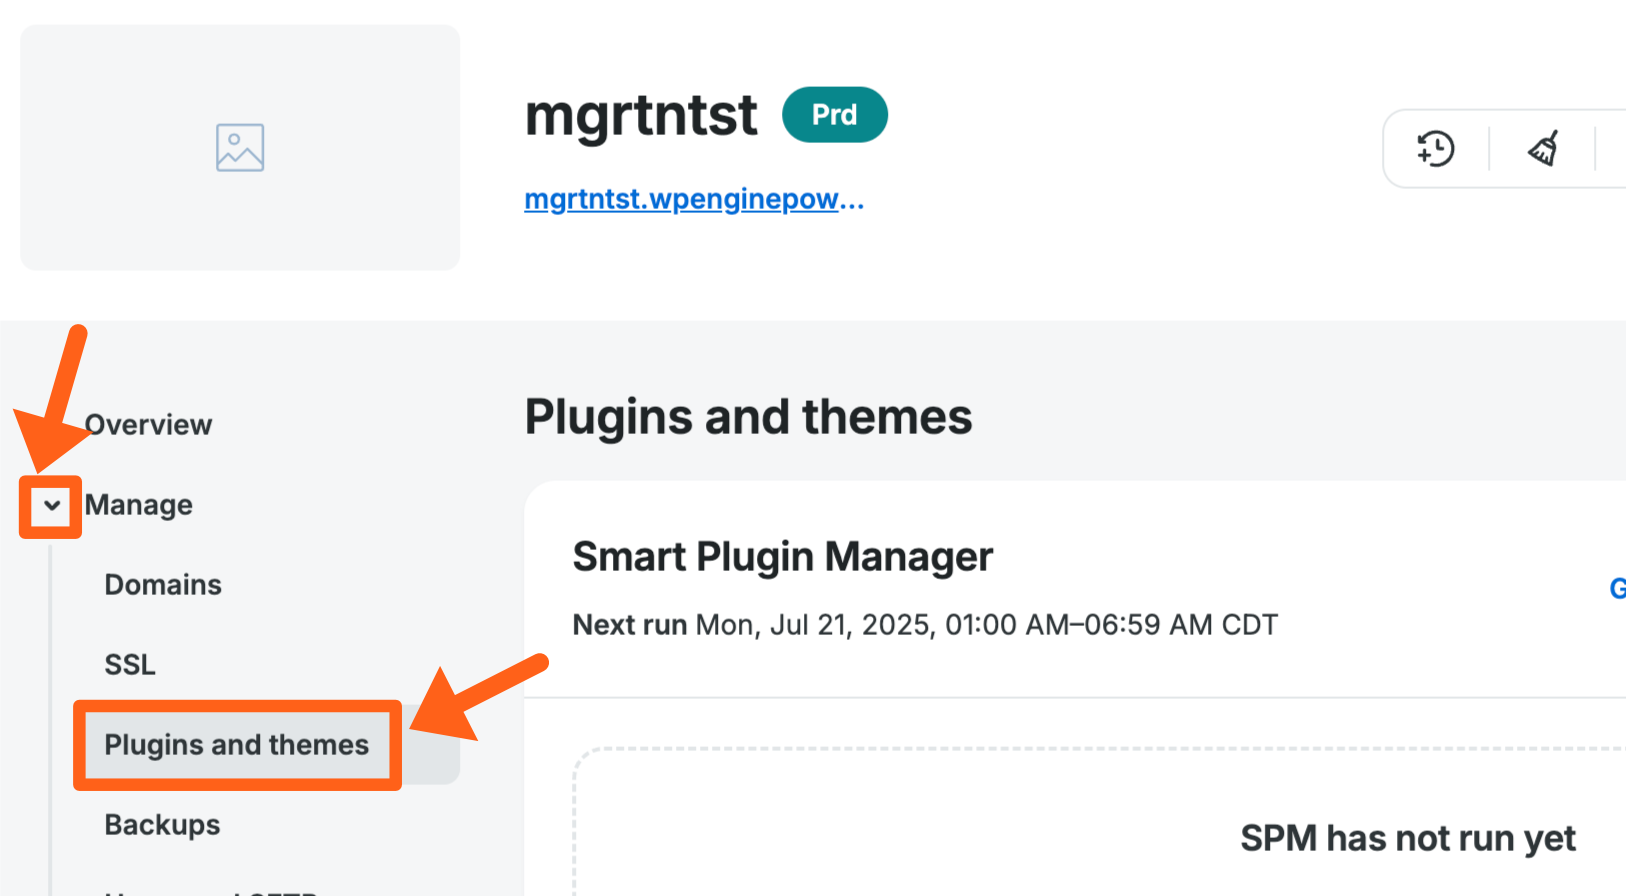
Plugins and Themes Page
As an alternative to managing plugins and themes that are updated by SPM in bulk from the SPM settings page, you can update them for an individual environment from the environment’s Plugins and themes page.
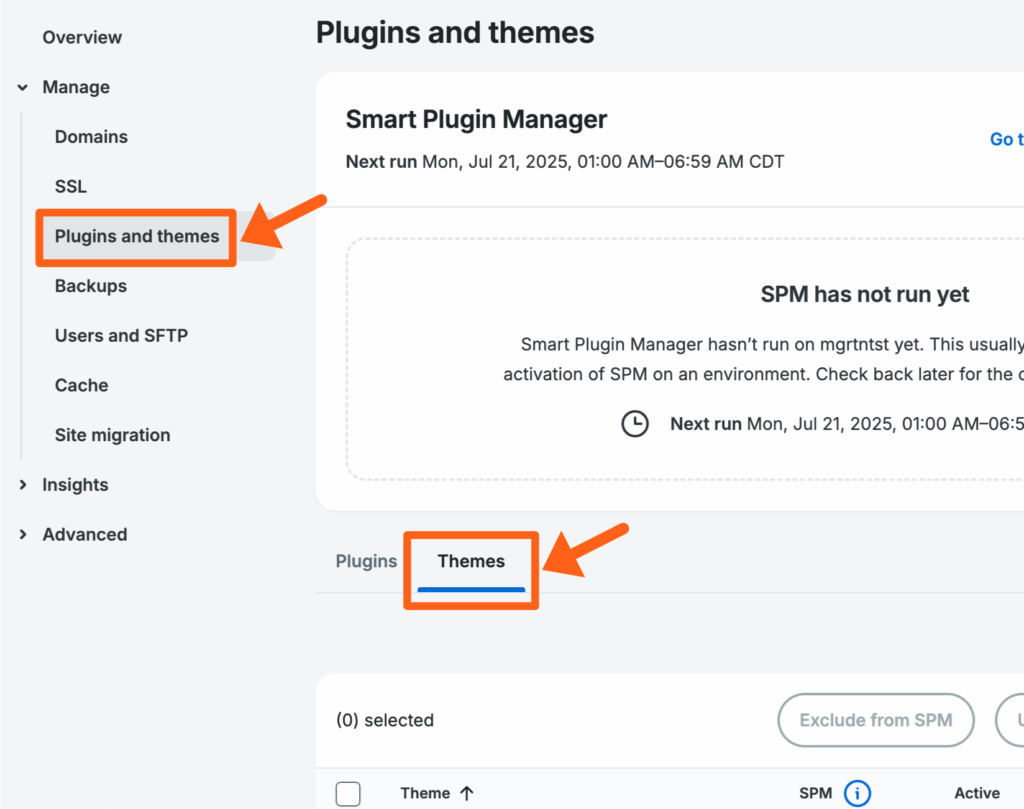
To access the Plugins and themes page:
- Select the site from the Sites page to go to the environment’s overview page.
- Expand the Manage menu from the secondary lefthand menu and click on Plugins and themes.
Smart Plugin Manager Overview
The Smart Plugin Manager section in the Plugins and themes page for an environment will show the status of your last SPM run, the next scheduled run time, and quick links to view history, settings, and latest run reports.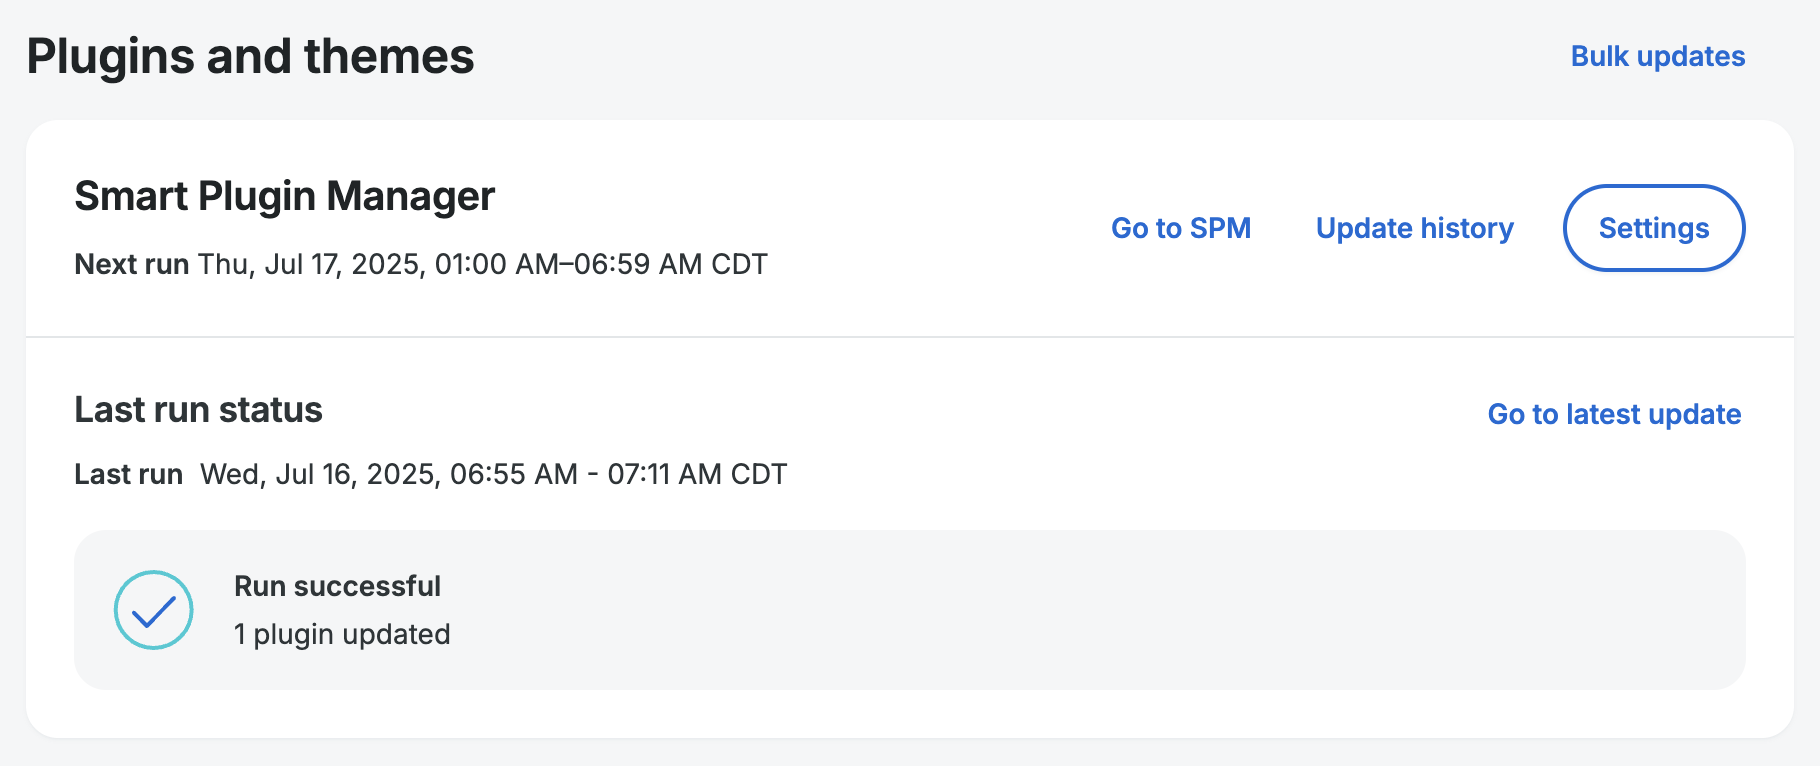
Plugins Tab
The plugins tab for an environment gives you options to manage a site’s plugins in bulk. For SPM, the applicable option in this table is to include or exclude plugins from being updated by SPM.
To access the plugins page, scroll down on the Plugins and themes page and select the Plugins tab.
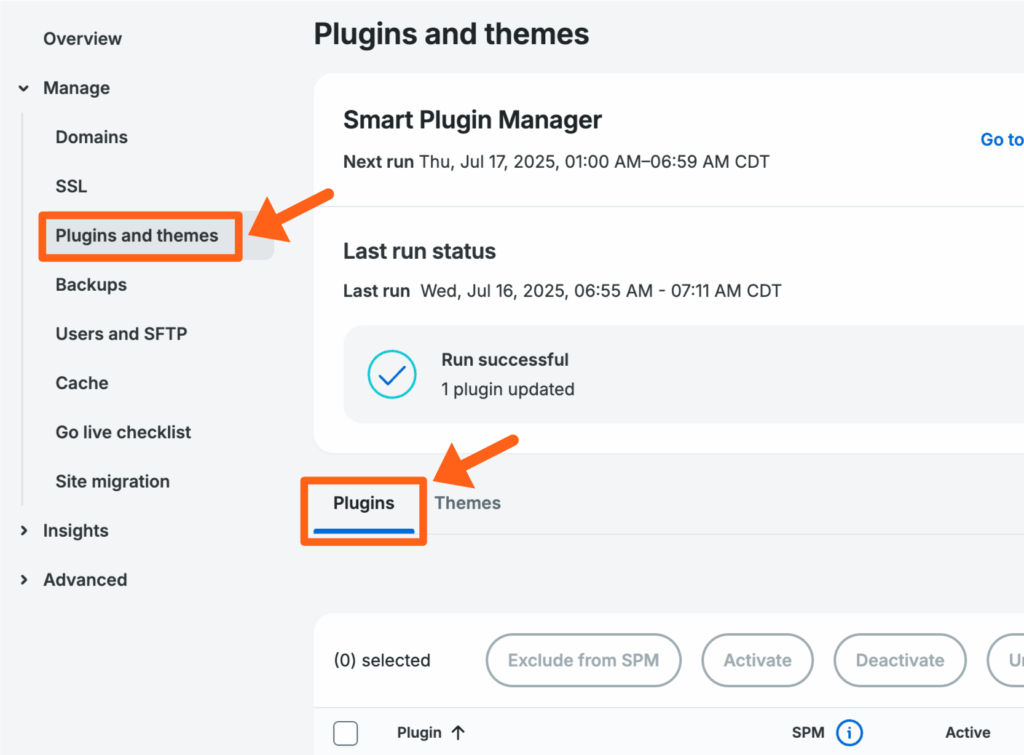
To manage plugins that are updated by SPM, first take note of the current status for each plugin in the SPM column as shown below. The status will either be Managed or Excluded.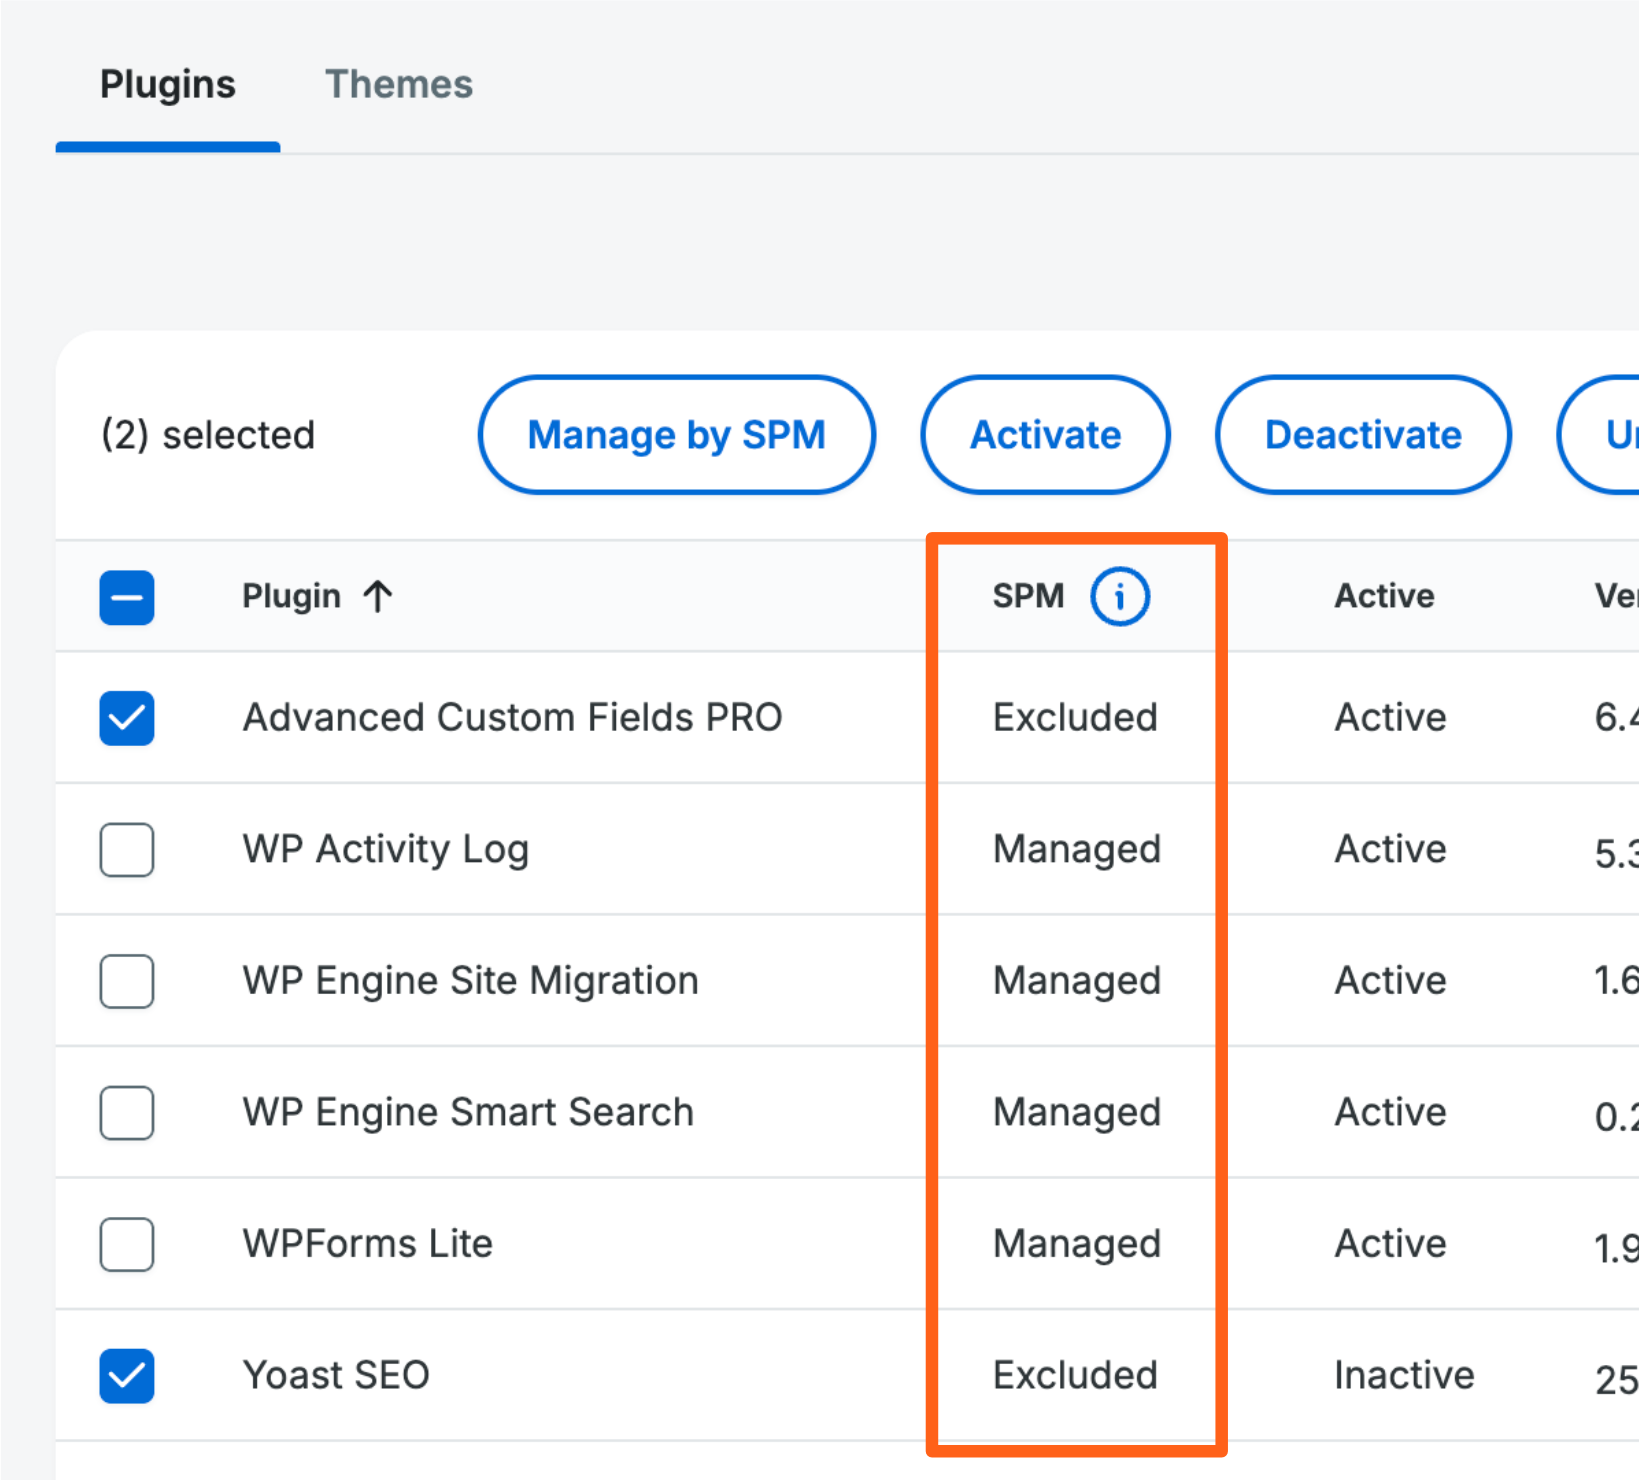
When checking boxes next to plugins, only check Excluded or Managed statuses at the same time and not a mix of both. As shown in the 2 screenshots below, you’ll see the button change to Manage by SPM when you select boxes with an Excluded status, and the button will change to Exclude from SPM when you select boxes with a Managed status.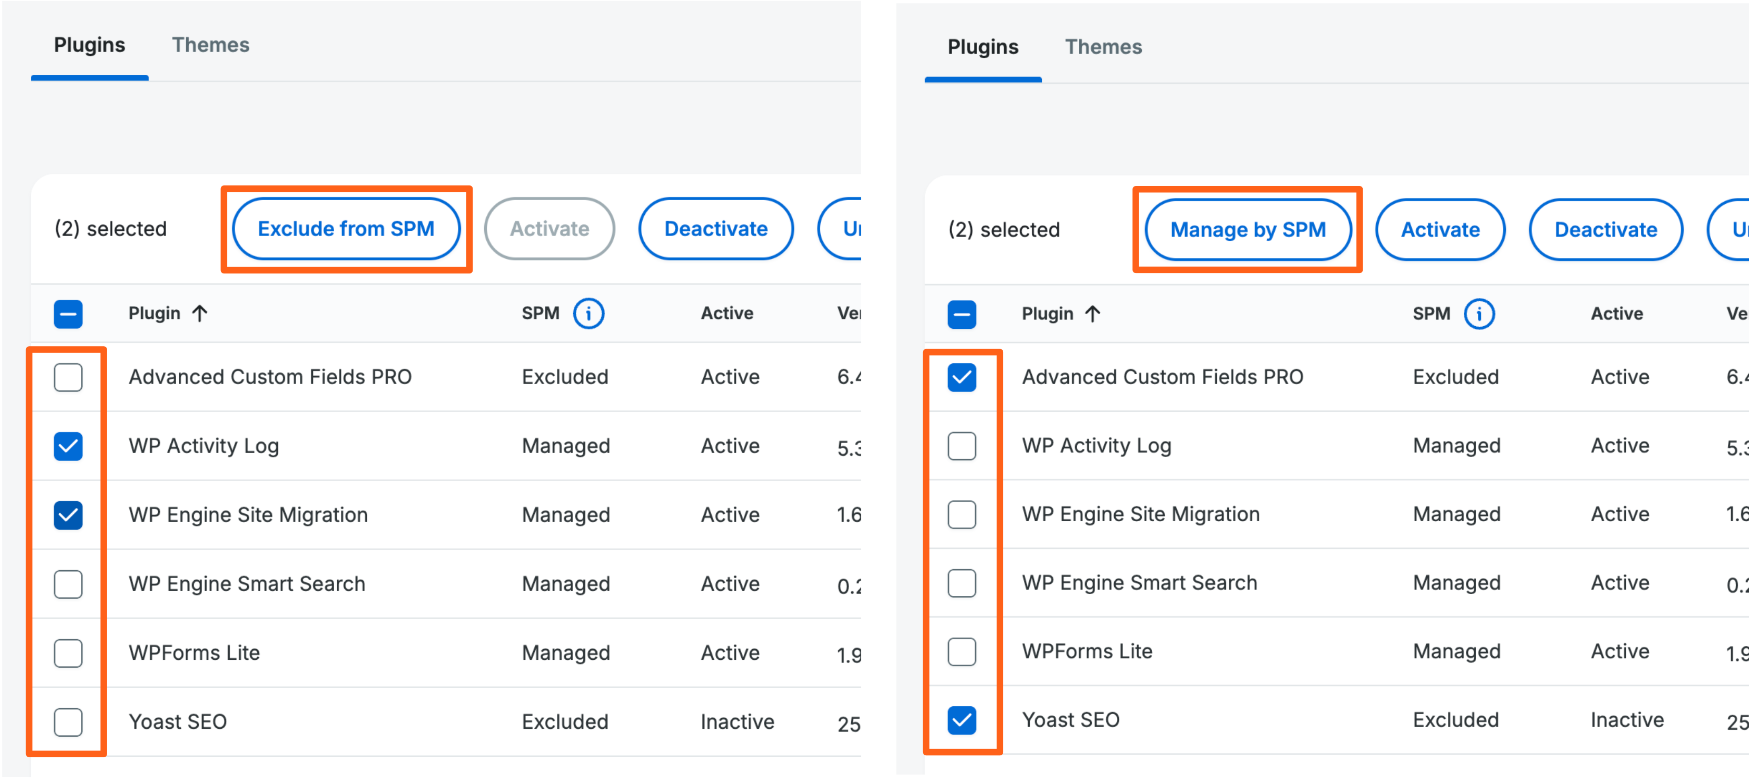
Themes Tab
The themes tab for an environment gives you options to manage a site’s themes in bulk. For SPM, the applicable option in this table is to include or exclude themes from being updated by SPM.
To access the themes page, scroll down on the Plugins and themes page and select the Themes tab.
To manage themes that are updated by SPM, first take note of the current status for each theme in the SPM column as shown below. The status will either be Managed or Excluded.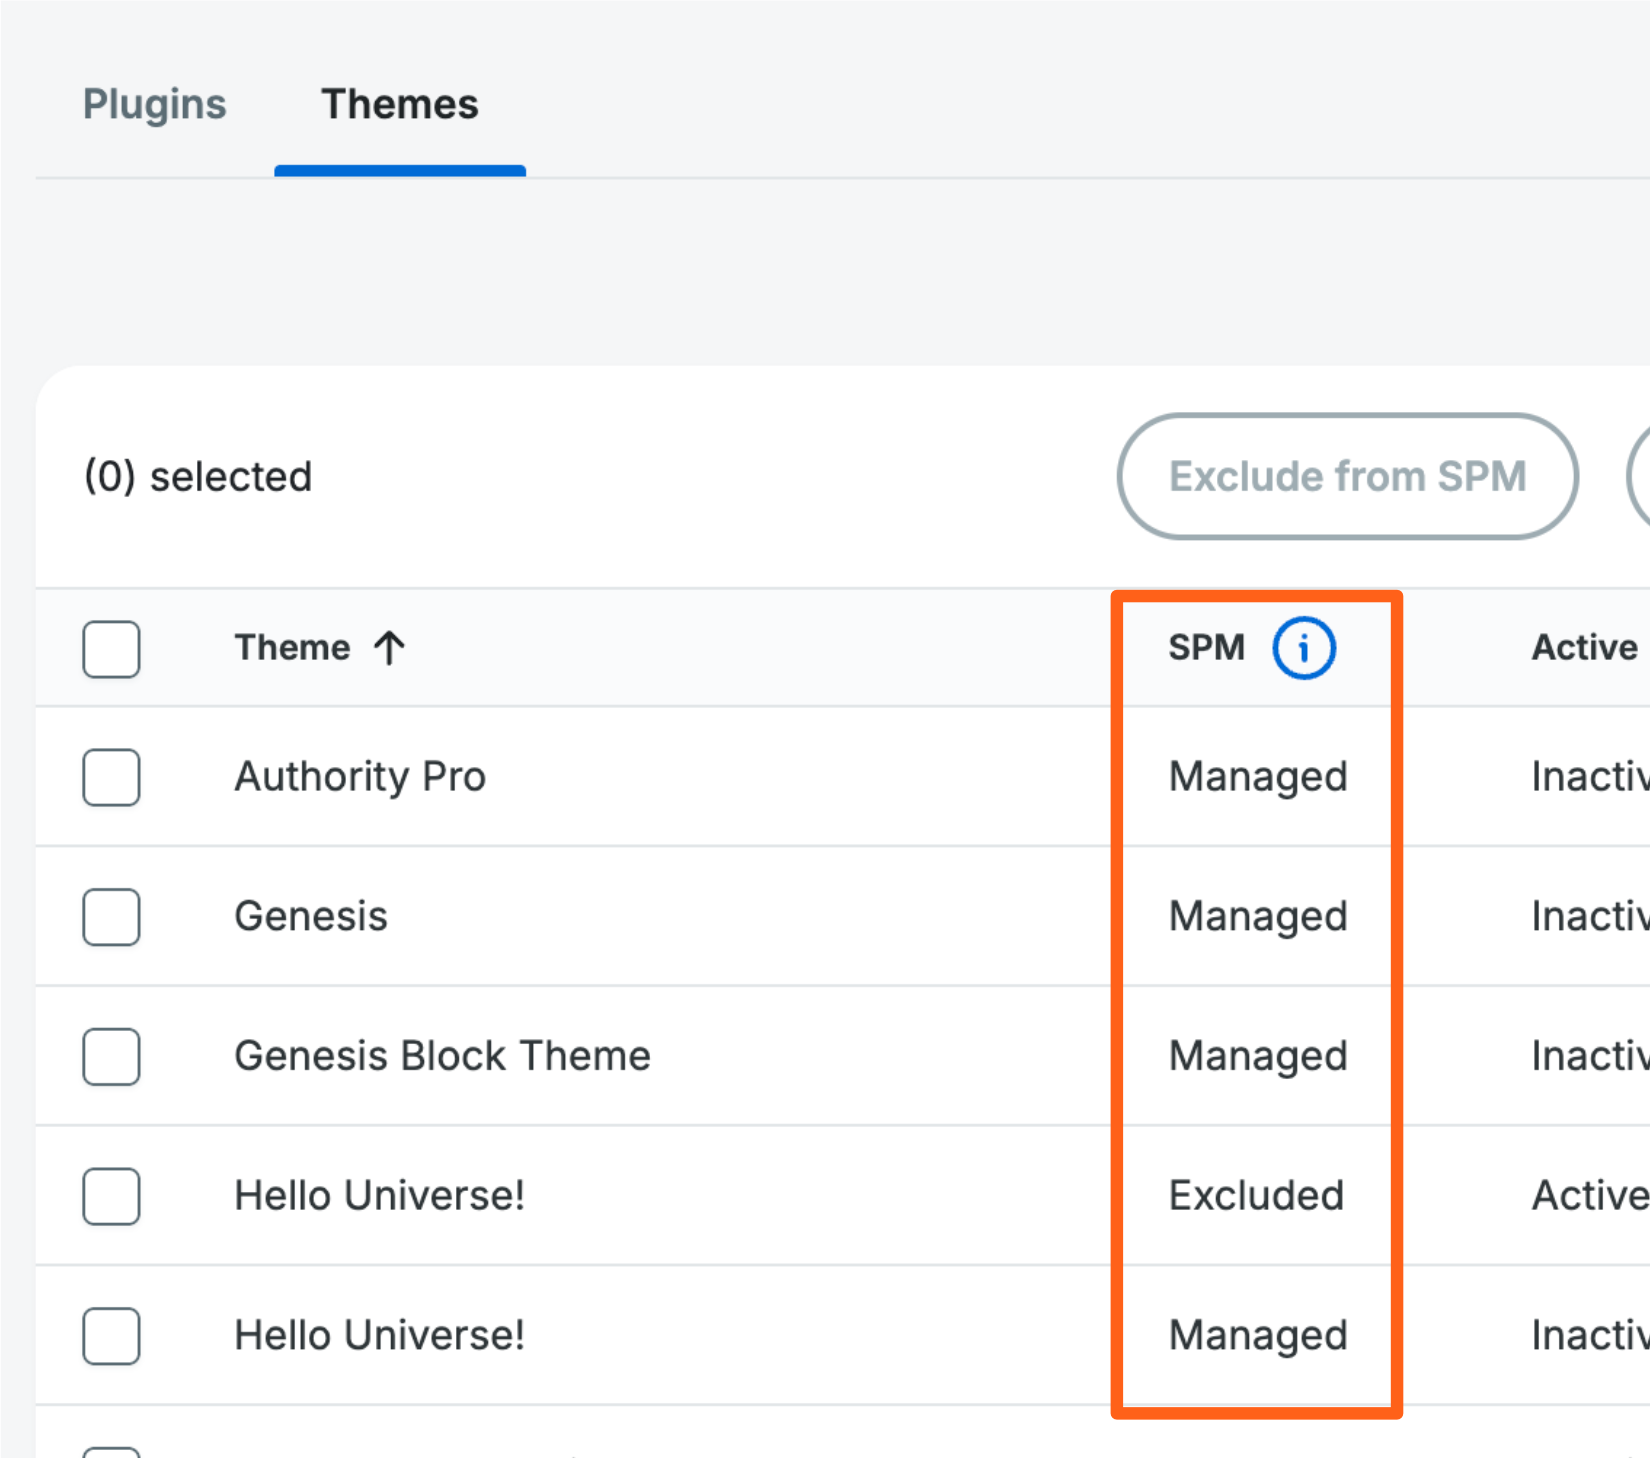
When checking boxes next to themes, only check Excluded or Managed statuses at the same time and not a mix of both. As shown in the 2 screenshots below, you’ll see the button change to Manage by SPM when you select boxes with an Excluded status, and the button will change to Exclude from SPM when you select boxes with a Managed status.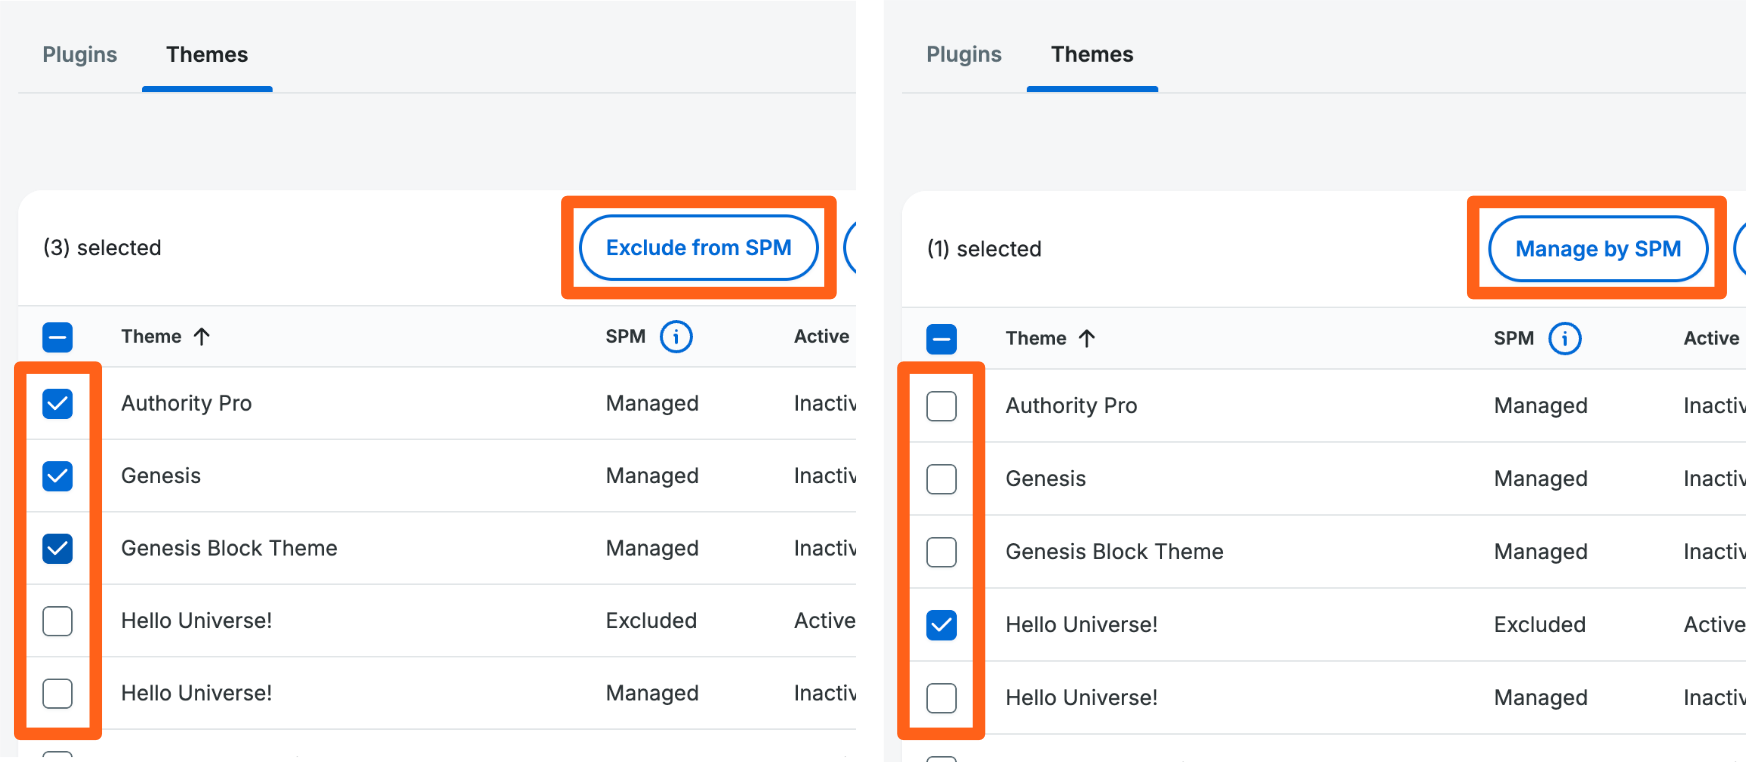
Release SPM License
Releasing an SPM license will disable Smart Plugin Manager on the selected environments. The Smart Plugin Manager plugin will be removed automatically and a license will be freed up for use on another environment. This process may take a few minutes to complete.
You can release a single environment’s license by selecting the option from the three dot menu: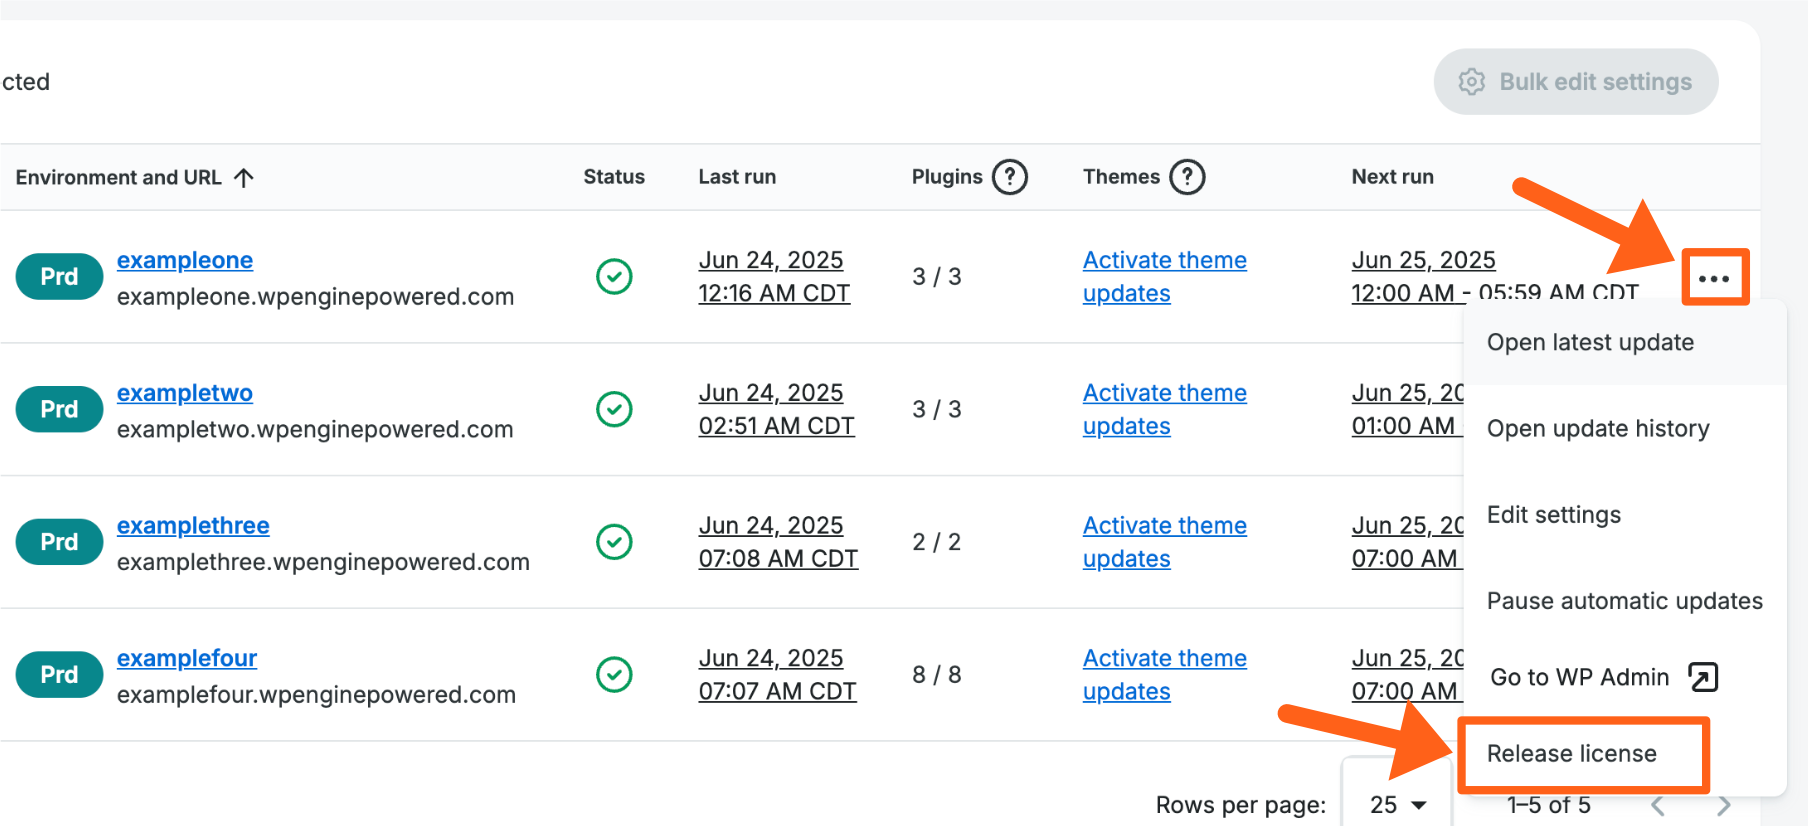
Or, you can release multiple licenses by checking each of the environments and clicking Bulk edit settings. From the settings page scroll down and select Release Licenses.
Pause SPM Updates
If you’d like to simply pause updates, without removing Smart Plugin Manager or the SPM plugin you can choose to pause updates. Updates will remain paused until enabled again.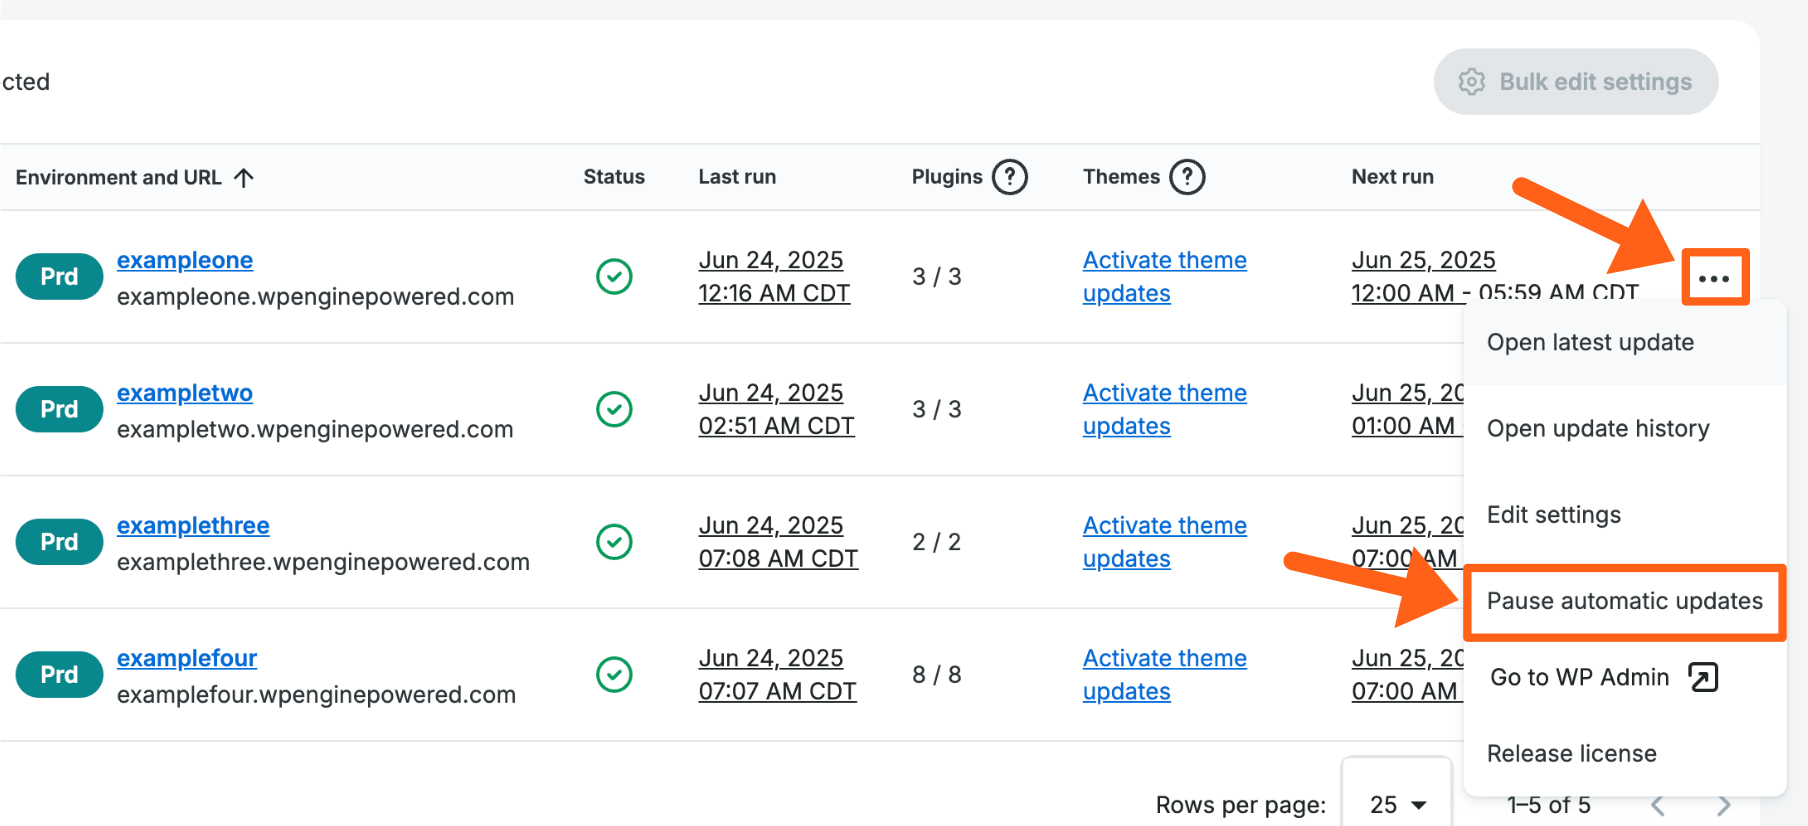
Limitations
Smart Plugin Manager requires the ability to access and update files. For this reason there are several limitations:
- Sites behind a reverse proxy or other configurations – By default, the WordPress site URL must match one of the domains in User Portal. In some cases like reverse proxy, this might not be viable. In order to work around this, please add a custom header of:
X-WPE-Forwarded-Hostwith a value pointing to the WP Engine site environment’s domain (i.e.yoursite.wpenginepowered.com). This will bypass the domain verification and use the aforementioned value from the header instead. - From time to time, SPM may have too many updates scheduled in a time slot, and some updates are skipped. If this happens then a site receives a higher priority during the next run to make sure it doesn’t miss its schedule twice in a row.
- Smart Plugin Manager can only update WordPress sites on the WP Engine platform.
- Transferable installs cannot be updated, as we consider these non-billable.
- Websites that are password-protected (HTTP Basic Authentication) can be updated only if it was set up in the WP Engine User Portal and not by a 3rd party solution.
- Read-only websites cannot be updated.
- Smart Plugin Manager may need to be added to the allowlist of any security services to ensure it does not get blocked. Read more here.
- Additional caching layers may need to allow Smart Plugin Manager to help prevent display issues. Read more here.
- Sites using 2FA will need to add the SPM IPs to the allowlist. Read more here.
- Websites utilizing a WAF will need to allow Smart Plugin manager by configuring certain settings within their firewall. Read more here.
Allowlist Smart Plugin Manager
Additional security layers, such as 2FA and WAF, will require Smart Plugin Manager be whitelisted in that service. The SPM IPs that must be allowed are:
- 35.186.183.60
- 35.221.41.251
- 35.236.216.128
- 35.245.159.253
- 35.245.210.234
- 35.245.251.214
- 35.245.50.252
CleanTalk
If your website is using the plugin CleanTalk our automated tooling will be blocked by default. To get our plugin update software working, we’ll need you to go into your firewall settings and allow the Smart Plugin Manager IP addresses.
In addition to this, you’ll also need you to adjust the following settings through your site’s WP-Admin dashboard: Under the CleanTalk plugin -> Advanced Settings, turn off the Anti-Crawler feature. Next, adjust the Anti-Flood count to 20 pages (CleanTalk assumes our automated tooling is a bot because it opens 20 pages in under a minute to take before and after screenshots for our visual regression testing). Finally, turn Off the selection for Check all posts data.
Caching Services
To ensure maintenance mode can enable and disable correctly, Smart Plugin Manager should be allowed in any additional caching layers (Sucuri, WP Optimize plugin, NitroPack, Cloudflare, etc). More specific instructions are detailed below:
NitroPack
NitroPack is compatible with SPM as long as NitroPack is on version 1.5.8. If your website is utilizing the NitroPack optimization plugin on an earlier version you will need to exclude a Smart Plugin Manager cookie to prevent any interruption in our update services.
Cookie name: autoupdater
Cookie value: 1
Learn how to exclude a cookie in NitroPack.
Sucuri
- Set “Cache Level” option in Sucuri to “Site caching”. Learn more from Sucuri here.
- Add SPM IP addresses to the allowed list under the Whitelist IP Addresses section in the Sucuri dashboard. Learn more from Sucuri here.
Cloudflare
Ensure the SPM IP addresses are whitelisted in Cloudflare. Learn more on Cloudflare here.
Two-Factor Authentication (2FA)
If your website is utilizing a two-factor authentication plugin or service (2FA) then you must add the SPM IP addresses to the allowed list to ensure SPM can access the WP-Admin.
If you use Duo for WordPress, then configure Authorized Networks > Allow access without 2FA from these networks. Read the full documentation on Duo.
Web Application Firewall (WAF)
If requests to a website from SPM could be denied by a WAF (web application firewall), you may need to add SPM requests to the allowed list. Those requests will contain the header named autoupdater and come from a static set of IP addresses.
Stackpath WAF
Create a custom WAF rule with the WAF rule editor:
- Under Rule Type, select WAF.
- Next to IF, select a rule type Header.
- In the next drop-down menu select — to apply the rule only to the specified header.
- In the field, enter the header key
autoupdater - In the next drop-down menu select Contains.
- In the field, enter the header value
.(dot).
Learn more about Stackpath WAF rules.
Cloudflare WAF
Add a rule to allow access by header name:
any(http.request.headers.names[*] == "autoupdater")
Alternatively, add a rule to allow access by URI:
any(http.request.uri.args["autoupdater"][*] == "api") or any(http.request.uri.args.names[*] == "autoupdater_nonce")
Learn more about Cloudflare WAF rules.
Wordfence WAF
In your WP-Admin panel go to Wordfence > Firewall and click “All Firewall Options”.
Next, expand “Advanced Firewall Options” and enter SPM’s IP addresses into the “Allowlisted IP addresses that bypass all rules”.
Be sure to save changes!
SPM Errors
Some error messages from SPM are self explanatory. Others may be a little more complex and require adjustments to be made by you or your website team. Below are some examples of error messages from SPM. If you are unsure of an error message that you’ve received, you can contact our support team for help to understand the error.
Error: Basic authentication usage. Your website uses HTTP Basic Authentication.
This error is thrown if you have password protection on for your pages. SPM can not scan your pages for visual changes if password protection is on. If you turn off the password protection then you should not see this error the next time that SPM runs. One example of the password protection that could be on is our password protection setting in the User Portal.
Error: Failed to copy files. We could not copy the downloaded update file or the unpacked files. Please check write permissions on your site.
If the file permissions have somehow been altered for your website files, you can use the reset file permissions option to reset them back to WP Engine’s required permissions.
Error: Failed to create a backup.
If you receive this message then there is potentially some alteration to your website that is interfering with our system’s ability to create a backup. You can view the Backup errors section of our backups article to see potential database additions that could be interfering. Having a very large website can also cause issues with creating backups. If your file storage is more than 100GB or your database is larger than 10GB for the website, consider reducing the size of large files, or removing any unnecessary files or data to reduce the amount of total data that needs to be backed up each time. If you are unable to determine the cause you may have to contact your website development team or our support team to try to get more insight into the error.
Error: Failed to download the update. Please check that you have a valid license attached to your website.
Premium plugins often have a license key that you must input into the plugin settings. If you see this error then you have likely not input your license key. You should be able to either log into your account on the plugin author’s website or reach out to their support channels to retrieve your license key. They will often email you the key so you can also check your old emails. Then you can input the license key into the settings for the plugin in the WordPress dashboard. After inputting the key, SPM should be able to download the newer version of the paid plugin on its next run, but remember that SPM does not guarantee support for premium plugins.
Error: Redirect loop. SPM is stuck in an infinite redirect loop on your website.
If you see this error, review your rewrite rules or redirect rules in the User Portal and see if there are any rules that might be causing URLs to redirect to each other. You may also need to check redirect rules in your WordPress dashboard if you are using a redirect plugin. Review the main pages of the website visually as well to make sure they’re publicly available. If you are unable to find or fix a redirect error, you can contact our support team for assistance to investigate the redirect loop.
NEXT STEP: Learn how to upgrade your PHP version