SSH Key Management for SSH Gateway
WP Engine’s SSH Gateway service provides shell access to a Linux environment so that you can manage your site’s files, database, and run commands such as those available through WP-CLI.
About SSH Keys
An SSH key casts aside the username and password, while providing greater security and saving you valuable typing time during authentication. WP Engine’s SSH Gateway system only allows you to authenticate via SSH key.
A private and public key pair must exist. Your private key should be kept private, and it should be stored on the machines from which you want to authenticate (usually in the ~/.ssh directory for UNIX-like operating systems, such as MacOS or Linux).
The public key is then added to the WP Engine User portal for authentication via our servers.
There are three primary steps for connecting your SSH key to WP Engine for use with the SSH Gateway:
- A public/private SSH key pair
- Add the public key to your User Portal profile
- Create an SSH Config file (Optional, but highly recommended)
View and Validate Existing SSH Keys
Before you generate and add a new SSH key, you may first want to take a look at the SSH keys configured for your user profile. An existing key can be used easily, as long as it’s valid.
Check Local Machine for Existing SSH Key
- Open a Terminal or Command Prompt window from your computer
- Change directory into the “.ssh” folder and list out the files.
- Mac:
cd ~/.ssh && ls - Windows:
cd C:\Users\USERNAME\.ssh && dir
Note: Replace “USERNAME” with the username for your computer.
- Mac:
- If the following two files exist, then you already have an SSH key configured for WP Engine on this machine:
wpengine_ed25519andwpengine_ed25519.pub
If you do not have a key listed here, learn how to generate a key below.
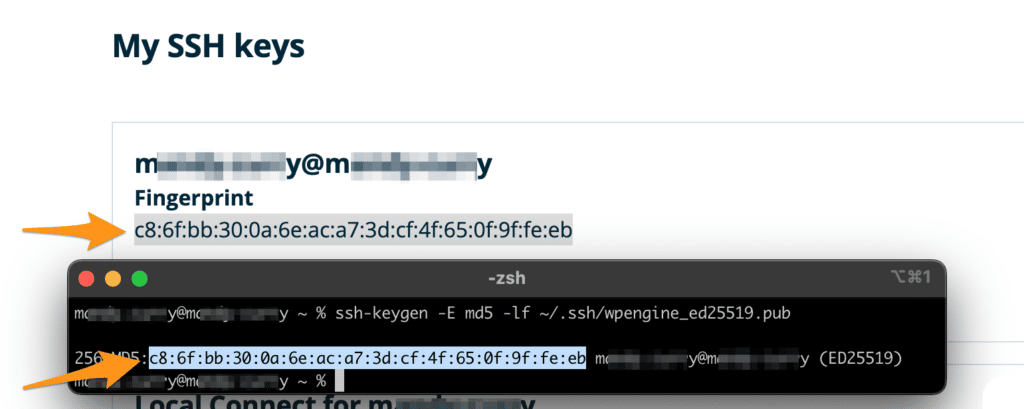
Validate Fingerprint on Existing SSH Key
If the two files above exist, validate that the key on your computer matches the key with WP Engine by comparing fingerprints.
- From your computer, print the fingerprint for this key using the following command:
- Mac:
ssh-keygen -E md5 -lf ~/.ssh/wpengine_ed25519.pub - Windows:
ssh-keygen -E md5 -lf C:\Users\USERNAME\.ssh\wpengine_ed25519.pub
Note: Replace “USERNAME” with the username for your computer.
- Mac:
- Now, visit the following page in your User Portal:
- Compare and confirm the fingerprints match.
If the fingerprints do not match, proceed to generating a new SSH key.
Generate New SSH Key
If you already have a key that you want to use for shell access, then you can certainly simply use that key when connecting. Otherwise you’ll need a new key pair which you can generate with these simple instructions:
- Open a Terminal or Command Prompt window from your computer
- Use ssh-keygen to generate a new key as shown below:
- Mac:
ssh-keygen -t ed25519 -f ~/.ssh/wpengine_ed25519 - Windows:
ssh-keygen -t ed25519 -f C:\Users\USERNAME\.ssh\wpengine_ed25519
Note: Be sure the replace “USERNAME” with the username for your computer.- If the .ssh folder doesn’t exist yet then you can add the directory from within your “USERNAME” directory, with the mkdir command.
mkdir .ssh
- If the .ssh folder doesn’t exist yet then you can add the directory from within your “USERNAME” directory, with the mkdir command.
- Mac:
- Hit enter or return to leave the passphrase blank.
- If you wish to set a password, you may. However the security benefit is debatable and it cannot be recovered if lost.
- Once the process has completed, run the following to print the contents of the public key file:
- Mac:
cat ~/.ssh/wpengine_ed25519.pub - Windows:
type C:\Users\USERNAME\.ssh\wpengine_ed25519.pub
- Mac:
The entire contents of this SSH key file must be copied and added to your WP Engine user profile.
PuTTY
If you choose to use the PuTTY program on Windows, you must also install the PuTTYgen utility.
- When you install the PuTTY program, also install the PuTTYgen utility
- Open the PuTTYgen utility to generate your SSH key
- When asked which type of key to generate, select ED25519
- Click the Generate button to create your public and private key pair
- Save both the public key and the private key locally and take note of where the files will reside on your computer
When asked to enter the public key into the WP Engine User Portal we recommend simply copying the key from the top of the window in PuTTY.
SSH Config File
After generating an SSH key pair, it is best practice to setup an SSH configuration file.
The SSH config file tells your computer which public/private key pair should be used for which hostname. It can prevent many issues and we highly recommend setting one up now to prevent issues down the road.
The configuration file will simply be named config and will live in the .ssh folder within your User folder directory.
- Mac:
~/.ssh/config - Windows:
C:\Users\USERNAME\.ssh\config
If you are also using Git, you will also want to add a second section to this file for your Git SSH key.
Create SSH Config
This process will create an SSH config that tells your computer to use the newly generated wpengine_ed25519 key for any host matching *.ssh.wpengine.net
Create your SSH config file on a Mac computer:
- Open the Terminal app.
- Type the following command:
cd ~/.ssh - Type the following command:
vim config - Inside the file, type
ito insert text. - Paste the following contents:
Host *.ssh.wpengine.net
 IdentityFile ~/.ssh/wpengine_ed25519
 IdentitiesOnly yes
- Hit the ESC button, and then type
:wqto save the file and exit the vim editor.
Create your SSH config file on a Windows computer:
- Open the Command Prompt app.
- Type the following command:
cd C:\Users\USERNAME\.ssh
Note: Replace “USERNAME” with the username for your computer. - Type the following command to create the file:
type nul >> config - Type the following command to edit the file in the Notepad app:
notepad config - Paste the following contents into the file within the Notepad app:
Host *.ssh.wpengine.net
 IdentityFile C:\Users\USERNAME\.ssh\wpengine_ed25519
IdentitiesOnly yes- Note: In the above text, replace “USERNAME” with the username for your computer.
- Select File > Save within the Notepad app.
NOTE
If you are using a different key, be sure to update the file name wpengine_ed25519 in the above to your own private key filename.
If you are using SSH Gateway and Git, additional SSH Config contents should be added for Git.
Use SSH Config to Connect with an Alias
If you are a developer with several SSH keys and prefer to specify a key for each environment, the following SSH Config can be used instead:
Host MYCOOLALIAS
 User ENVIRONMENTNAME
 Hostname ENVIRONMENTNAME.ssh.wpengine.net
 PreferredAuthentications publickey
 IdentityFile ~/.ssh/YOURKEYFILENAME_ed25519
 IdentitiesOnly yes
Be sure to update the following accordingly:
Update MYCOOLALIAS to the alias name you wish to use.
Update ENVIRONMENTNAME to the unique WP Engine name of the environment. This is also the name of the User.
Update ~/.ssh/YOURKEYFILENAME_ed25519 to your private key file path. This should typically be in the ~/.ssh/ directory and end in _ed25519.
To connect, you would then simply type the alias nickname you’ve assigned. For example: ssh MYCOOLALIAS
Test SSH Key
After adding your SSH key to your profile, you can test your shell access by typing this command on a terminal. Replace environment with your unique WP Engine environment name.
ssh environment@environment.ssh.wpengine.net
For example, if I was trying to connect to the “tiramisu” environment:
Connect with a Specific Key
Specifically, use this if you chose not to create the SSH configuration file previously. Replace “ENVIRONMENT” with the name of the environment that you are connecting to.
Mac: ssh -i ~/.ssh/wpengine_ed25519 -o IdentitiesOnly=yes [email protected]
Windows: ssh -i C:\Users\USERNAME\.ssh\wpengine_ed25519 -o IdentitiesOnly=yes [email protected]
NOTE
If you are using a different key, be sure to update the file name wpengine_ed25519 in the above to your own private key filename.
Delete SSH Gateway Keys
Users can remove their SSH key from WP Engine with the following steps.
- Login to the User Portal
- Click your name, at the top right
- Select My Profile
- Click SSH Keys
- Select Remove next to the desired key
Remove SSH Key for a User
Users cannot directly delete SSH Keys of other users, as they’re attached to a WP Engine user profile. However the profile itself can have access granted or removed to the environments or account, which will in turn remove their SSH access to those environments.
Remove Access to Specific Environment(s)
Edit their user role on the account to “Partial”.
Ensure the desired environment(s) are not selected.
Remove Access to all Environments on a WP Engine plan
Remove the user from the WP Engine plan entirely.
SSH Key Specifications
- The SSH key must begin with
ssh-ed25519with the entire key contents following on one single line when entered into the User Portal profile page. - Each user can add multiple SSH keys to their User Portal profile.
- Each SSH key added to WP Engine is attached to a User Portal email address. If there are multiple computers from which a user will connect to SSH, it’s advised to use a separate key for each computer.
- Once your SSH key is added it can be used for all environments to which your WP Engine User Portal user also has access. If you cannot see the environment in the User Portal, you cannot access it using SSH.
- Each SSH Gateway user should add their own SSH key as a best practice. Do not share SSH keys between users or machines for security reasons.
Troubleshooting SSH
For more information to troubleshoot SSH connection issues, see our SSH Gateway Issues guide here.
NEXT STEP: Learn how to connect to SSH Gateway