Get Started


Key Takeaways
Google Analytics helps optimize user engagement and boost traffic. Understanding user data through Google Analytics enables website improvements tailored to visitors’ needs.
Google Tag Manager simplifies tracking and analytics integration. Easily add Google Analytics and other tools to WordPress for scalable tracking solutions.
Consider placement when adding Google Analytics tracking code. The location of the tracking code affects data collection timing and user behavior insights.
Installing Google Tag Manager in WordPress is a straightforward three-step process. Setting up Tag Manager allows seamless integration of tracking codes for analytics.
Google Tag Manager streamlines Google Analytics installation and usage. Once set up, Tag Manager manages the analytics tag for data collection and website optimization.
Optimize your website with managed hosting plans for WordPress. Quality hosting ensures smooth website performance and user experience.

To drive targeted traffic to your website, and to keep the traffic you currently have, it’s important that your site caters to your audience’s needs. However, understanding exactly what your audience needs can be difficult without the right tracking info.
Fortunately, Google Analytics is a tool that enables you to collect user data and use it to your (and your visitors’ advantage). By implementing what you learn on your website, you can then improve user engagement and boost traffic.
In this post, we’ll introduce you to installing Google Analytics on WordPress manually. This will include a look at how to integrate Google Analytics on your website with and without any WordPress plugin. You’ll also learn how Google Analytics and Tag Manager work effortlessly together, and how to install both on your site.
Google Analytics for WordPress
Google Analytics is a web analytics service that launched in 2005. When connected to your website, it can collect user data including demographics and behavior, so you can better understand (and cater to) your website visitors.
Fortunately, Google Analytics and WordPress work seamlessly together. This means you can collect all the data you need, then optimize your WordPress site based on your Google Analytics report.
How to Add Google Analytics to WordPress
Within WordPress, there are two main ways to add Google Analytics to your WordPress website. One is with the use of a WordPress plugin, and the other is without. Let’s take a closer look at both options.
How to Add Google Analytics with WordPress Plugins
One of the easiest ways to add Google Analytics to WordPress is with plugins. This is a great option for those who only need a ‘basic’ installation, or who aren’t technologically savvy.
Google Analytics WordPress Plugins
The first plugin—and one of the most popular—is Google Analytics for WordPress by MonsterInsights. While this plugin has a potentially lengthy setup process, there’s no need to edit your WordPress Google Analytics code. As such, it’s a great option for beginners:

Another popular plugin choice is Google Analytics Dashboard for WP (GADWP). The Google Analytics Dashboard plugin makes it simple to install Google Analytics on each page of your website (with the plugin’s tracking info component), and will also help you to read the collected data:

While there may be easier options, they aren’t always the best. Let’s look at another way to add Google Analytics to your WordPress website.
How to Add Google Analytics without WordPress Plugins
The other way to add Google Analytics to your website is through adding Google Analytics’ tracking code manually. The simplest way is to add it via the dashboard’s Appearance > Editor screen. This requires some HTML knowledge, but it’s not difficult.
Where to Put Google Analytics Tracking Code in WordPress
Simply put, the tracking code can be placed just about anywhere on your website, including the head, body, and footer. However, there are some pros and cons to each option.
If you place your tracking code at the very top of the HTML <head> section, the code will be executed almost immediately as the user lands on the page. This is where Google recommends placing the code:

Alternatively, placing the code at the end of your HTML will mean it’s executed after all other code on the page. If a user leaves your website (or page) before the code has been executed, no data will be collected:

As you might imagine, placing the tracking code in the <body> section will mean the code could be executed at any point during the page load. You won’t collect the data of users who bounce quickly from the page, but you’ll collect more than if it was at the end of the HTML:

There is no right or wrong place for the code, so the decision is yours. Consider exactly what you’d like to track, then place the tracking code accordingly.
Google Tag Manager for WordPress
In simplest terms, Google Tag Manager is a system that manages JavaScript and HTML codes used for tracking and analytics. When used with WordPress, you can very easily add Google Analytics (and other Google products) to your website.
Perhaps best of all, Google Tag Manager is a scalable solution for all websites, especially enterprise-level sites. This means it’ll continue to work for you, even as your site grows.
How to Install Google Tag Manager for WordPress
Installing Google Tag Manager in WordPress is a simple three-step process. To begin, head over to the Tag Manager home page and sign up (or sign in with your current Google Analytics account):

Here, you’ll be asked to name your Google account (we recommend using your company name) and your Container. In this case, your website’s URL:

Once you’ve set up your account, you’ll be given two separate codes:

Copy the first code, and head to your WordPress dashboard. Go to Appearance > Editor, and you’ll see a list of different files on the right side. Select theme header.php. Find the <head> element within the file, and paste the first part of the Tag Manager code directly below it:

Go back to Tag Manager, and copy the second (i.e. bottom) code. Once again return to your website, and paste this code right after the opening <body> element:

Click Update File and you should see a confirmation appear. That’s it—you’ve successfully added Tag Manager to your WordPress site!
How to Install Google Analytics Through Google Tag Manager
Once Google Tag Manager is successfully installed, it’s time to install and use Google Analytics. When completed, Google Analytics will “funnel” through Google Tag Manager on your website.
In fact, once it’s set up, you don’t even have to add analytics code to your site. To begin, go back to your Tag Manager account and click New Tag:

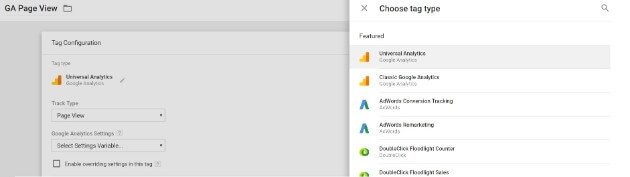
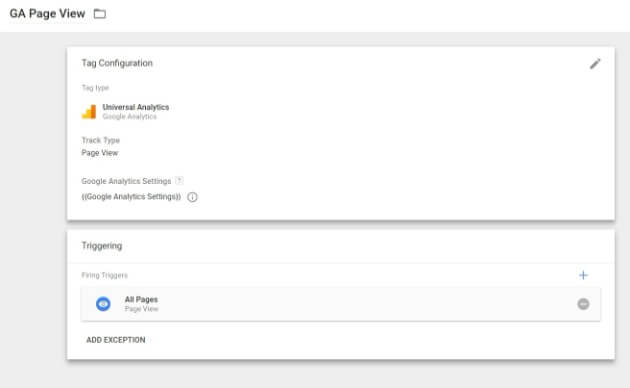
You’ll now have two separate boxes: Tag Configuration and Triggering. Click Tag type in the Tag Configuration box and select Universal Analytics:
You’ll also need to configure the Google Analytics Settings. You can do this independently, or set an override option. Both of these require your Analytics Tracking ID. Once your Google Analytics tracking ID is configured, move on to Triggering . For Page View, you’ll want to select All Pages.
This very last step is crucial, because otherwise the tag will not be published. On the Tag Manager account page, click SUBMIT in the top right corner. Add a Version Name and Description, and then be sure your new GA tag is showing under Workspace Changes. Once you’ve verified, click PUBLISH:

With your Google Analytics tag now configured and published, Google Tag Manager will implement the tag on your website. In no time at all, your Google Analytics account will begin to collect user data, which you can then use to optimize your website for your audience.
To optimize your website even further, consider WP Engine’s managed hosting plans for WordPress. With quality WordPress hosting, you can be sure your website is always running as smoothly as possible. Get started today!