Get Started


Key Takeaways
XML sitemaps enhance search engine visibility. They help search engine bots crawl website content efficiently, improving organic traffic.
WordPress websites benefit from XML sitemaps. Thorough indexing by search engine crawlers boosts content visibility and ranking on SERPs.
Dynamic sitemaps update automatically. Plugins like Yoast SEO and Google XML Sitemaps simplify sitemap generation for WordPress users.
Static sitemaps require manual updates. They are easier to create but need manual maintenance for accurate indexing.
You want your website’s content to be easy to find through search engines. After all, it’s a great way to bring organic traffic to your site.
However, you’re missing out on an effective Search Engine Optimization (SEO) tool if you aren’t using an XML sitemap.
XML sitemaps are used by search engine bots to more effectively “crawl” your site’s content. Creating one for your website can make your content more visible on Search Engine Results Pages (SERPs).
In this post, we’ll discuss what XML sitemaps are and why you may need one for your WordPress website. We’ll then show you a few ways to generate your own sitemaps and alert Google to their existence. Let’s get started!
What is an XML Sitemap?
An XML sitemap is an index of your website’s posts and pages. It’s used by search engine crawlers—robots that index and add your website to SERPs.
When robots crawl your site without a sitemap, they must use your site’s internal links to navigate it. An HTML sitemap simplifies the process by providing the crawlers with a detailed map of your entire site—including your pages, posts, and hierarchy.
Do You Need an XML Sitemap for a WordPress Website?
If your website’s content is already visible on SERPs, do you really need an XML sitemap? If you want your WordPress website to be thoroughly and frequently indexed by search engine crawlers, the answer is yes!
The more successfully a search engine bot can crawl your website, the better. This enables updated content to rank on SERPs, which is beneficial for driving targeted traffic.
How Can You Find a Sitemap in WordPress?
Finding the XML sitemap for a WordPress site is simple, and all it takes is the addition of a specific slug at the end of your (or another website’s) URL. For example, most sitemaps use sitemap.xml/. As such, you can enter www.example.com/sitemap.xml into the address bar and be redirected to a sitemap:
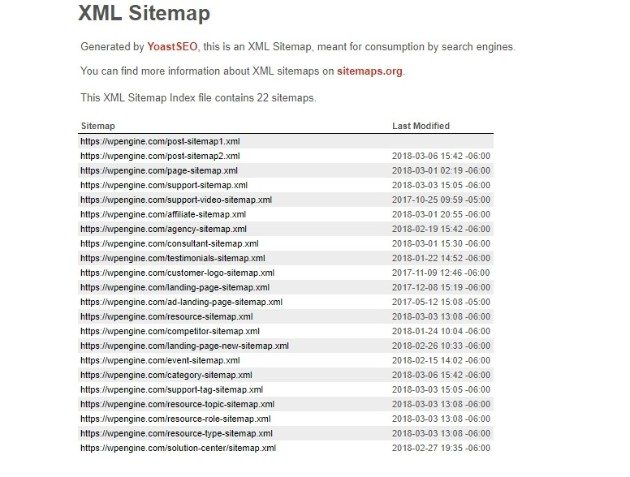
If this doesn’t work, other popular slugs include page-sitemap.xml and sitemap_index.xml. Of course, you can also do the same for your own website to determine if you currently have an active sitemap.
How to Create an XML Sitemap for WordPress
There are two different kinds of XML sitemaps you can create on WordPress—static and dynamic. The generation techniques differ for each, so let’s take a closer look.
How to Generate a Dynamic Sitemap
A dynamic sitemap is used by most websites. It’s recommended for anyone who doesn’t have the time or the knowledge to maintain one manually, and it essentially updates based on your site’s structure automatically.
In fact, it is possible to generate a dynamic sitemap manually, but this takes quite a bit of XML knowledge. If you aren’t familiar with XML, your next best option is to use a WordPress plugin. There are quite a few options in the WordPress Plugin Directory, but we recommend All in One SEO, Google XML Sitemaps, or Yoast SEO.
How to Create a Sitemap for WordPress Using Yoast SEO
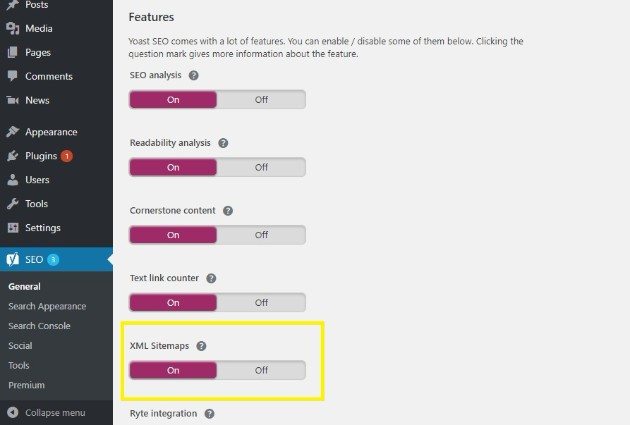
Yoast SEO is one of the most popular SEO plugins and includes the ability to generate an XML sitemap with just a few clicks:

To generate your own sitemap, firstly download and install the plugin. Next, navigate to the WordPress dashboard, and click SEO > General from the left-hand menu. From here, select the Features tab and scroll to XML Sitemaps. Toggle the bar to On and click Save Changes:
To see your new sitemap, click the question mark next to XML Sitemap, then click the dedicated link:
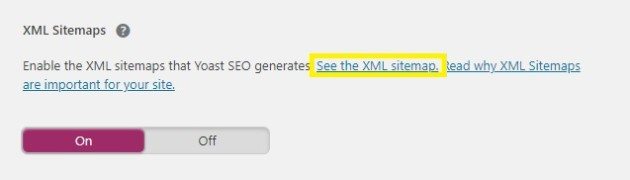
You can also manually type the URL into your address bar. With Yoast SEO, the sitemap URL will follow the http://www.yourwebsite.com/sitemap_index.xml structure.
However, you’re not done just yet. You still need to submit the sitemap to Google, which we’ll show you how to do later.
How to Create and Add a Static Sitemap to WordPress
As we mentioned, a static sitemap does not automatically index your posts and pages, and must be updated manually.
This also means a static sitemap URL is easier to generate manually than a dynamic one. To begin, collect a list of all active URLs on your website that you want to include in your sitemap. You can use an online generator, such as XML-Sitemaps if your website contains less than 500 active URLs:

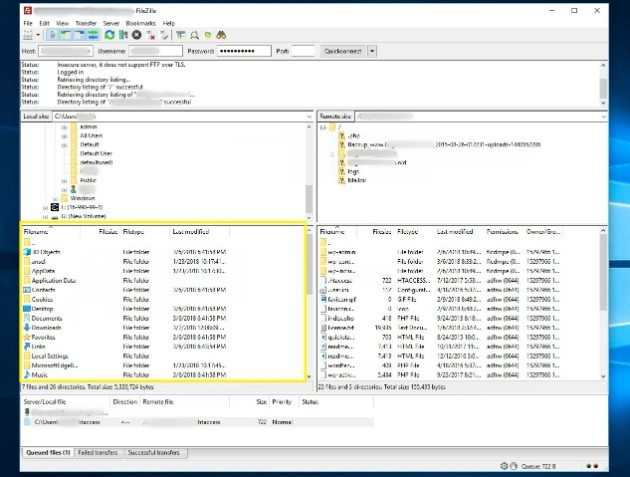
Once generated, you can download your sitemap in .xml format. Now, it’s time to it upload to your website’s root directory. You’ll need a free File Transfer Protocol (FTP) manager, such as FileZilla, to do so. If you’re not au fait with FTP, you may also want to brush up on your skills beforehand.
Once installed on your computer, you’ll need a few key pieces of information for logging in: a Host, Username, Password, and Port.
You can locate this information by logging into your hosting account, and navigating to FTP Users (or a similarly named area) from the dashboard. You can also ask your host directly, or find your initial signup email.
Once you’ve logged in, double-click on your site’s root folder in the lower right-hand section of FileZilla. It may be called www, public_html, or named after your website. To upload the sitemap.xml file, drag-and-drop it from your local folder, which can be found on the bottom left of the screen:
With the sitemap now uploaded to your website, it’s time to notify Google and other major search engines of the change.
How to Create a Sitemap Using All in One SEO
All in One SEO is not just a sitemap plugin—it also provides a range of SEO improvement tools, including video and news sitemaps. However, its easy-to-use XML sitemap functionality is one of its best assets. Here’s how it works.
After downloading and installing the AIOSEO plugin, your WordPress site will immediately include a sitemap. It’s that easy!
To customize your sitemap, visit the WordPress dashboard and head to All in One SEO > Sitemaps. Under General Settings, ensure the Enable Sitemap setting is switched on.
As you scroll down, you’ll see Enable Sitemap Indexes. Unless your site has over 1000 URLs, set this to Disabled. If you’re unsure, leave it as Enabled. Next, you can edit the Links per Sitemap setting; however, the default 1000 should be fine for most users.
You can also decide what post types and taxonomies appear in your WordPress sitemap. Unchecking the Post Types and Taxonomies boxes reveals a list of posts and categories that you can edit.
Lastly, you can choose whether or not to include Date Archives and Author Archives in your sitemap. These don’t add anything from an SEO perspective, so we suggest leaving these as Disabled. You now have a powerful sitemap driving search engine traffic to your WordPress site.
How to Create a Sitemap Without Using a Plugin
A WordPress sitemap plugin simplifies sitemap creation, but you don’t have to use one. Whether you want to save money or reduce plugin usage, here’s how to create a sitemap manually.
Step 1: Code Your Sitemap (or Use Existing Code)
First, you’ll use PHP code to create an XML sitemap. For those unfamiliar with PHP, All in One SEO has conveniently provided an example. Copy the entire string to your clipboard.
Step 2: Add the Sitemap Code
In your dashboard, navigate to Appearance > Theme Editor. Open the functions.php file on the right-hand side, then paste your code at the bottom of the file. Click Update File, and your site now has a basic XML sitemap.
Always edit your code in a Child Theme to avoid losing changes.
Step 3: Submit to Google
Many plugins submit your sitemap to Google automatically. But manually creating your sitemap means that Google will be unaware of the file. We’ll explain how to submit your sitemap to Google in the following section.
How to Submit WordPress Sitemap to Google
As mentioned, a sitemap makes it easier for search engines to crawl your website. However, you make their jobs much easier if you alert them to the sitemap’s presence beforehand.
To do so, you can use Google Search Console. Once logged in, you’ll first need to verify ownership of the website, then navigate to Crawl > Sitemaps found on the left-hand menu. On this page, click the red button at the top right that says Add/Test Sitemap:
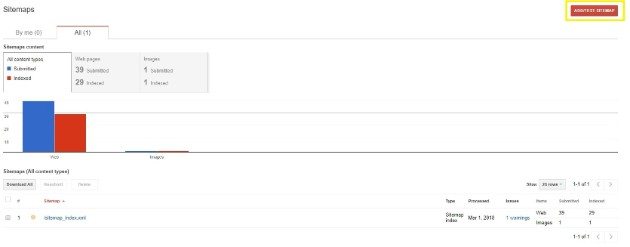
Enter the URL of your sitemap, and click Submit Sitemap. Now, Google can react more quickly to your content updates. This means your content will more quickly appear in SERPs, which is beneficial for your website’s traffic and overall success.
Are you interested in other WordPress-specific topics and information? Check out the WP Engine blog and visit WP Engine to find out more about our industry-leading hosting platform and flexible plans to learn more about our offerings.